Advanced Booking Grid (ABG)
Create, control, and configure personalized single and/or multiple grids across different locations, time zones, and regions, from the Advanced Booking Grid (ABG).
The availability of the Advanced Grid depends on your organization’s system setup.
About the Advanced Booking Grid
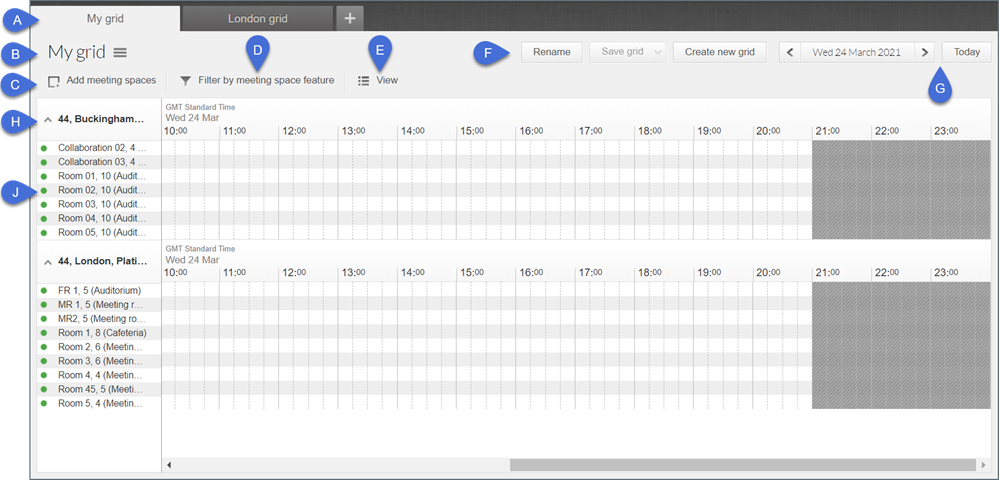
- Grid tabs (A): Up to five grids can be opened and accessed via the grid tabs at the top. Click ' + ' to add a new grid. Learn more
- Grid name (B): Displays the name of the open grid. Click the menu icon (three horizontal bars) to switch between grids.
- Add meeting spaces (C): Add meeting spaces to the grid.
- Filter by meeting space (D): Filter meeting spaces on the grid by booking type, meeting space type, and workspace type. You can also select specific meeting space features, as defined by your administrator.
- View (E): Change/amend grid view options. Learn more
- Rename grid (F): Rename the open grid. Learn more
- Save grid (F): Save changes to the open grid or save as a new grid. Learn more
- Create new grid (F): Create a new grid. Learn more
- Grid Calendar (G): Click the date to display a calendar, select a specific date, or use the arrows to move through dates sequentially. Click Today to return to the current day.
- Location (H): The location of the meeting spaces listed below. Click to expand or hide the meeting spaces.
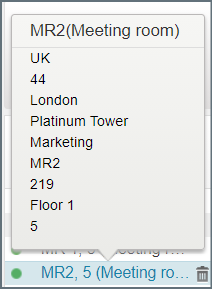
- Meeting space names (J): Hover over the meeting space names to view location information. Click a meeting space to open a popup window displaying room attributes and other information.
Customize the ABG
Grid tabs
Up to five grids can be opened at the same time and each appears in a separate tab.
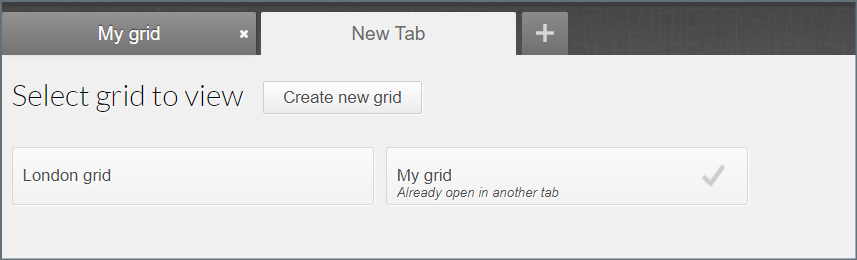
Create a new grid or open an existing grid
Click + to the right of the grid tabs to open a new tab. From here you can select an existing grid or create a new grid.
Save grid
Click Save grid (F) from the button bar at the top. Enter a name and click the green tick to save.
Rename grid
Click Rename (F) from the button bar at the top. Edit the name and click the green tick to save.
Close grid
To close a grid, hover your cursor on the tab name for a moment and click the x when it appears. This will delete an unsaved grid. If the grid was previously saved you can open it again by clicking + on the tab bar.
Add meeting spaces to the ABG
Click Add meeting spaces (C) to select spaces to add to the grid.
Set criteria for meeting spaces to add to the grid
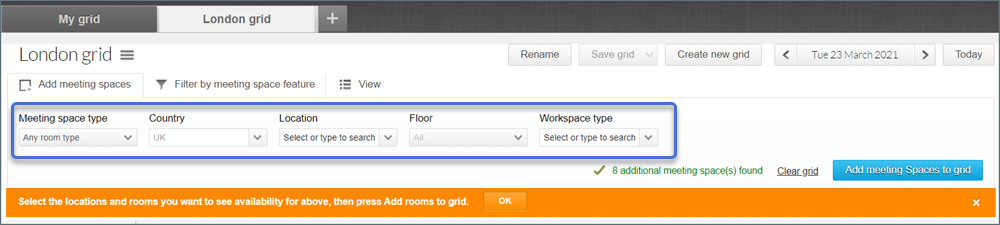
- Meeting space type: Click the drop-down to select a type.
- Location filters: Click each location drop-down and select one or more options from each. Click Check all to select all.
- Workspace type: Click the drop-down to select one or more workspace types. Click Check all to select all workspace types.
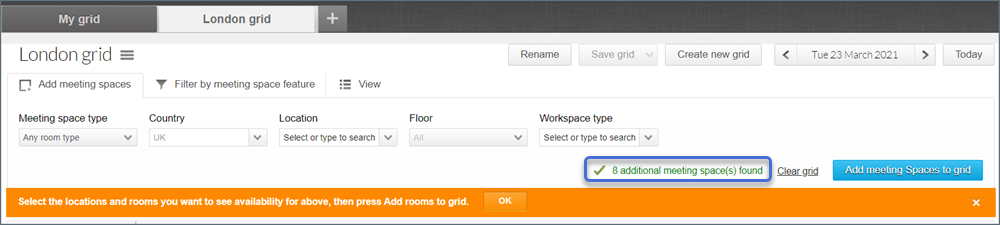
As you use the filter, the number of meeting spaces matching the selection is displayed. If you exceed the number of meeting spaces allowed on the grid (as defined by your administrator) an alert is displayed.
When you have completed your selection click Add meeting spaces to grid.
Click Save grid to save the grid tab settings.
Remove a meeting space from the ABG
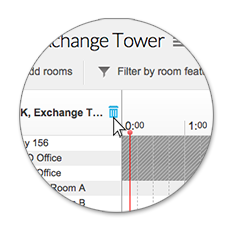
To remove a meeting space from a grid, hover over the space name for a few moments until the bin icon appears. Click the bin to remove the meeting space from the grid.
Click Save grid to save the grid tab settings.
Change the view
Click View (E) to display the grid viewing options.

- Booking Period: Select the length of the booking slots to display on the grid. 15, 30, or 60 minutes.
- Time Format: Choose either 12 hr or 24 hr clock.
- Colour Display: Choose to display different colors on the grid for either the type of booking or the booking status.

- Booking Label: Choose what to display on the booking label (if labels are enabled for the group).

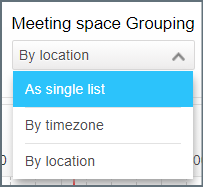
- Room Grouping: Choose to group spaces by Location (recommended), Time zone, or view as a single list.
Click Save grid to save the grid tab settings.
To return the view to the default settings click the Restore defaults button on the right.
Advanced settings
Advanced Settings allow you to further personalize the view of the displayed grid.

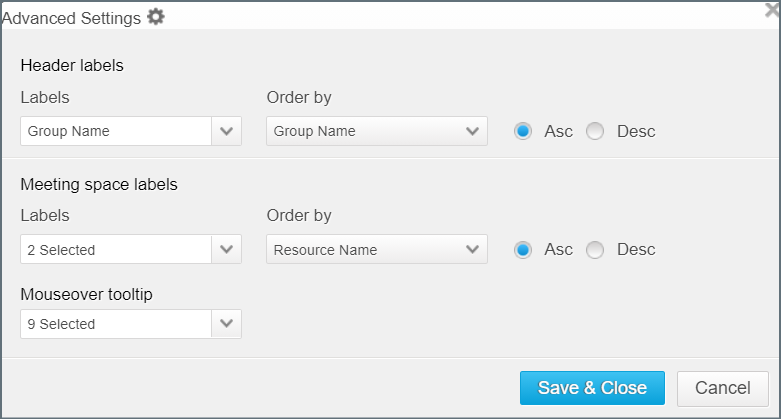
- Header labels: Change how locations (H) on the left of the grid are displayed.
- Meeting space labels: Change the details displayed on the meeting space labels (J).
- Mouseover tool tip: Choose the information to display when hovering over the meeting space name.