External group mapping for SCIM
Import external groups to the Device Hub
Import your AD groups from Azure to the Condeco Device Hub and assign in bulk, Condeco user and admin roles to the group members. For Country and Location administrators, you can select the specific country and/or location to apply to the group members.
Prerequisites
- Before importing your AD groups to Condeco, complete the SCIM tenant onboarding process. Learn more
- Your Condeco Device Hub URL.
- A Condeco Device Hub account with Admin privileges.
Assign user and admin roles to external group members
Assign user and admin roles for the Device Hub to the members of your external groups, from the External Group Mapping page.
The External Group Mapping page shows a list of all external AD groups pushed from AD and imported to the Condeco Device Hub. The list shows the name of the group, when the role was last updated, and the currently assigned role. See (C), (D), and (E) on the illustration below.
This guide is for customers who have deployed the Condeco SCIM API for the Device Hub to communicate with SCIM-compatible systems providing user identity information, such as Azure Active Directory.
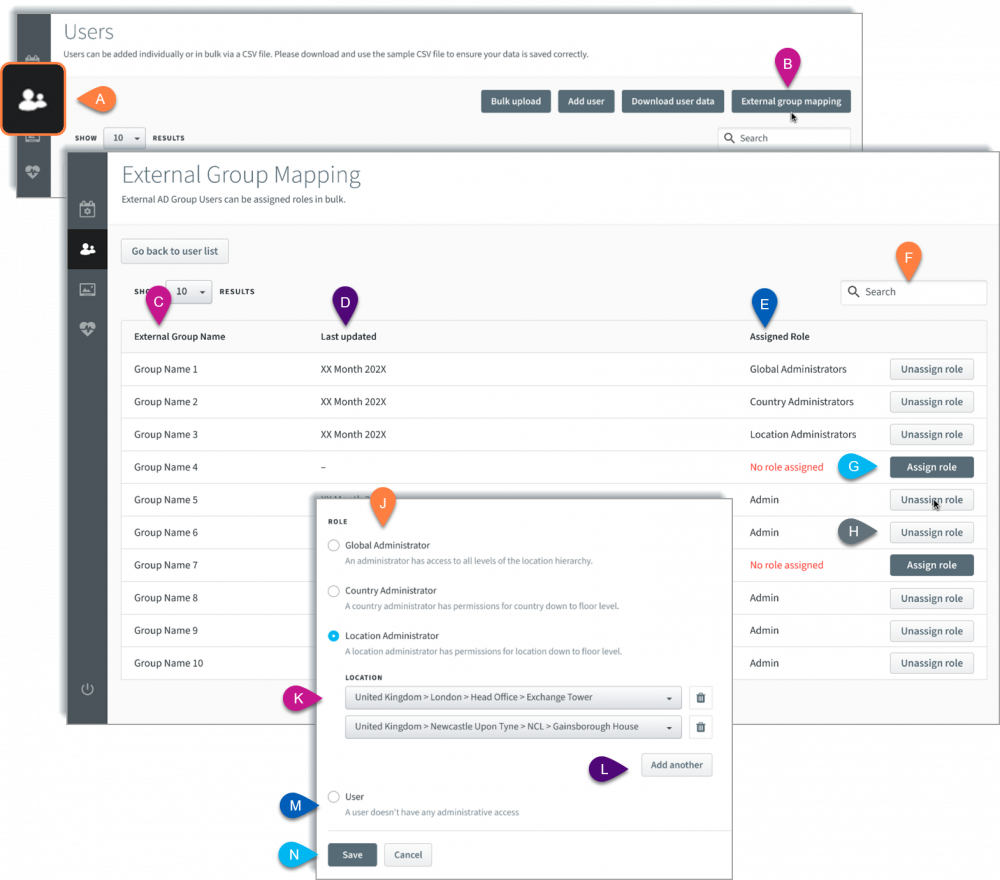
External Group Mapping page on the Condeco Device Hub
How to assign a role to the members of an external AD group
- Sign in to the Condeco Device Hub.
- Select Users (A) from the left icon bar and click the External group mapping button (B) to open the External Group Mapping page.
- Use the Search field (F) to find the external group you want to assign to a role.
- Click Assign role button (G) to the right of the group in the list.
- Select the role (J) to assign to the members of the external group, either Global Administrator, Country Administrator, Location Administrator, or User (M).
- If assigning Country or Location admin roles, select the relevant country/location from the drop-down list (K) and click Add another (L) to add more.
- Click Save (N) when done.
The ‘Role assigned successfully’ message is displayed when the role is successfully assigned to the group members.
If the process fails for any reason, the Failed to assign role, please try again message is displayed.
How to unassign a role to the members of an external AD group
- Sign in to the Condeco Device Hub..
- Select Users (A) from the left icon bar and click the External group mapping button (B) to open the External Group Mapping page.
- Use the Search field (F) to find the external group you want to unassign from a role.
- Click the Unassign role button (H) to the right of the group in the list and when prompted, click Unassign to confirm.
The ‘Role unassigned successfully’ message is displayed when the role is successfully unassigned from the group members.
If the process fails for any reason, the Failed to unassign role, please try again message is displayed.
How to change an assigned role
- Sign in to the Condeco Device Hub..
- Select Users (A) from the left icon bar and click the External group mapping button (B) to open the External Group Mapping page.
- Use the Search field (F) to find the external group.
- Click anywhere in the group’s row in the list to open the Assign Role page.
- Select the role you want to assign (J) and click Save (N).