User Permissions - How to Add/Edit/Delete
This guide is divided into the following three parts.
Guide 1 – Add a User (create a brand-new User to Hippo)
Guide 2 – Edit User Permissions (change an existing Hippo User’s permissions)
Guide 3 – Delete a User (remove a User from Hippo)
ADD A USER (Guide1)
Introduction
This guide shows you how to Add a User to Hippo. When you add a User, you can customize what a User can or cannot do within the Hippo software. To add a new User to Hippo there are a few simple steps needed.
First, familiarize yourself with the following terms:
Definitions
User: A User is someone who has access to the Hippo software. Users are assigned permissions, which determine what the user can and cannot do within the system.
Permissions: Permissions determine what a User can or cannot do within the system. The permissions are customized on the Edit Permission Form, found on the Users grid at Enterprise or Facility Admin levels.
Enterprise Admin: This is a section within the Hippo software that pertains to multiple facility permissions
General Permission: This refers to general permissions for Users that can be found on the Enterprise Admin page
Access: A permission that allows the User to log in and access the CMMS system (not needed for Requesters)
Facility Admin: This is a section within the Hippo software that pertains to individual facility permissions
Facility General: This refers to various general permissions within a facility
Edit Permission Form: This is a section within the Hippo software that makes it possible to add or delete permissions for any User
Instructions – Add a User (Guide 1)
A User of Hippo software must be added on the Users grid, from either the Enterprise Admin or Facility Admin tabs. Adding a User from the Enterprise level, allows you to give permissions to several facilities. Adding a User at a Facility level will only give permissions for that one particular facility. In this case, we will add the User from the Enterprise level.
To start, a bit of navigation:
You can click in the search field under any column name to locate specific information.

You can also view User amounts and move between page numbers to your User grid at the bottom of the screen.

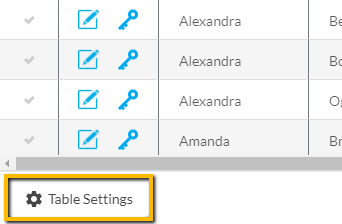
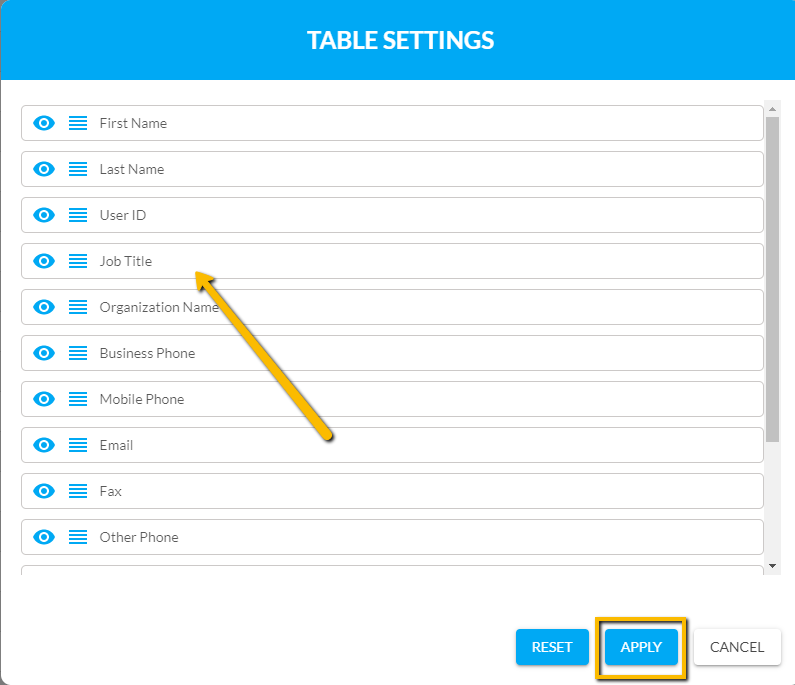
When you click on the "Table Setting" button at the bottom left of the screen, the Display pop-up window will appear.
You can click and drag the columns in order of how you want them to appear on your grid. You must hit the "Apply" button at the bottom of the pop-up to save your changes.
Click "Restore Default" to go back to the original default column settings, or click "Cancel" to close the window.
To Add a User:
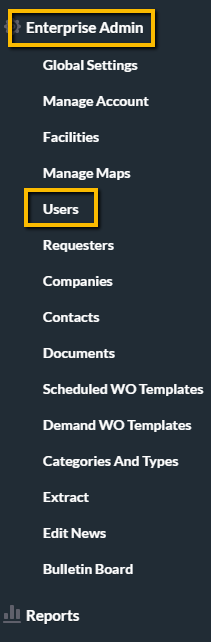
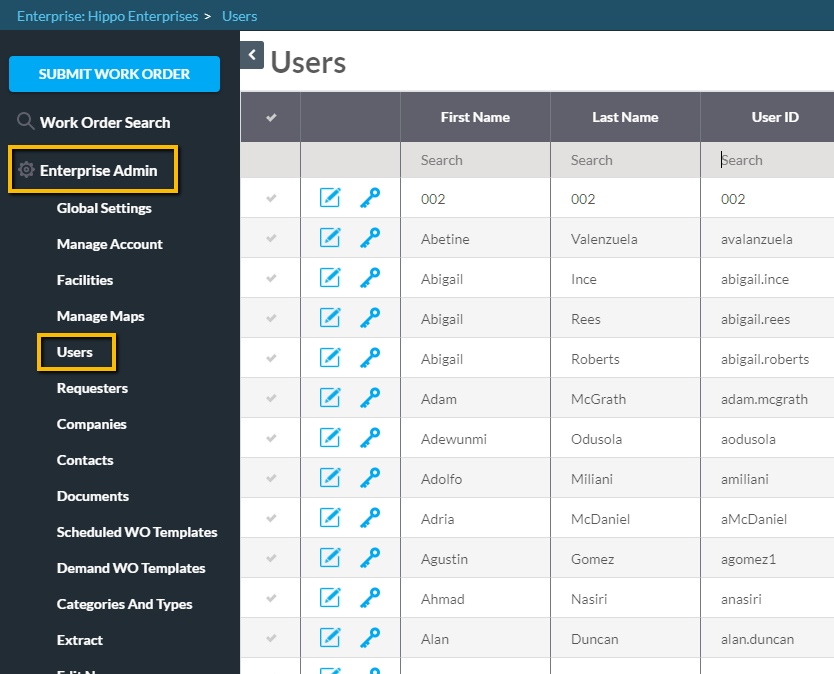
- Click on the Enterprise Admin panel located on the left side of the screen.
- Next, click on the Users panel on the left side to access the Users grid.
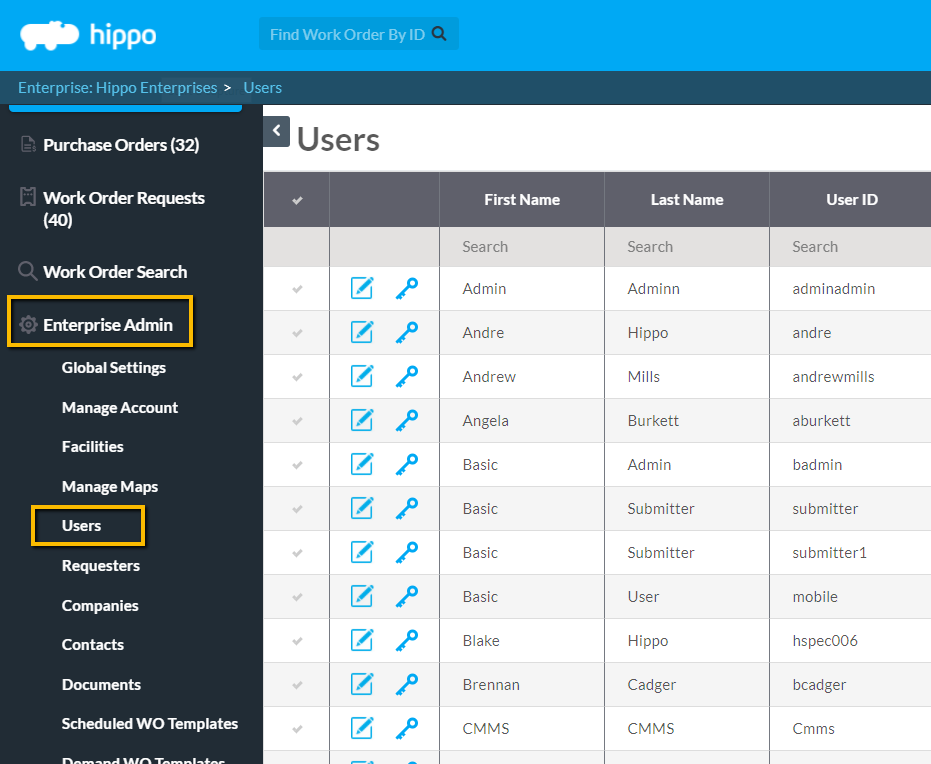
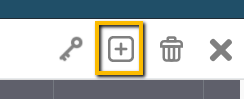
- Click on the Add control button (+ sign) located at the top right corner of the grid.
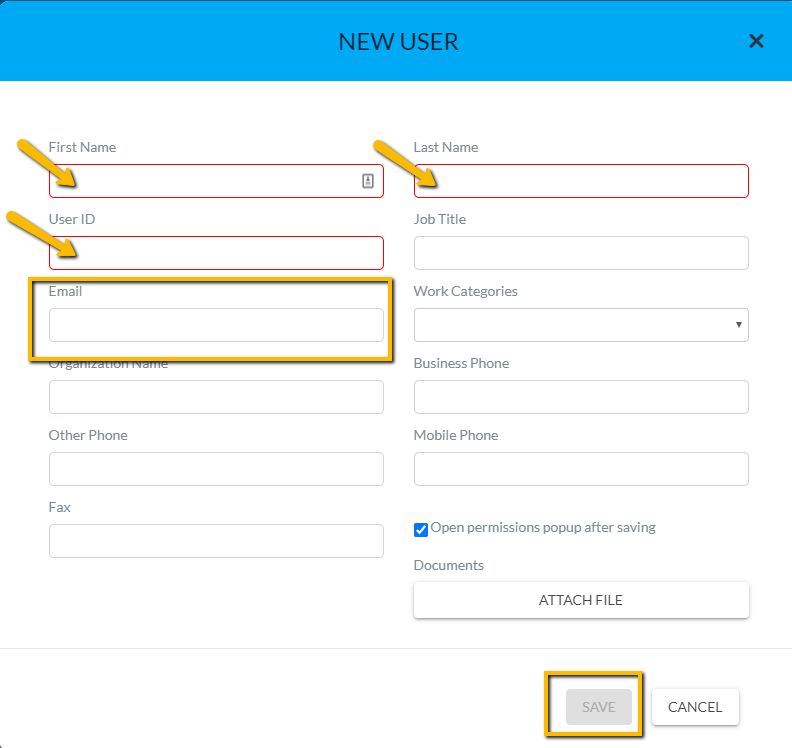
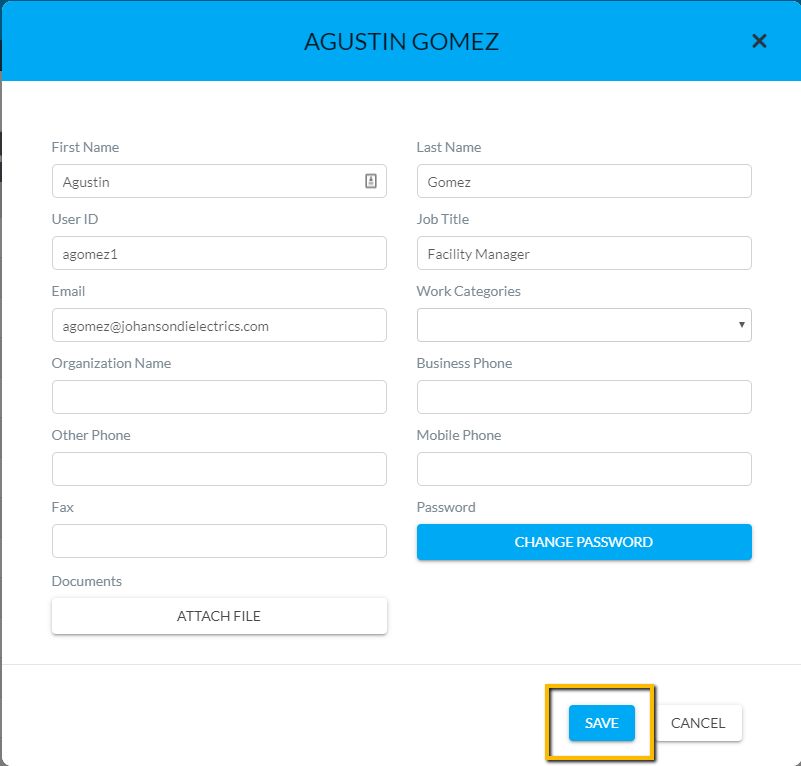
- A New User pop-up window will appear. Click in the mandatory fields that are outlined in red to add the First Name, Last Name, and User ID. The User ID will be needed when this User logs in.
Note: Type the User’s email address in the email field if he or she should receive email notifications. Any other optional field of information can be added. Once you hit the Save button, you will default to this User’s permission form.
- Click the Save button at the bottom of the form.
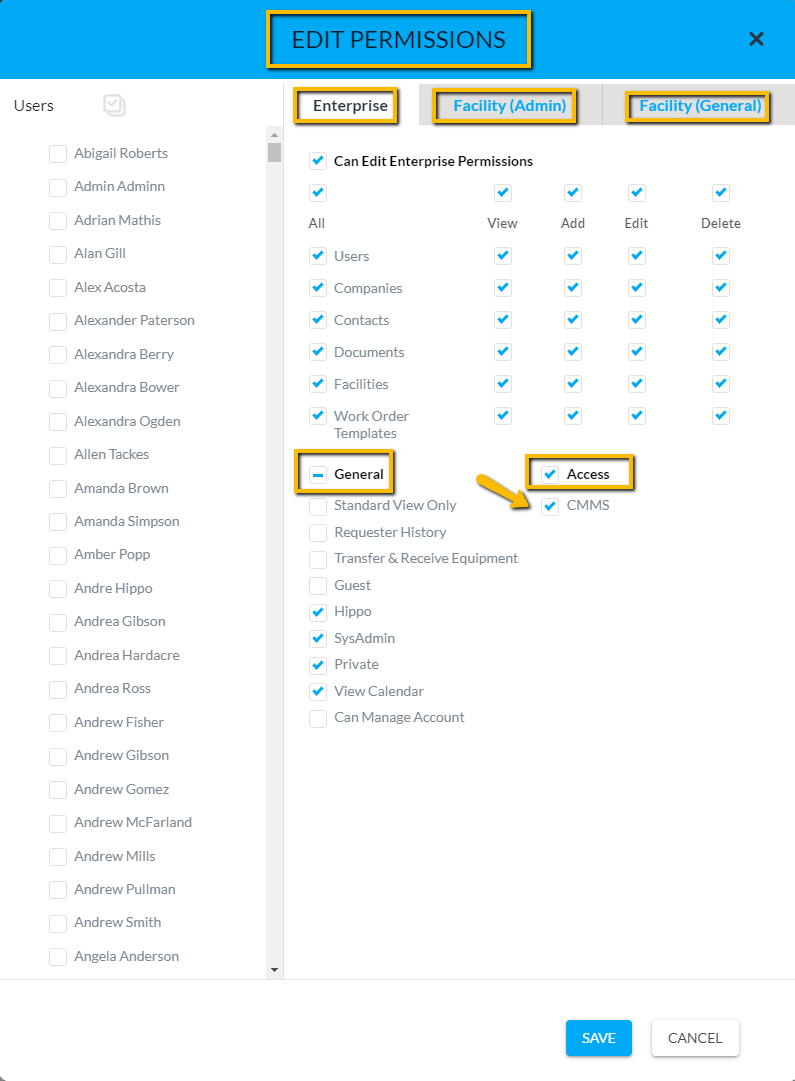
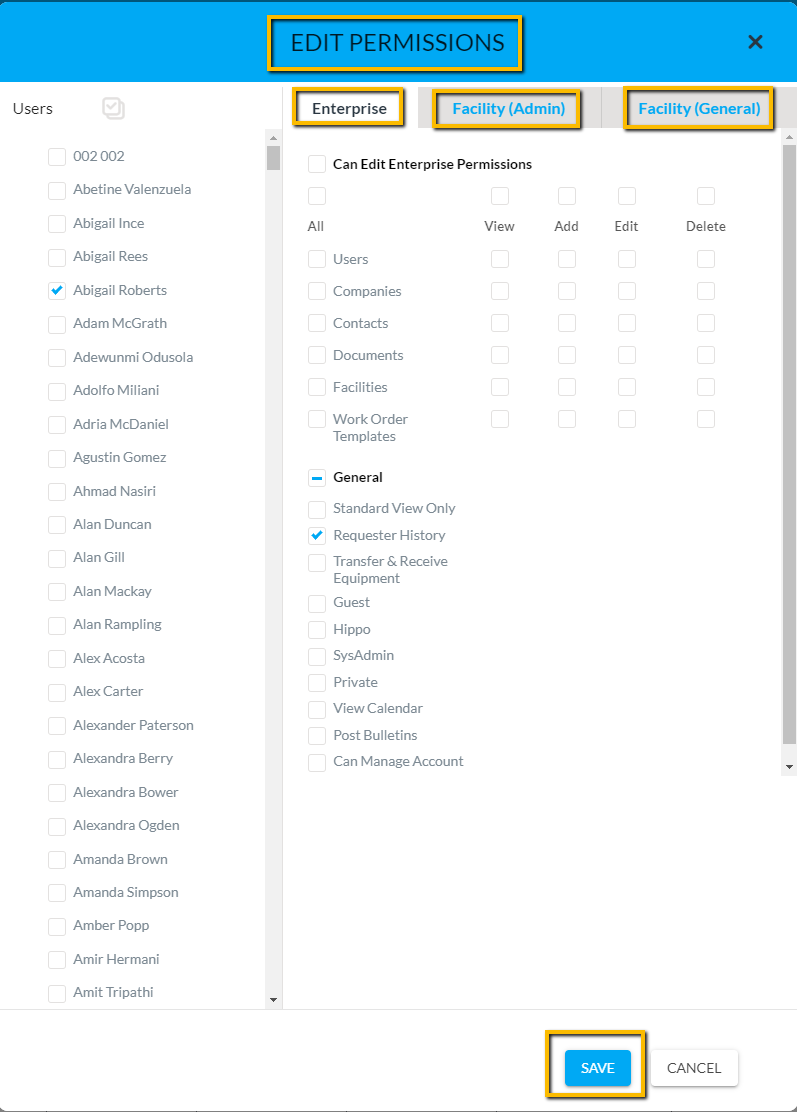
It is important to note that there are the following three pages to the Edit Permissions form: Enterprise Admin, Facility Admin, and Facility General. Which pages you see depends on your permission settings.
The Enterprise page contains Enterprise level permissions, General permissions, and Access permission.
Permissions on the Enterprise Admin page are top-level permissions to the whole Hippo program. The permissions you see here are related to the panels you see under the Enterprise Admin panel. Typically, only a limited number of Users hold Enterprise Admin permissions.
The General Permissions on the Enterprise Admin page includes a variety of permission settings. These permissions determine what the User can or cannot do within the Hippo system. You can add or remove the checks next to these general settings. For example: - Click on the box next to “Mobile Enabled” to allow a User access to the mobile version of Hippo.
The Access permission “CMMS” is extremely important for any User to have if he or she is to log in and interact with work orders, information, or the system in general. By removing the “CMMS” permission, you are partially setting the User up to be a Requester. A Requester will additionally need the "Enable Log In" and "Submit Work Order Request” found on the Facility General page.
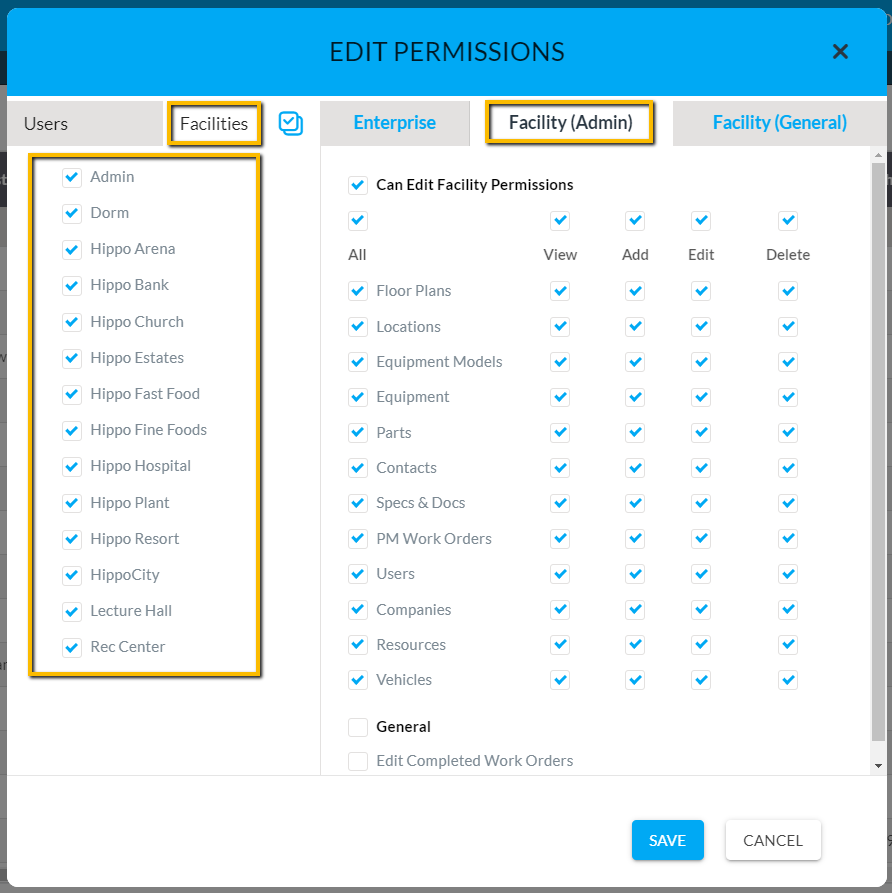
- Click on the Facility Admin tab. Make sure to put a check in the box next to the facility name that this User is associated with when they log into Hippo.

- On the Facility Admin page you have the option to click on the “All” button (i.e., to select all permissions) or to select permissions within rows, or check permission boxes one at a time.
The permissions on the Facility Admin page apply to the panels you see under the Facility Admin panel. The permissions shown determine what the User will be able to View, Add, Edit, or Delete on the corresponding panels.

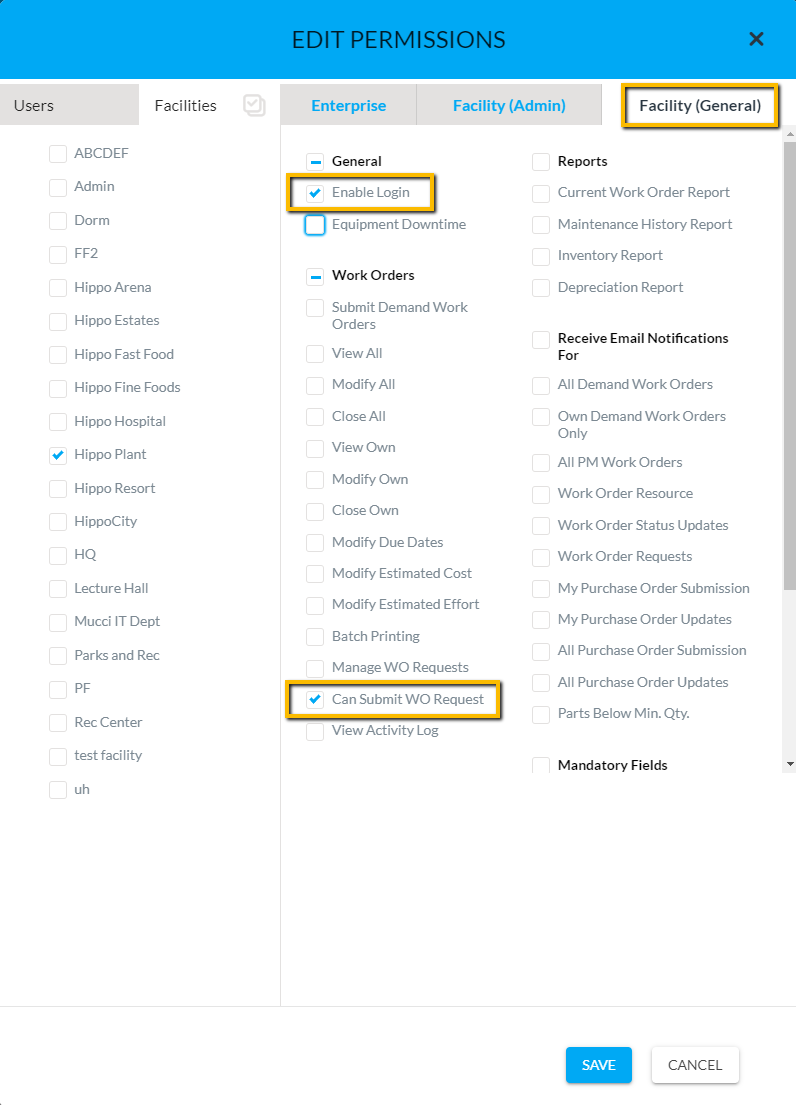
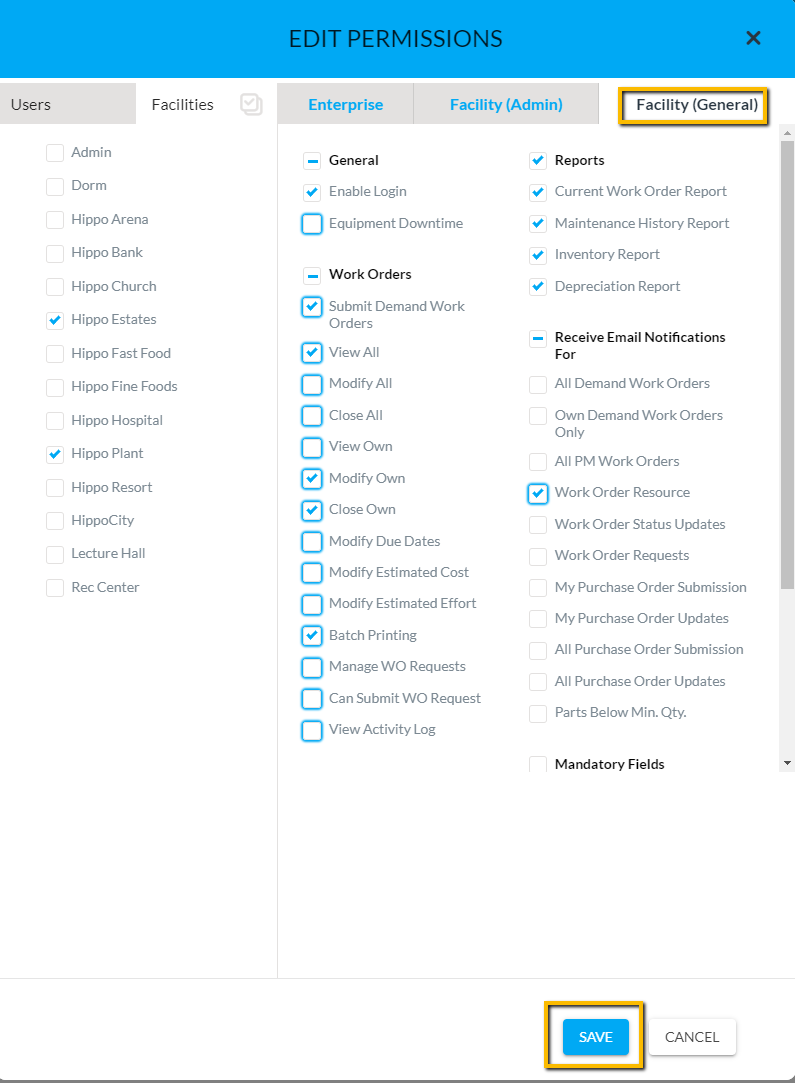
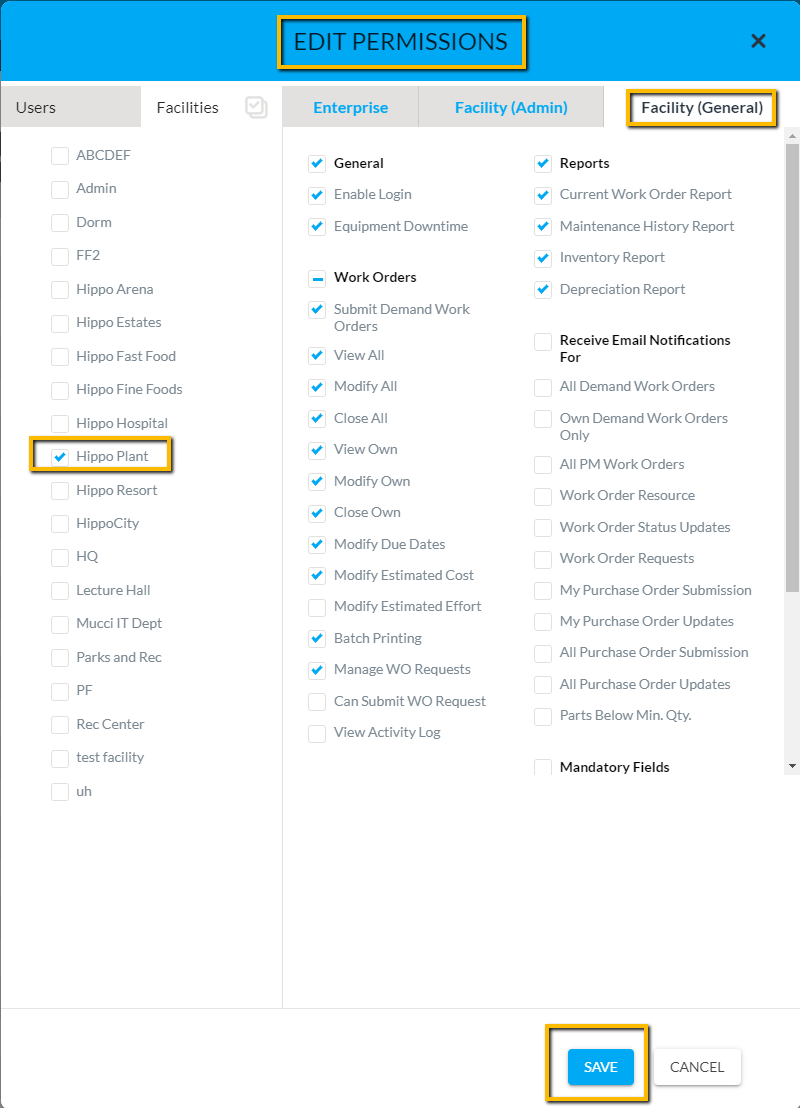
- Click on the Facility General page. This page is where most Users have permissions. This page is divided into multiple subcategories.
For a User to log into the Hippo system, make sure that the User name has a checkmark next to “Enable Login” permission, under the General subcategory. You can now give that User a variety of permission - again, for the Facility level. Some examples of common permissions include: Submit a Demand Work Order, Run Reports, or which email notifications a User receives.
- Once you have finished customizing permissions for this User, click the “Save” button at the bottom of the Edit Permission form. The User name is now placed in alphabetical order on the Users grid.
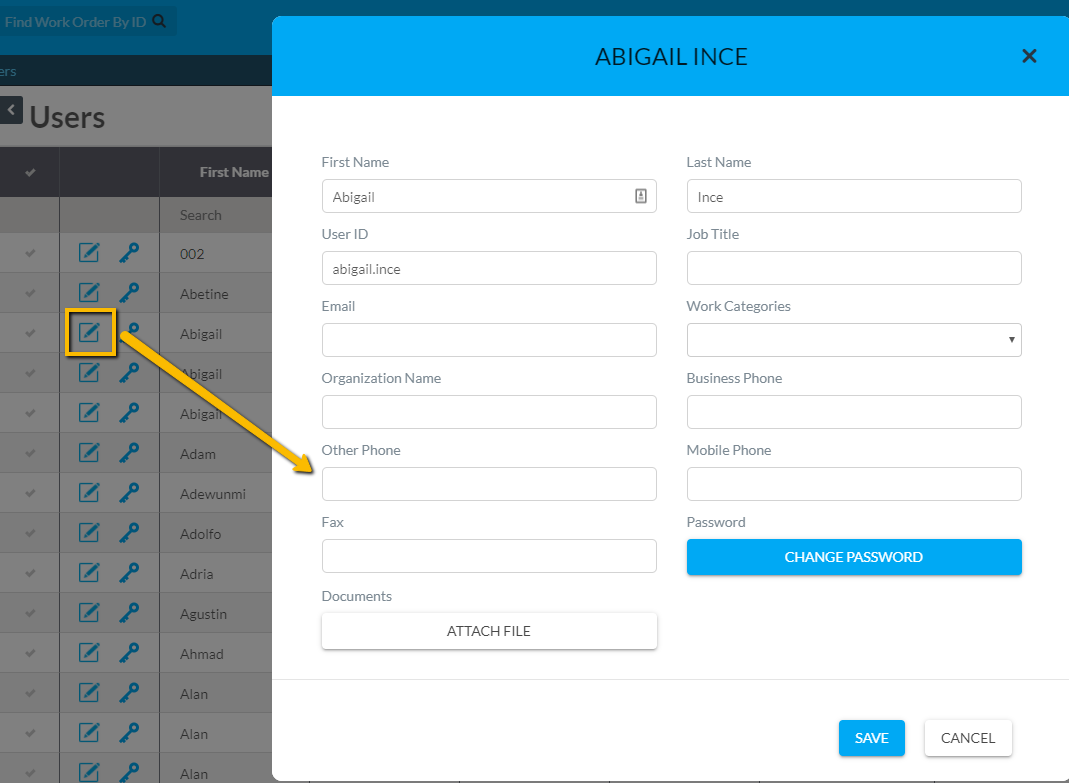
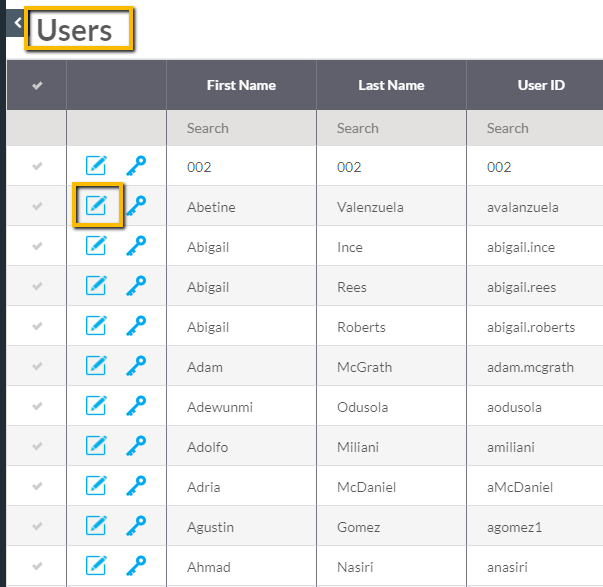
Any User information can be edited by clicking on the Edit icon next to his or her name.
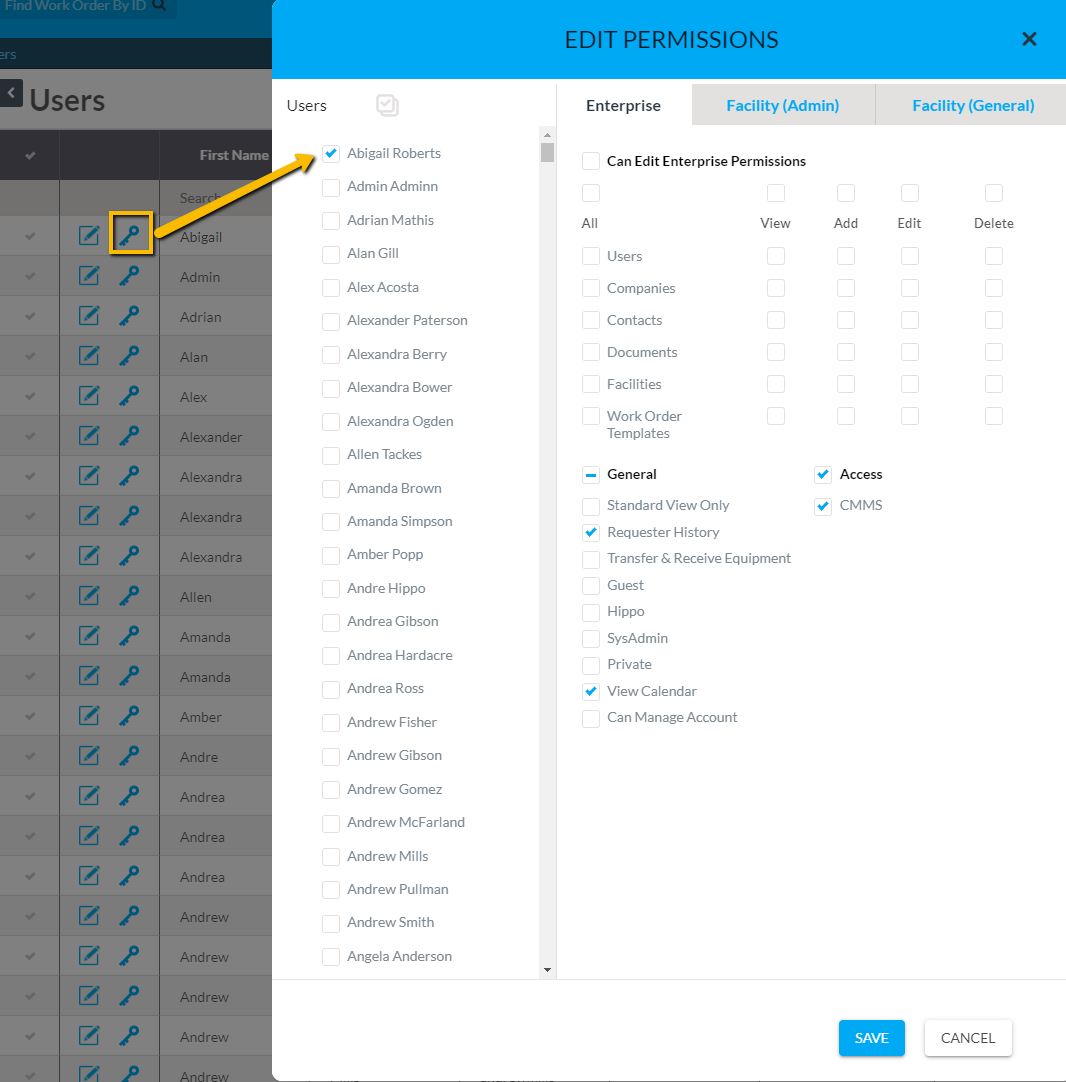
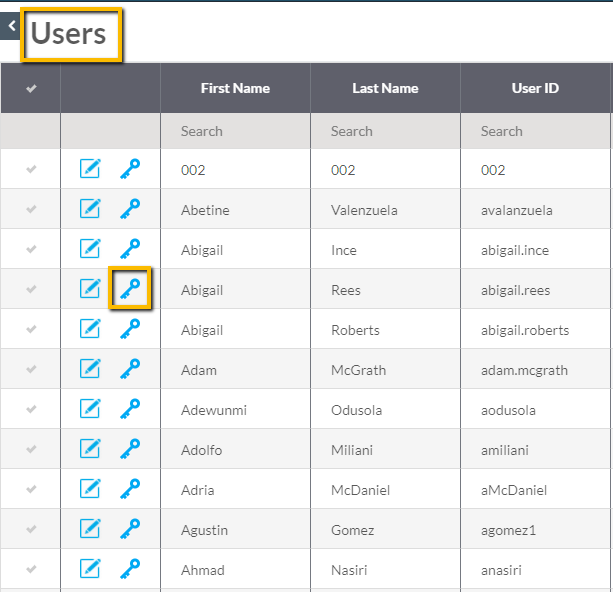
Any User permissions can be edited by clicking on the Key icon next to his or her name.
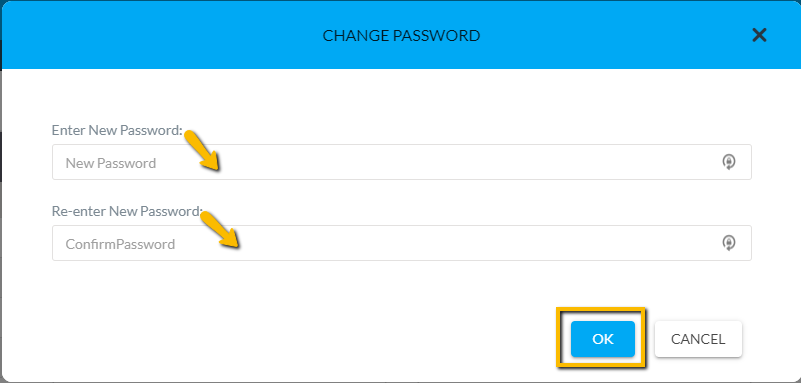
- To change a User's password, click on the key icon next to the User's name. Then click on the Change Password button to create or change a password for this User. You have to enter the password, enter the password again to confirm, and finally hit OK. If your passwords do not match, you will receive a notice and should try again.
Note: The password along with the User ID will be needed to log in. If no password has been created the word: password is the default for all new Users.
Edit User Permissions (Guide 2)
Introduction
When you edit permissions for a User it means you are making changes to what an existing Hippo User can or cannot do within the program. This Edit Permissions Guide shows you how to modify a User’s permissions on their Edit Permission Form.
Definitions
User: Anyone who is given access to the Hippo software using established login credentials.
Permissions: What a User can or cannot do within the Hippo system as what a user can or cannot see.
Edit Permission Form: The area within the software interface where changes can be made to User permissions.
Instructions – Edit Users Permissions (Guide 2)
To edit the permissions of a User you can do so on the User Grid, from either the Enterprise Admin or Facility Admin tabs. Remember, editing permissions at the Enterprise level will allow you to make changes to several facilities. Editing permissions from the Facility level will make changes to only a single facility. In the example below, we edit User permissions within the Enterprise level.
- Click on the Enterprise Admin panel located on the left side of the screen.
- Next, click on the Users panel, to access the Users grid.
- Find the User’s name and click on the “Edit” icon with the row. This allows editing of the User’s name, User ID, or email, etc. Simply click in any field and edit the information.
- Click on the Save button at the bottom of the pop-up window.
- Find the User’s name and click on the “Key” icon within the row. This opens the User’s Edit Permission form.
Please note there are the following three pages to the Edit Permission Form: Enterprise, Facility Admin, and Facility General. If you have access to the Enterprise Page by default, you will automatically open the Enterprise page. If not, you will arrive at the Facility Admin Page.
The Enterprise page permissions are related to the panels you see under the Enterprise Admin panel. These are top-level permissions that affect the entire program. Generally, a limited number of Users have access to the permissions on this page.
- To add more permissions to the Enterprise level, make sure there is a check in the box corresponding to that permission. Simply click in any box to add the check.
Example - You can allow a User to view, add, edit, or delete information on any Enterprise Admin level panels or grids. To do this, you can use the “All” button, select whole rows, or click in each box individually. - To remove permissions, click in the box that already has a check. By removing the check in the box, a User will no longer have that permission.
- Click on the Facility Admin page.
The Facility Admin page permissions are related to the panels you see under a Facility Admin panel.
- Put a check next to the name of the facility you wish to edit the permissions to.
Note: This is a very important step. The facility name with the check next to it means any permission on the Facility Admin and Facility General pages will apply to this User.
- You can add more permissions by clicking in the box next to the permission name.
- You can remove permissions by clicking in any box that already has a checkmark next to the permission name. No check next to a permission name means the User does not have that access within Hippo.
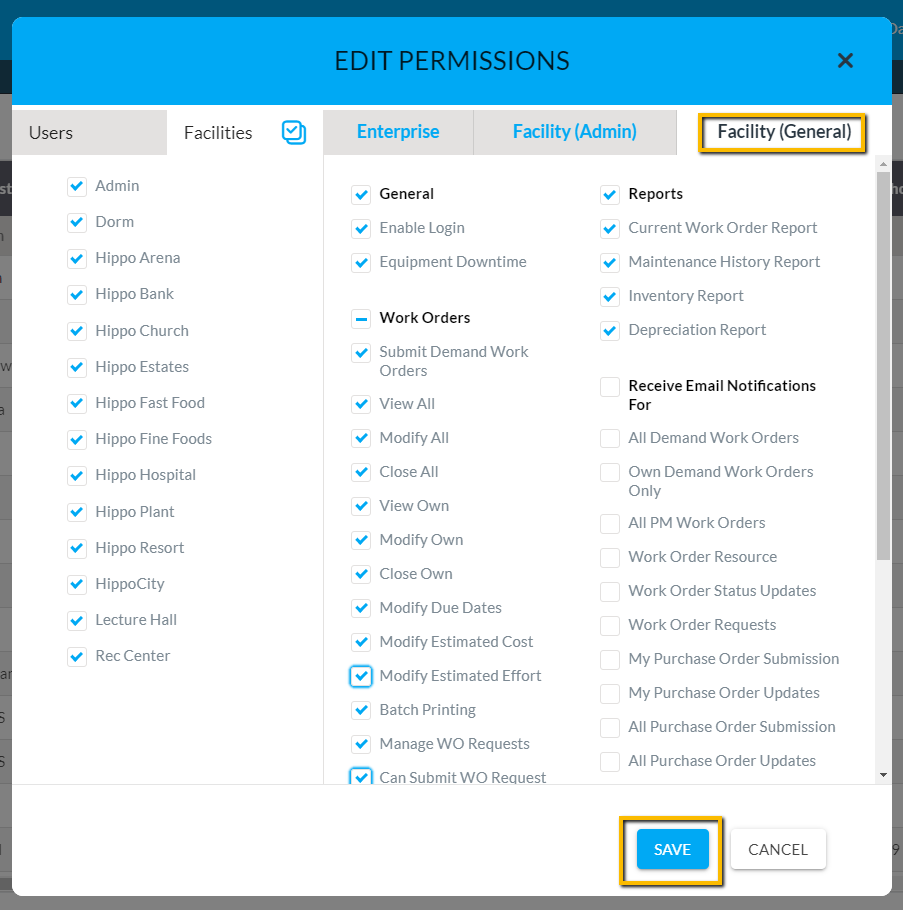
- Click on Facility General.
The Facility General page permissions are related to various general permissions within a facility.
- You can add more permissions by clicking in the box next to the permission name.
- You can remove permissions by clicking on any box that already has a checkmark next to the permission name. No check within the box next to a permission name means the User does not have that access within Hippo.
- To remove and disassociate a User from a facility, it is important to make sure you select the Facility name first, and then remove all checks on both the Facility Admin and Facility General page. This means the User will no longer have permissions to that particular facility.
- Click the “Save” button at the bottom of the Edit Permissions Form.
Delete a User (Guide 3)
Introduction
When you delete a User it means you are removing a User from the Hippo system. This Delete a User Manual shows you how.
Definitions
User: Anyone who is given access to the Hippo software using established login credentials.
Delete: to remove the information permanently from the system
Instructions – Delete a User (Guide 3)
To delete a User, you can do so on the User Grid, from either the Enterprise Admin or Facility Admin tabs. Deleting at either the Enterprise Admin or Facility Admin level will permanently remove them from Hippo. In the example below, we will delete a User from the Enterprise level.
- Click on the Enterprise Admin panel located on the left side of the screen.
- Next, click on the Users panel, to access the Users grid.
- Click next to the User’s first name so that a check appears in that row.
- Click the Delete icon in the top right corner.
- A Warning pop-up window will appear. Select “Yes” to verify the delete, or “No” to cancel the delete.
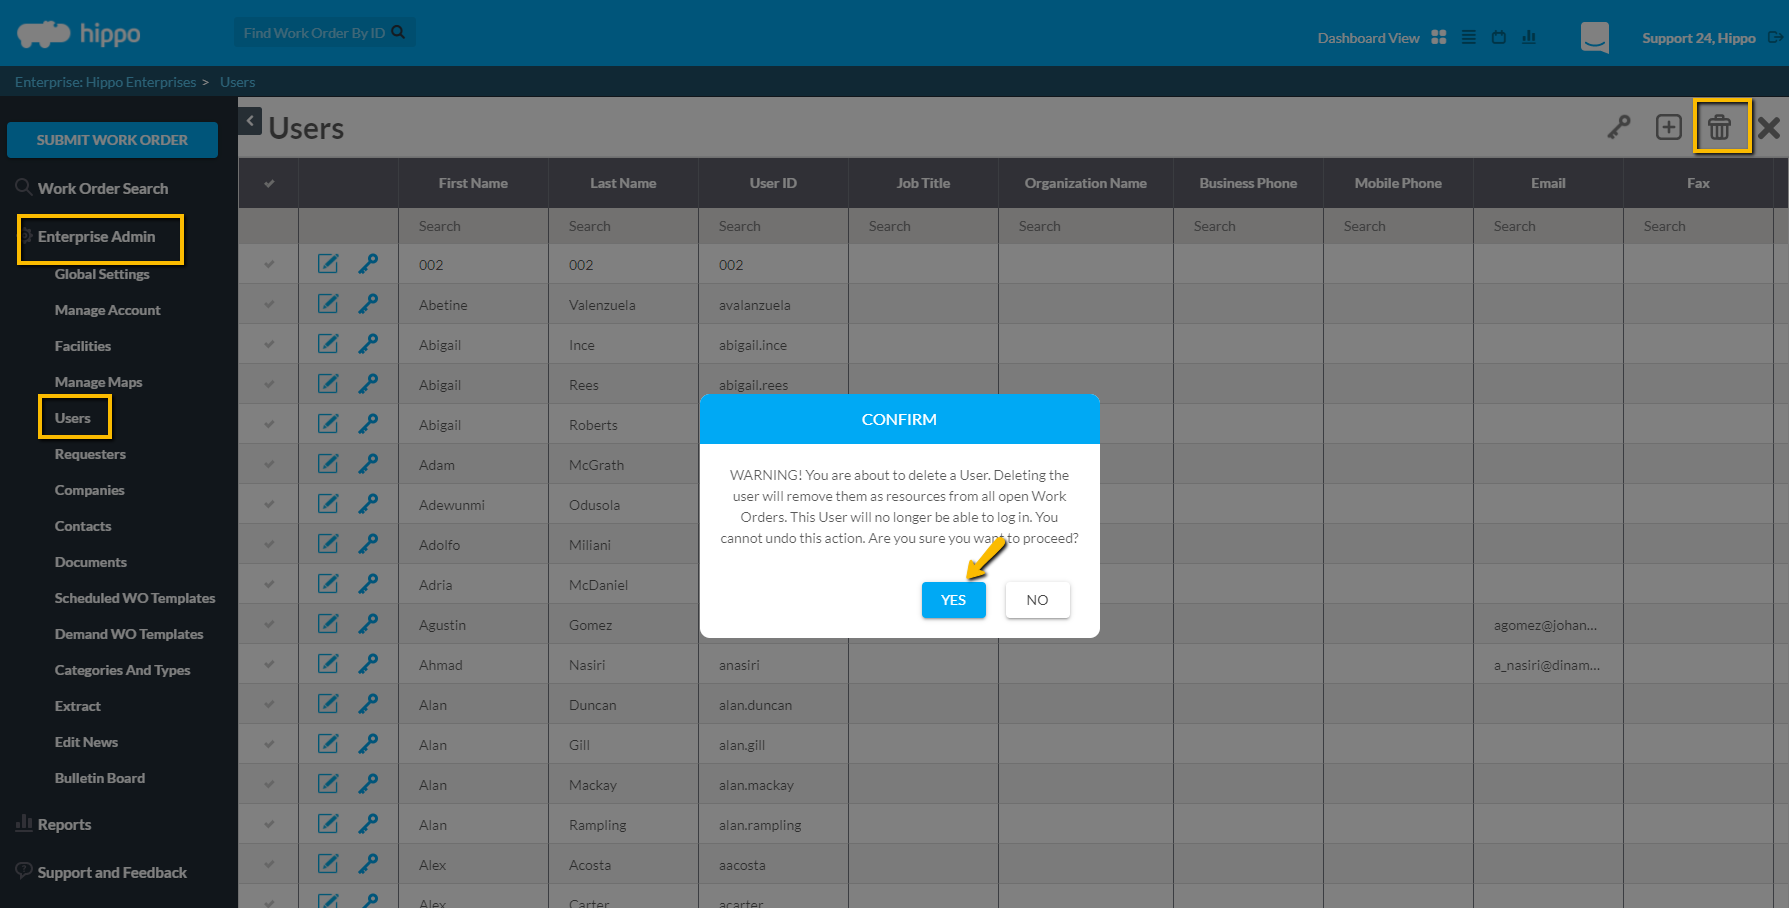
This User is now deleted from Hippo.