Parts
Introduction
This guide shows a User how to add new Parts. A User with the correct permissions can also edit or keep inventory details accurate. Parts are assigned by on-hand quantity. Including a minimum quantity amount sends email notifications once reached. Inventory levels can be monitored via Inventory Reports.
Definitions
Part Type: Part Type makes it possible to group similar parts together so that inventory lists can be organized, making searching for a part by type much easier.
Work Category: Work Category is a classification of the type of work to be done for that part.
Subcategory: Subcategories are associated with Work Categories. Typically, work categories are generic - umbrellas terms, so a subcategory allows a user to make them more specific. For example, a work category of Kitchen Equipment may have a subcategory of Oven or Dishwasher. A user can associate more than one subcategory with a work category.
Quantity on Hand: Quantity on hand is the number of parts readily available.
Desired Quantity: Desired Quantity is the number of parts that would like to maintain at a facility. The desired quantity of a part determines the re-order amount on an inventory report.
Minimum Quantity: Minimum Quantity is the minimum number of parts that must be readily available.
Instructions
- To add a new part, access the Facility Admin panel and open the Parts grid.
- Click on the New icon (+) located in the top right corner and a popup window appears and defaults to the General page.
- The mandatory fields for entering a part are as follows:
- Name – Click in the “Name” field to enter the name of the part. Please note that all part names must be unique per facility.
- Part Type – Click in the part type column and click to open the drop-down menu of available part types. You can either scroll through the list to find the required part type or you can type in a new part type. If you add a new part type, make sure you click on Add (new part name) to permanently add it to your list.
- Work Category – Click in the “Work Category” field and select a work category from the drop-down to assign a work category to part. You can either scroll through the list to find the required Work Category or type the work category name in the field to search.
- Once these pieces of information are entered, hit the Save button at the bottom of the popup window.
Note: It is suggested to make use of the Part Number and Storage Location fields. That information will be visible from work orders. It is also suggested to enter the “Quantity on Hand” together with the “Minimum Quantity” as a User can receive an email when the minimum quantity falls below. Quantity on Hand will be reduced with every part used on a closed work order.
- All the other fields in the equipment models grid are optional fields. However, it is best practice to enter in as much information as possible regarding parts as the Hippo system should be used as a database to store all part information.

Note: The "More" page has an optional field. If you make use of the Associated Type and Associations fields that means the part will automatically show on the associated work order. Without these fields use, the parts must be entered manually on the work order.
- Click in the “Subcategory” field to associate a subcategory with that Part.
- Click in the “Image” field to upload an image for a part. Please note that the suggested file size for an image is 30Mb.
- Click in the “Part Number” field to enter the part number for a part.
- Click in the “Associated Type” field to associate a part to Location, Equipment, or Vehicle and select one item from the drop-down.
- Click in the Associations column to associate the part to a specific location, equipment, or vehicle. A user can associate multiple items with a part. The associations made here will make that part available to use on any work order that is submitted for that association (equipment, location, or vehicle).
- Click in the “Storage Location” field to specify the storage location for a part.
- Click in the “Description” field to enter any additional information about a part. A user can make use of the description column to store any information that does not fit into any other column.
- Click in the “Manufacturer” field to enter the manufacturer name for a part.
- Click in the “MFG Number” field to enter the manufacturer number for a part.
- Click in the “Supplier” field to type in the name of the supplier for that part.
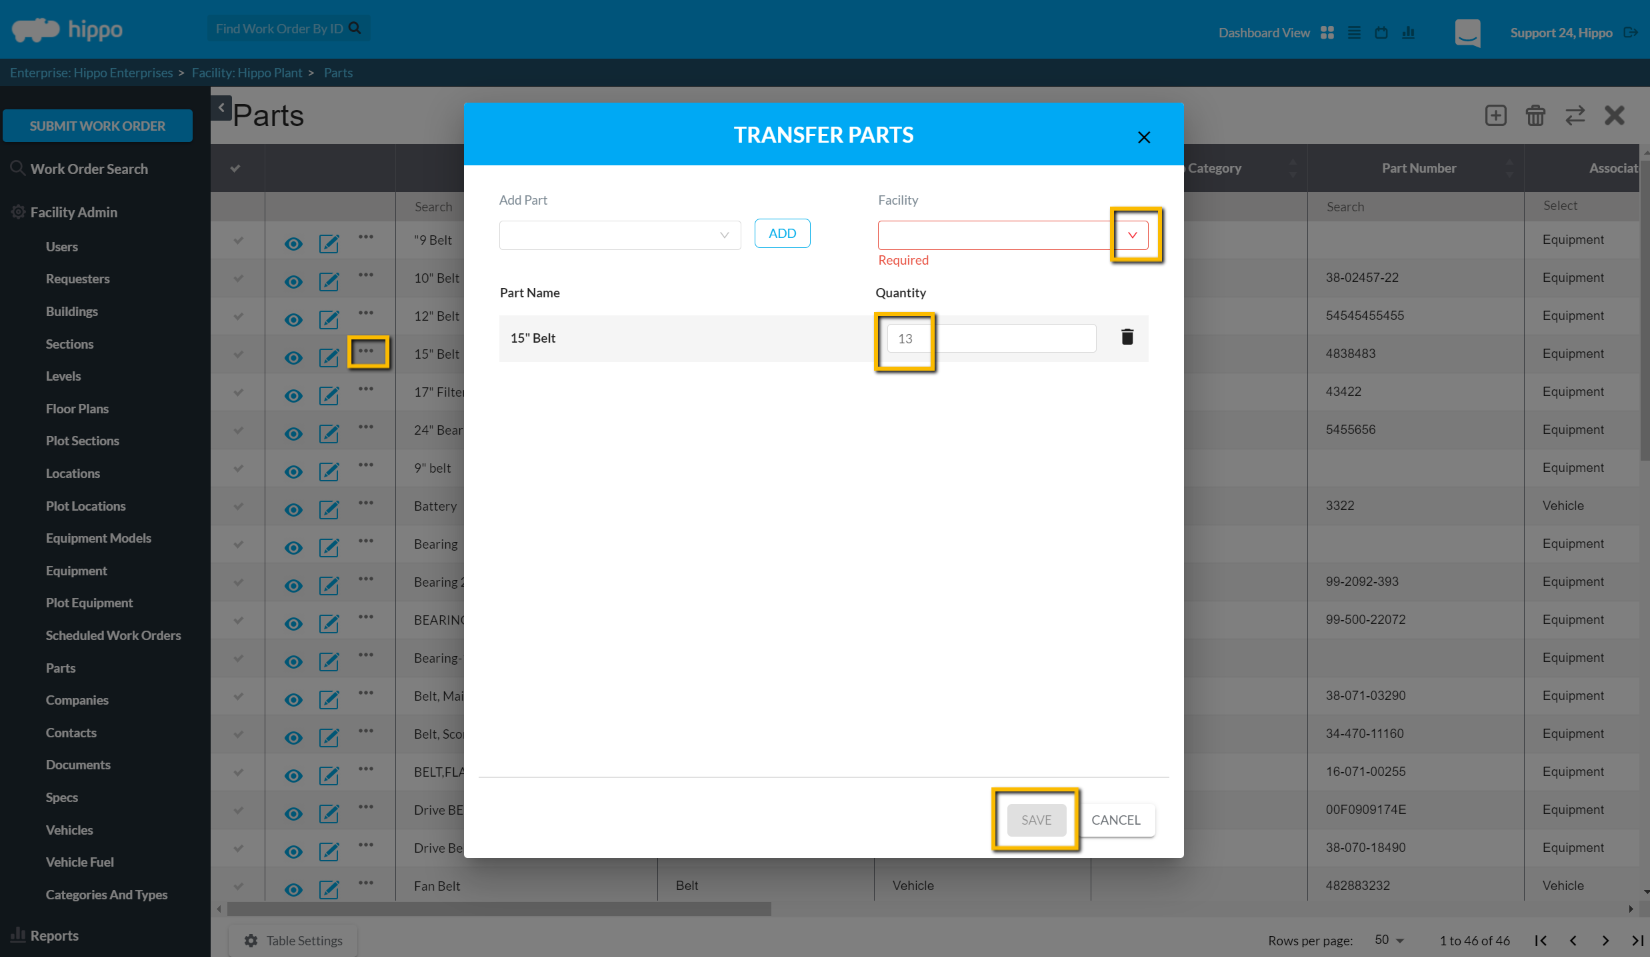
- Make use of the Transfer feature to transfer parts between facilities. Select the name of the facility to which the part is being transferred and specify the quantity to be transferred. Once this information has been entered, click on “Save”.
- Click in the “Quantity on Hand” field to enter the quantity. The quantity on hand for a part can be viewed from the Parts grid and also the Work Order edit form. When a part is added to a work order, the quantity on hand will appear automatically so that the number available to use can be viewed on the work order.
- Click in the “Desired Quantity” field to enter the desired number of parts.
- Click in the “Minimum Quantity” field to enter the minimum quantity amount. The minimum quantity set for each part will determine when it will show up on the At/Below Inventory report.
- Low-Level Notification will indicate if all the required information has been filled out so that an email is sent out to the user with correct permission when parts go below the minimum quantity. If “On” is seen in the low-level notification column, it means all the required data has been entered for an email to be sent out when the parts go below the minimum quantity. If “Off” is seen in the column, it means all the required information for sending out a low-level notification has not been filled out. If “Sent” is seen in this column, it means parts are below minimum quantity and the low-level notification has been sent to the user with permissions to receive that email.