PM Meter Based
Introduction
A PM, also known as Scheduled Work Order is one of two types of work orders in Hippo, the other being Demand. PMs in Hippo can be based on a calendar date or by a meter reading. This guide instructs you on all the steps needed to create meter-based PMs. Click here to learn more about PMs calendar-based.
Definitions
Enterprise Level: provides access to details related to all facilities
Facility Level: provides access to details specific to a facility
Scheduled Work Orders: also known as a PM, Preventative Maintenance
Meter Reading Unit: refers to a Unit of measurement (Run Time Hours, Revolutions Per Minute)
Meter Based PM: refers to Preventative Maintenance that is generated when a piece of Equipment or Vehicle meets a specific Meter Reading Value
Steps:
Note: Before creating any meter-based PMs in Hippo you have to customize Meter Reading Units. System Admins can create these units from the Catagories and Types panel, Metering Reading Units grid. Click here to learn more about creating metering reading units.
Note: Additionally, Meter Reading Units must be assigned or associated with Equipment Models or Vehicles. Go to either the Equipment Models panel or Vehicles panel under Facility Admin. Find the Meter Reading Unit column to associate a meter reading unit with an equipment model or vehicle.
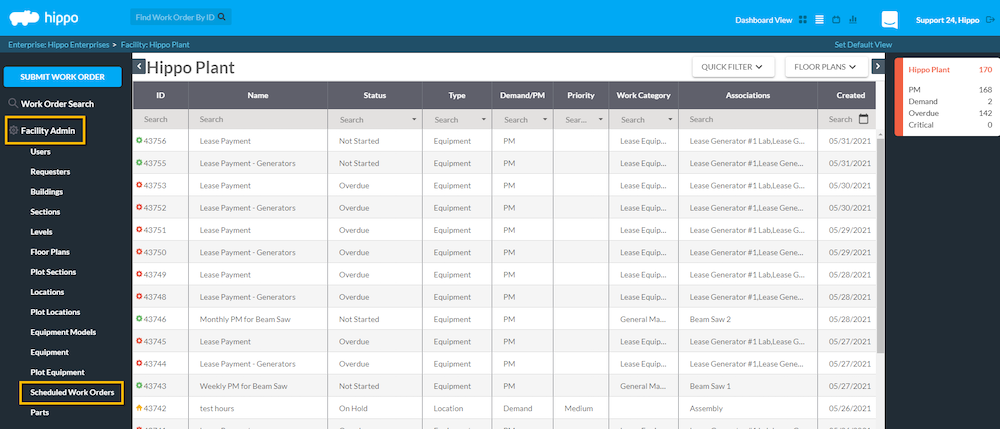
- Click on Facility Admin, then Scheduled Work Order panel to open the grid.
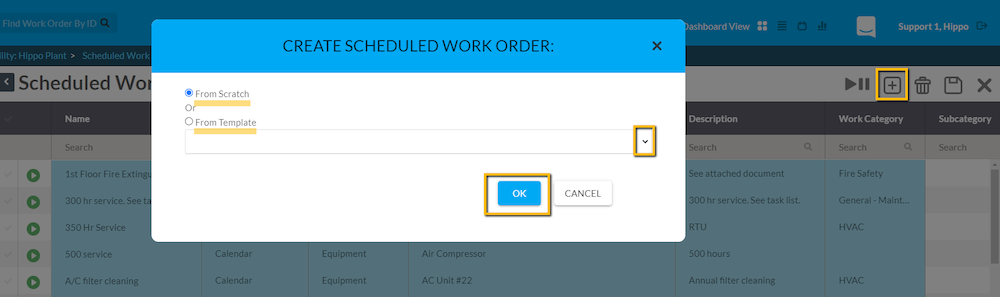
- Click on the add (+) icon located in the top right corner and the Create Scheduled Work Order window appears. Choose if you are creating a PM from Scratch or From Template.
Note: From Scratch option means you will manually fill in the PM details by typing or selecting from dropdowns.
Note: Templates have most PM details but you must switch to Meter as the Schedule Category and add the Association. You can edit any other details from the template.
- Hit OK and the new PM details appear at the top row.
- Any field in blue is mandatory. Click in the Name field and type the name of the PM. We suggest naming the new PM based on what needs to be done and when. For example, “Pump Maintenance.”

- Click in the Schedule Category column and select Meter.
- Choose either Equipment or Vehicle from the dropdown in the Type column.
- Click in the Association column. Two drop-down menus appear. The first drop-down menu shows a list of Meter Reading Units. Select a Meter Reading Unit. The second drop-down menu shows a list of Equipment or Vehicles, associated with that Meter Reading Unit. You can select one or multiple associations with the PM.
- Click in the Description field to add a description of the preventative maintenance procedure. For example, “Pump Maintenance” could have a description of “Perform Maintenance for Pump”.
- Select the Work Category that best fits the PM. You can find a Work Category by either scrolling through the list or by using the search bar available at the top.
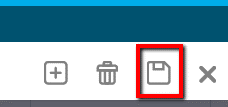
Note: At this time you can hit the “Save” button located in the top right corner of the screen and the new PM jumps into alphabetical order, or you can keep adding other optional details. To actually get this work order to generate, you must click in the **Schedule field to further customize.
Sub Category: Select from the dropdown. A subcategory can only be customized by a System Admin and used to further group Work Categories for reporting or search purposes.
**Schedules: This field is where it is determined when the Scheduled Work Order generates.
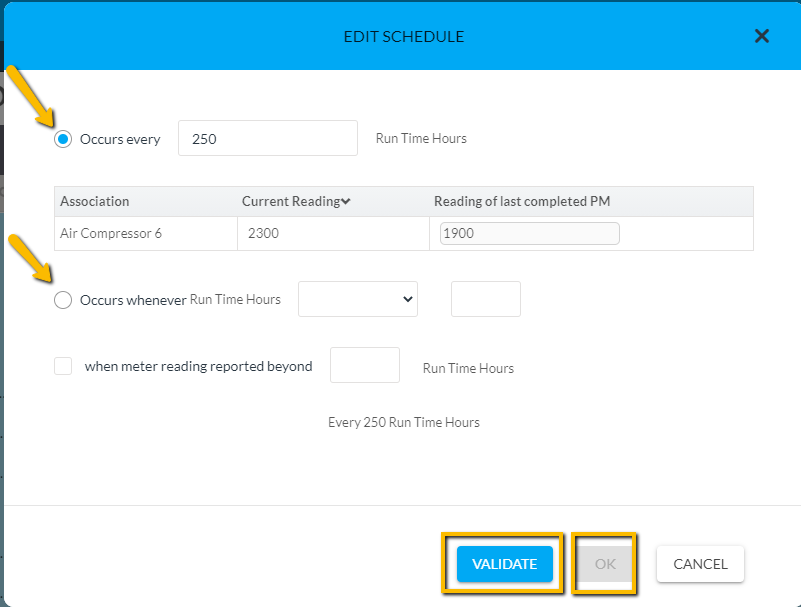
Click in the field to view the “Schedules” Window. Next, click “Add” and the “Edit Schedule” window appears. In this window, select between two options to generate a PM:
Occurs every - or - Occurs whenever greater or less than
“Occurs every” refers to generating the PM when the Meter Reading Unit meets a specific quantity. For example, a PM can be set to generate “Every 50 run time hours”.
“Occurs Whenever Greater or Less Than” refers to generating the PM when the Meter Reading Unit is greater or less than a specific value. For example, a PM can be set to generate when “Run Time Hours are Greater than 50”.
A User then sees the name of the Equipment or Vehicle name listed under “Association”. There are also two columns to complete:
Current Reading refers to the current meter reading of that association.
Reading of the last completed PM refers to what the meter reading of the association was the last time the PM was generated. If a Meter Based PM for the association has never been generated, this value will be blank and a value needs to be entered.
Optionally, a User can indicate if a reminder email notification is needed by completing the “when meter reading reported beyond” field. Checkmark the box, then type in the value of how many Meter Reading Units to be reminded before the next scheduled date of the PM.
After all the details are completed, click on the “Validate” at the bottom of the window. It then shows a summary of the schedule of selected options to be generated for this PM. Click on “OK” to return to the Scheduled Work Orders grid. A User can click “Cancel” to exit without saving changes.
Days to Complete: Enter a value into this field to indicate how many days to complete the PM before it becomes overdue. Remember, overdue PMs will be color-coded red when they become overdue.
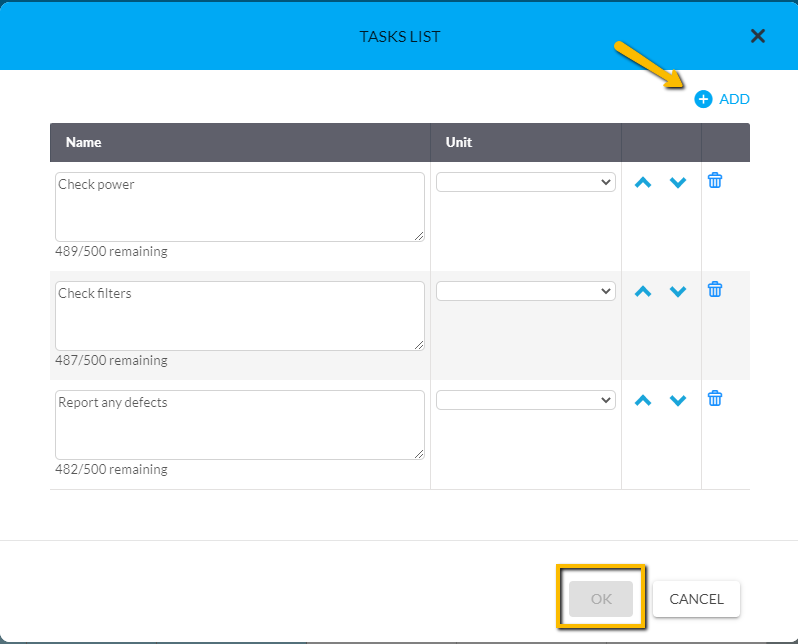
Tasks: In this field, a checklist of tasks for a PM can be created. This will ensure that a PM will follow a specific procedure. For example, “A/C Unit Maintenance - Monthly” could have three tasks: remove the filter, check the filter, clean the filter.
To add a task, click on the field. A new Tasks list window appears. Next, click on the “Add” button. Two new drop-down menus appear below Name and Unit. For Name, type in the name of the task. For Unit, select a unit if applicable. Examples of Units are amps, liters, or hours. If there isn’t a unit for this task, do not select a unit. Units are added by a System Admin from the Enterprise Admin, Categories and Types, then Units grid.
To add an additional task, click on the “Add” button. If there are multiple tasks, a User can rearrange the task order by using the “move up” or “move down” buttons. Once all the desired tasks have been added, click on “Ok” to return to the Scheduled Work Orders grid. Or, click on the close icon (x) to exit without saving changes.
Resources: Use this field to associate a Resource with this PM each time the PM generates. To add a Resource, click in the field and select one or multiple Resources. The Resource list is any User that has “Work Order Resource” permission on their Edit Permission form, Users grid.
Documents: Use this field to add a Document to the PM. These documents are stored under Facility Admin > Documents grid. Click in the field and select one or multiple Documents.
Lockout Procedures: Use this field to add a Lockout Procedure to the PM.
Job Hazard: Use this field to add a description of any Job Hazards for the PM.
Estimated Effort (Minutes): Use this field to estimate how long this PM will take to complete in minutes. For example, type in 60 for a PM that will take approximately 60 minutes to complete.
Estimated Cost: Add an estimated cost to the PM. Click in the field to type.
Floating: Floating is an option only for calendar-based PMs. It prevents a PM from generating if the previous PM has not been completed.
Generate Multiple: If multiple associations (e.g., Equipment, Vehicle, Type) have been selected with this PM, a separate Work Order will generate for each association. For example, a PM has 3 pieces of equipment associated: light 1, light 2, and light 3. If Generate Multiple is selected, a Work Order will be generated for each piece of equipment. Checkmark the box to enable Generate Multiple.
Company: Click in this field to add a Company name to the PM. These companies are stored in Facility Admin > Companies grid.
Contact Information: Type in any additional Company/Vendor information.
Contacts: Click in the field to select a contact from a Company. The Contact names are stored on the Contacts grid, Facility Admin.
Last Generated Scheduled Date: Indicates the last time the PM was generated.
Next Scheduled Date: Indicates when the PM will generate next.
A few things to note:
- Always hit the save icon in the top right corner after editing or done.
- A PM is only visible on the Advanced or Standard Dashboard, on its scheduled date. The Calendar Dashboard allows a User to view PMs that are scheduled in the future.
- A User can make modifications to PMs, only if they have permission to do so. Click in any field on the grid to make changes. We suggest you modify only one PM at a time.
- A User can also delete a PM from this grid, only if they have permission to do so. Click on the checkmark beside the name of the PM. Then, click on the delete icon located in the top right corner of the grid.
To exit the Scheduled Work Orders grid and return to the Facility Screen, click on the Close icon ( X ) located in the top right corner of the grid.