
Managing Asset Settings

Eptura Knowledge Center

Managing Asset Settings

This article will help you manage your Asset field settings including custom fields.

All changes to your Asset Settings will impact ALL users of the program

Getting There

MANAGEASETTINGS.gif

  Settings > Module Settings > Assets > General    

  1. Log into your ManagerPlus account and click on the Settings icon located on the left.
  2.  Click on the Assets icon under the Module Settings section.
  3.  You can select between the three sections: 
    general category settings makes and models.png
  4. Select General
General

SCRAPPED.gif

  • General controls which statuses are available for your assets.    
    •  Status List  shows the names of all current statuses.  
    •  Active  indicates the status should be treated the same as the ACTIVE status
      • Assets with an active status  clipboard_e926122cf4d61fa5dc38a1a0fffbb0cb5.pngwill behave normally
      • Assets with an inactive status clipboard_ed1493ed0d4929a12f8af27f49b67c1a7.png can still have work orders created, but their PMs (on their Maintenance Plans) will not come be included on the PM Management board (thus, not be eligible to be automatically turned into a work)
    •  Default  selects the default status every time an asset is created, and can only be designated to a single status

To create a new status:

  1. Click the    +    button.  The new status line will appear.
  2. Enter the name of the new status
  3. By default, the new status will be treated as an Active status clipboard_e45bf464f50e50b925af2f2f28c4716c9.png.  Uncheck the box if it is not.

To edit an existing status:

  1. Click the pencil to unlock the status clipboard_edf2db44d5bea5455deea8d50b20f23dc.png
  2. To delete the status, click the red trash can clipboard_e8f31fdddf51a890b84d5e5a60d93d235.png  
Category Settings

Category Settings establish What kinds of assets you can create in the Assets module.
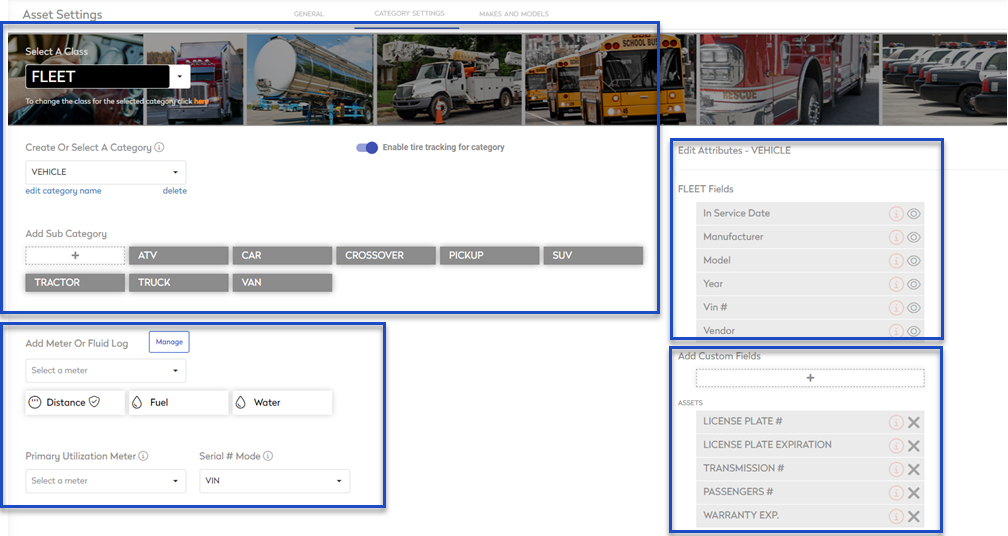
There are three levels to all assets:  Class > Category > Sub Category

CLASS 

All categories fall into one of four different Classes

  • FIXED EQUIPMENT    This is the default class.  Assets imported into Lightning (no matter the category) will land here.
  • FLEET
  • MOBILE EQUIPMENT
  • FACILITIES


CATEGORY

The relationship between Category/Sub Category is the most important when setting up your assets.  

Category

  • Sub Category
  • Sub Category
  • Sub Category
  • Sub Category

Machinery

  • Conveyor
  • Lathe
  • Mold
  • Press

Heavy Equipment

  • Bulldozer
  • Excavator
  • Grader
  • Backhoe

Vehicle

  • Van
  • Pickup
  • SUV
  • Motorcycle

Rental Facilities

  • Condominium
  • Home
  • Towne House
  • Storage Unit
 

  To create a new Category    

  1. Select the Class the category should be under.
  2. Click inside the Category drop-down box, type the new category name, and press enter (or click on the [+] button)

  To edit or delete an existing Category    

  1. To edit a the Category name displayed on the screen, click the edit category name link.  Once finished, press enter.
  2. To delete the displayed Category, click the delete link.  This is only permitted if the category has no historical record.       


SUB CATEGORY 

There is no limit to the number of Sub Categories that can be added to a Category.  They cannot be moved to another Category.  If you change your mind and want a Sub Category placed under a different Category, it must be created under that other Category.

  To create a new Sub Category    

  1. First select the desired Category.
  2. Click the + button under Add Sub Category.
  3. Enter the name and hit enter.

  To edit / delete an existing Category  

  1. Click the edit category name link.  Once finished, press enter.
  2. To delete the displayed Category, click the delete link.  This is only permitted if the category has no historical record.   
Add Meter Or Fluid Log

Assets - Managing Asset Settings 3.gif

Meters and Logs are established at the Category level.  They apply to all Sub Categories and all Assets listed under the selected Category.

  To Add a Meter/Log to a Category  

  1. Select from the options in the drop-down menu Select a meter clipboard_e4031fcc99a0bef648e9473fe9ffe8ead.png
  2. To remove a Meter from a Category, select a visible meter.  It will display the Minimum/Maximum settings for the Meter.  At the top of the window, click on remove from categoryclipboard_e86cd2186ec68e4d739bb830dd417aea8.png
  3. To establish a Minimum/Maximum level that will restrict the acceptable entries for a Meter on that Category, select a visible meter.  It will display the Minimum/Maximum settings for the Meter.  Enter the numeric value, and hit enter.

  To Create a new Meter/Log  

  1. Click the   Manage   button.  It will display all available Meters. 
  2. Click the + button under New Meter or Log.
  3. Decide which type of meter you want from 4 options:

clipboard_ec2a5ef54fad1afb651633d49d814ad6c.png

  • Fluid
  • Gauge
  • Trip meter
  • Meter
  1. Enter the name of the new log and click enter.
Edit Category Attributes

clipboard_e0385914a1243219eb7c43268b8444258.png

Each Category has six standard fields available to it:

  • In Service Date
  • Manufacturer
  • Model
  • Year
  • Serial # (Under the FLEET Class, this will appear as VIN #)
  • Vendor

By default, all six are made visible for any Asset assigned to that Category.  These are all optional fields, when creating/editing an Asset.

  1. To change the field to Not Visible, click the Visible icon clipboard_e2edd69a223cde3e4496d01df82f6cc86.pngand change it to Not Visible clipboard_ea5156d0eda795a9557eca876b6244d97.png
  2. To make the field mandatory when creating/editing an Asset, click the Not Required iconclipboard_eef228679cbb5db37957f7a20a419e3e4.png and change it to Requiredclipboard_e769b4544d7a775a5f9974b584a13e532.png 

clipboard_e9c10260f0b4b7d78c538b83545af8cdd.png

Custom Fields

Assets - Managing Asset Settings 4.gif

Asset Custom Fields are also determined at the CATEGORY level.  New Categories have no Custom Fields and must be added manually.

 To add an existing Custom Field 

  1. Click on the + button below Add Custom Fields clipboard_eac29e044b4a85d7da648c95fe4cd315f.png
  2. Select all custom fields to be added, and click   Add   at the bottom  of the window.
  3. To make the field mandatory when creating/editing an Asset, click the Not Required icon clipboard_eef228679cbb5db37957f7a20a419e3e4.pngand change it to Required clipboard_e769b4544d7a775a5f9974b584a13e532.png 
  4. To reorder the fields, use the double ellipsis button, and drag up or down to change the order.  clipboard_e5d9857becf4ecc2abb724252120cc078.png


 To create a NEW Custom Field 

  1. Click on the + button below Add Custom Fields clipboard_eac29e044b4a85d7da648c95fe4cd315f.png
  2. Click the New button in the top right corner clipboard_e5c17cd96ca5f0d07dc527e4eb3efc62a.png
  3. Fill out the required fields
  • Name
  • Group  (Groups are only to help with organizing a lengthy list of Custom Fields)
    • To create/edit a Custom Field Group, click the   Manage Groups   button.  Begin typing the name in the    Add a Field Group   button, and hit enter.
    • To delete a Custom Field Group, click the   Manage Groups   button.  Remove the Group for clicking the trash can icon clipboard_eec455e00d2c849484f09cfe76787fe8f.png
  • Type:  This is the most important field when establishing a new custom field.  It determines how the custom field should behave.  Once a Type is selected and saved, you cannot change to a different type.  The 8 Type options are:
    • Text:  Any character, letter, symbol, or number, can be typed in this field
    • Checkbox:  Creates a Yes/No style checkbox clipboard_e7bad6fdb739d83957c7f30c8d42d65ef.png
    • Integer:  Only numbers can be entered
    • Decimal:  Numbers with a decimal point can be entered
    • Date:  MM/DD/YY
    • Lookup:  Creates a drop-down field, containing the options that may be selected from
    • Contact:  Creates a drop-down field that brings up the list of Employees, Vendors, Customers, Users
    • Currency:  Numbers entered will be preceded by your country's currency symbol
  1. Click   Save   at the bottom  of the window.


 To edit an existing Custom Field 

A custom field must be removed from the Category, before it can be edited.
clipboard_e9219606ba1b55dd941622b3c761b5abc.png        clipboard_e9e02c8a145f88b3ccc6aa4d304e7a2af.png

  1. Click the X button on the desired Custom Field, to remove it from the Category.
  2. Once removed, click the + button below Add Custom Fields clipboard_eac29e044b4a85d7da648c95fe4cd315f.png
  3. Find the desired custom field, and click the pencil icon to edit the record. clipboard_e5fdcba0b59ede1be1ef8e296faabc590.png
  4. Edit the NameGroup, or (if applicable) the Lookup field. 
    REMEMBER:  The Type cannot be edited.  Once a Type is selected and saved, you cannot change that custom field to a different type.
  5. Click   Save   at the bottom  of the window.


Makes And Models

The items listed in this section, will be made available for the Asset Manufacturer and Model fields.

Models are tied to Makes.  You cannot have a model without a Make, but you can have a stand-alone Make/Manufacturer.

Assets - Managing Asset Settings 6.gif

MAKE / MANUFACTURER

 To create a NEW Make (Manufacturer) 

  1. Click in the box below  clipboard_e82dc597cdcc3d9e7b8aa66301eea39dd.png
  2. Start typing the Manufacturer's name.  If it's available, you can select it.  If not, click the   [+]   next to the name, to add the new Make to your database. 

 To edit an existing Make (Manufacturer  

  1. Select the Manufacturer of choice from the drop-down library.
  2. Click the edit manufacturer name? button underneath the chosen Make.  This will open the edit option.
  3. Type in the changes and hit enter.
MODELS

 To attach a Model to an existing Make 

  1. Select the Manufacturer of choice from the drop-down library.
  2. Click the + button under the Add Model line.  clipboard_eb672452897040c182309ae2270caa39b.png
  3. Type in the changes and hit enter. ​​​​

 To edit or Delete a Model 

  1. To edit a Model, move the cursor over the model of choice, and click the pencil symbol to alter the name. clipboard_eac7bbcff834953b8611109fbc205ab7c.png
  2. To delete a Model, move the cursor over the model of choice, and click the X symbol to alter the name. clipboard_eac7bbcff834953b8611109fbc205ab7c.png
  • Was this article helpful?