Create Cycle Counts
Cycle Counts allows you to audit the Inventory levels you already have on hand.
- If your physical inventory is lower than what the Inventory shows, the cycle count will decrease your stock numbers.
- If you physical inventory is more than what the Inventory shows, a cycle count will increase those stocking levels without creating a new expenditure (as you have previously spent funds to acquire the parts). Any increase on a cycle Count, will add to your inventory value, without creating a new expenditure.
Cycle Counts allows you the freedom to either perform a complete inventory audit (where all operations cease at a facility while every Inventory item is counted), OR you can perform Cycle Counts in smaller increments. These options include:
- Bin Location Only - Creat a Cycle Count using only Bin Locations and no additional filters.
- High Cost Per Item - Create a count list for high cost parts by setting a minimum part cost.
- Inventory Shortages - Count parts with qualities below their minimum stocking level.
- Not Recently - Count parts that have not been counted since a selected date.
- Part Type - Count parts based on a specific Part Type.
- I want to pick specific pars on the cycle count itself
Create a Cycle Count
- Navigate Inventory > Cycle Counts.
- Click the New Cycle Count button.
- Click on the Cycle Count Type.
- From the Warehouse drop-down, select a warehouse. Cycle Counts can only be performed on one warehouse at a time.
- From the Budget drop-down, select the budget.
- If needed, toggle the Require recounts to On to recount the part and then from the Assigned to drop-down, select the user.
- Click the Next button.
- Select the Bin Location.
- Click on the Create icon to create your Cycle Count.
The beginning status will be NOT STARTED.
- Fill in the Current Count for each inventory item.
- If the listed cost is incorrect, be sure to update the Part Cost.
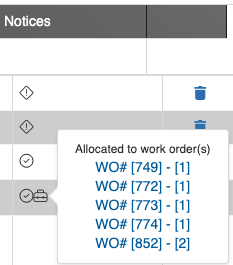
- If the part being counted is allocated to current work orders, the
 icon will appear. If you hover over it, the work order numbers will appear, along with the number of parts allocated to it
- At any time, go to the bottom of the screen and click Post Count. This will change the cycle count status to STARTED.
- If your count matches current inventory levels, you will see a check mark in the Notices column

- If the quantity you entered doesn't match what the Inventory has on record, the Recount Required notice will appear
 . The Cycle Cost status will also change to RECOUNT REQUIRED. You will need to enter the quantity and cost again and then click on the Post Count icon. This process will need to repeat until there are 2 consecutive entries that match.
 - If the part is successfully counted and shows a discrepancy, the Current Count number will appear in red as shown below:
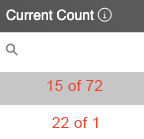 |
Example: 15 of 72 states that 15 is the new quantity showing in inventory, against the 72 that were showing previously. A discrepancy of -57. 22 of 1 shows that 22 is the new accepted count, and 1 is the old. A discrepancy of +21. Because this is an increase, the value of the inventory also goes up by the listed cost per part. |
- After all the parts are counted, the cycle count will automatically change the status to CLOSED.
