Check In Mail Items
The iOFFICE Mail App allows you to check-in packages using the following methods:
- "Magic" Scan
- Barcode Scan
- Manual Entry
Watch the following video for a general overview of the package check-in process in the iOFFICE Mail App.
For a step-by-step guide of the check-in process, refer to the following procedure.
Check In Mail Items Using Magic Scan
The ![]() (Magic Scan) icon on the Home screen of the iOFFICE Mail App allows you to scan a mail item's barcode and either check it in if it is not present in the local database or to deliver it if the mail item is found in the local database and is inbound.
(Magic Scan) icon on the Home screen of the iOFFICE Mail App allows you to scan a mail item's barcode and either check it in if it is not present in the local database or to deliver it if the mail item is found in the local database and is inbound.
- Log into the iOFFICE Mail mobile application. The Home screen displays.
- On the Home screen, tap the
 (Magic Scan) icon in the upper-right corner of the screen. The Barcode Scan screen displays.
 - Line up the barcode of your mail item into the scan box and the app will automatically take a picture for you.
- Multiple options display, allowing you to confirm the check-in.
- Tap the Check-In option to check in the package. The Item Information screen displays.
If you do not see the Check-In option, the package has already been checked in. Tap the Mail Item Details option to update item information. If you are ready to deliver the mail item, see Deliver Mail Items Using the Mail App.
- Tap the Inbound, Outbound, or Interoffice option to indicate the type of mail item being checked in.
- Enter the intended recipient in the To field.
- Optional - Enter the name of the sender in the From field.
- Optional - Enter the package type in the Package Type field.
- Optional - Enter the location in the Location field.
- Optional - Enter additional item information in the Note field and tap the +Add a Note button.
- After you have entered the applicable information about your mail time, tap the Save button. A confirmation Item Information screen displays, allowing you to verify the mail item was successfully checked in.
Barcode Scan
The Barcode Scan option allows you to simply scan the barcode of a mail item to automatically populate mail item information on the Check-in screen.
The table below describes the sections of the screen.
| Item | Description |
|---|---|
|
Light icon |
The light icon allows you to enable or disable the device flash light to help you to better view your scanned barcode. |
|
Scan field |
This is the box you will use to align your barcode. Once your barcode is aligned within the box, the box will turn blue indicating the barcode has been scanned |
|
Done button |
To cancel and go back to the home screen, you may press the "Done" button.
Note: If using the Magic Scan icon (see below) instead of the Check-In feature, you will have the option to check-in the mail item if it is not checked in, or deliver it if it is. If Check-In is selected, the Item Information screen opens upon barcode scan. |
|
Manual Entry button |
If you would prefer to manually enter your mail item information, click this button. The Item Information screen opens. |
Check in a Mail Item Manually
When you tap Check-In on the Home screen, the Scan Mail Item screen displays. Using this screen, you can scan a mail barcode using your device's camera, or you can tap Manual Entry to access the Check-in screen, where information for the mail item can be manually entered.
Manual Entry
If you prefer not to scan a barcode of a mail item, you may enter the check-in information manually.
- Tap the Manual Entry button on the Barcode Scan Screen. The Item Information screen displays.
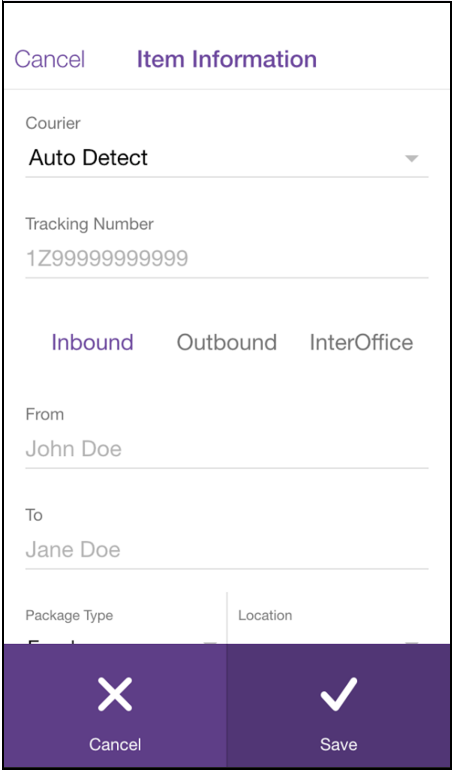
- Complete the following:
| Fields | Description |
|---|---|
| Courier |
Tap this field allows you to select any of the available Couriers you have loaded. You may allow the Mail Module to auto-detect your courier, or you can select other items like Local Courier or Airborne. Availability will depend on your pre-set Couriers. |
| Tracking Number | Tap this field allows you to enter the tracking number for the selected mail item. |
| Inbound Section | |
| From | Tap this field allows you to enter who the mail item is from. |
| To | Tap this field allows you to determine the mail recipient. |
| Package Type |
Tap this field allows you select the type of package. Examples
Note: Availability of package types will be dependent on what has been pre-loaded. |
| Location | Tap this field allows you to select the location of the mail item. |
| +Add a Note | Tap this button allows you to add a note about the mail item. |
| Outbound Section | |
| To | Tap this field allows you to determine the mail recipient. |
| From | Tap this field allows you to determine the mail recipient. |
| Package Type |
Tap this field allows you select the type of package. Examples Note: Availability of package types will be dependent on what has been pre-loaded. |
| Location | Tap this field allows you to select the location of the mail item. |
| +Add a Note | Tap this button allows you to add a note about the mail item. |
| Interoffice Section | |
| To | Tap this field allows you to determine the mail recipient. |
| From | Tap this field allows you to determine the mail recipient. |
| Package Type |
Tap this field allows you select the type of package. Examples Note: Availability of package types will be dependent on what has been pre-loaded. |
| Location | Tap this field allows you to select the location of the mail item. |
| +Add a Note | Tap this button allows you to add a note about the mail item. |
- Tap the Save button to save your manual check-in.