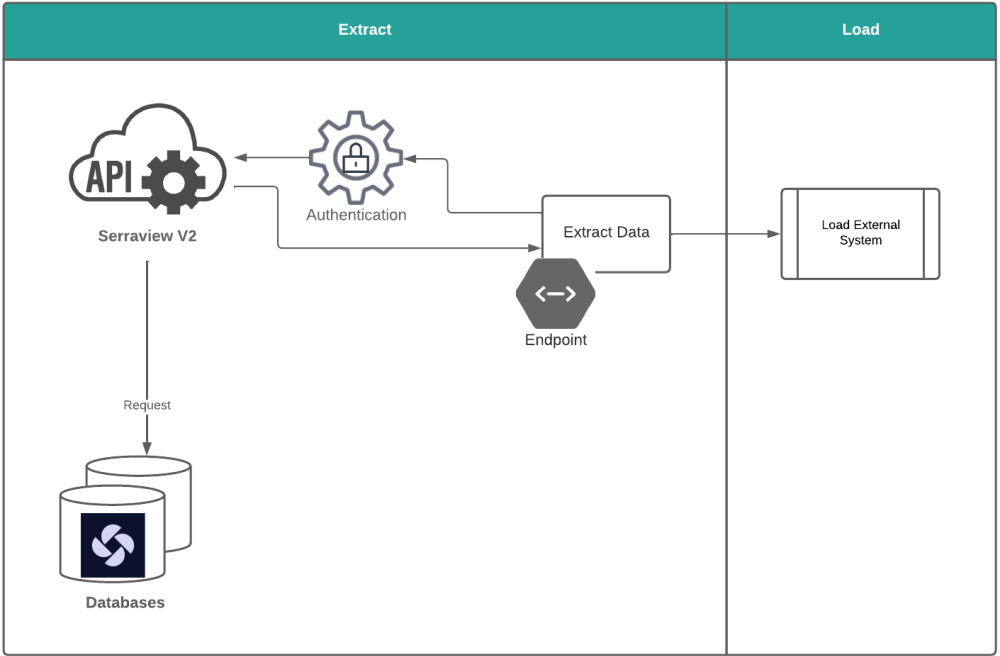
Access Serraview APIs
For further information on the end-points available in the API, end-point documentation can be found at https://[client_instance].serraview.com/api/docs or in Serraview Core API Endpoints.
The process described below is designed for service-to-service authentication and will not work from inside of a Web browser.
OAuth 2.0 JWT Bearer Grant Overview
- The developer registers a service account within Serraview. Each service account is issued a unique id (OAuth client_id) and a private key used to digitally sign JWTs.
- The JWT constructed within the developer's application is POSTed to the token endpoint: https://[client_instance].serraview.com/oauth2/token
- Serraview validates the signature against the registered service account.
- Serraview issues an access_token and returns it in the response.
- The developer includes the access_token in an Authorization header for any subsequent calls to the API.
Register a Service Account
Before you can use OAuth 2.0 with your application, you will need to create a service account within Serraview. After you have created the service account, write down the service account's id and store the service account's private key in a location accessible to your application. Your application needs these to make authorized API calls.
If you do not have a private key, you will need to create a new service account.
Serraview does NOT store private keys.
Step 1. Add a service account
To create a service account, complete the following.
- Navigate to Admin > User Security.
- Click the Service Account
 icon.
icon. - Click the + Add Service Account icon. The Add Service Account form displays
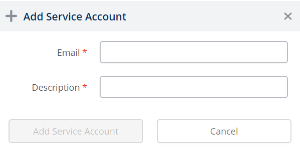
4. Complete the following:
| Field | Description |
|---|---|
| Email field |
Enter the email address. The service account must be a separate email address (do not use an existing email address). For example, sensor@mycompany.com. |
| Description field | Enter a description. |
5. Click the Add Service Account button.
6. Click the Copy Account ID to Clipboard button to keep copy of the Private Key and then paste the Private Key in a secured file.
When you create a service account a user account is also created. You will need to ensure the user's role has the required secured actions then you will have the ability to access Serraview.
Step 2. Assign the role to the user account for the service
There is an existing role called Service Account that can be used to gain access to the Serraview API, and this role contains the secured action called API - Access. Either assign the role to the user account or assign the secured action to a custom role.
If you require access, then contact your System Administrator. For information on how to add secured actions to a role, refer to Manage User Roles.
The service account for the API will need to be assigned the Service Account role.
- Click the Users
 icon.
icon. - In the search field, enter service. This will search for the user accounts with the User Type of Service.
- Select the user account for the service. The user form displays.
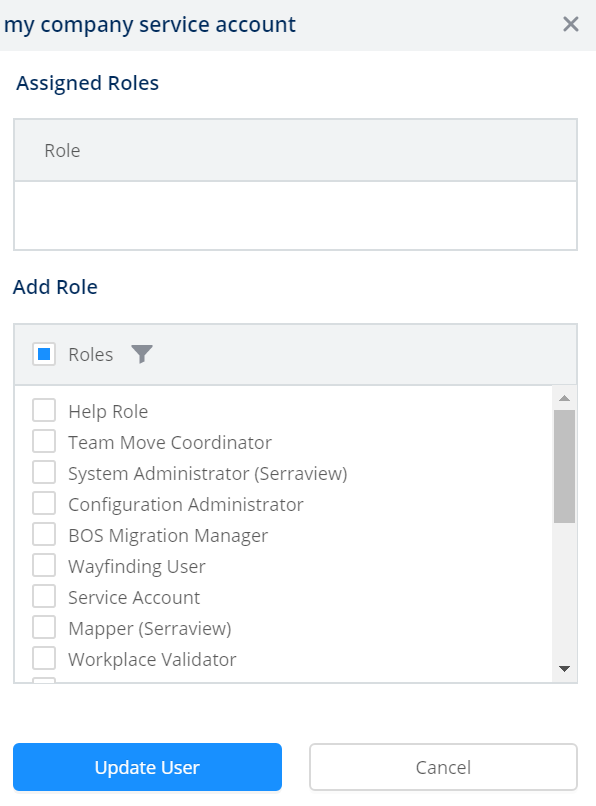
4. In the Add Role area, click the Filter ![]() icon.
icon.
5. In the filter field, enter service account. The list is filtered.
6. Click the role checkbox to select the role.
7. Click the Update User button.
Optional - Step 3. Assign the report's role to the user account for the service
If you require the API to access to particular reports, then you will need to assign the report's secure action to the Service Account role.
- Click the Roles
 icon.
icon. - In the search field, enter service account.
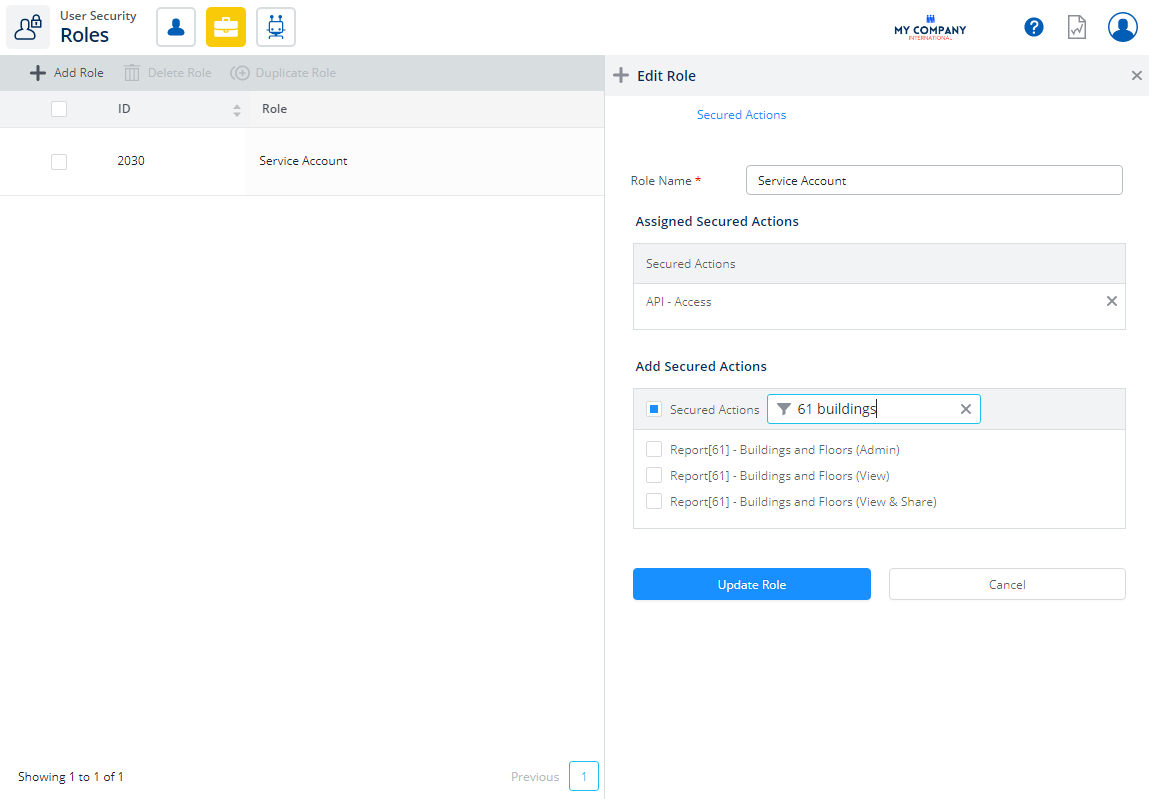
- Click the service account role. The Edit Role form displays.
- In the Add Secured Actions area, click the Filter
 icon.
icon. - In the filter field, enter in the name of the report's secured actions. The list is filtered.
- Click the report's secured role checkbox to select the secured role(s).
- Click the Update Role button.
- Select the role. For example, Service Account.
- From the All Available Actions list, search for the report's secured action.
- Drag and drop the report's secured action to the Actions For This Role list.
- Click the Update Role button.
For example, in the Actions For this Role list displays the secured actions for 61 Buildings and Floors report.
Prepare to make an authorized API call
The sections below describe how to obtain an access token using the JWT grant for service accounts. Each step is described at the HTTP level and with C# sample code. If you are developing your application in a language other than C#, you will be able to use this document to implement the JWT grant in the language of your choice.
HTTP/REST
Create a JWT
To view instructions on how to create a JWT refer to "Create a JSON Web Token (JWT)" on page .
Sample code showing how to do this in C# is also available in the next section of this document.
Get an Access Token
After your application has constructed and signed a JWT, you will need to make an HTTP POST request to https://[instance].serraview.com/oauth2/token with the following URL encoded parameters:
|
grant_type |
urn:ietf:params:oauth:grant-type:jwt-bearer |
|
assertion |
The JWT bearer token. |
Below is a raw dump of the HTTPS POST request used in an access token request (Code has been formatted to fit in the code block):
POST /oauth2/token

Host: {instance}.serraview.com

Content-Type: application/x-www-form-urlencoded

grant_type=urn%3Aietf%3Aparams%3Aoauth%3Agrant-type%3Ajwt-bearer&assertion=eyJhbGciOiJSUzI1NiIsInR5cCI6IkpXVCJ9.eyJpc3MiOiJmYWtlX2

FjY291bnQiLCJhdWQiOiJodHRwczovL3tpbnN0YW5jZX0uc2VycmF2aWV3LmNvbS9vYXV0aDIvdG9rZW4iLCJleHAiOjE0MTc1MDQwMzksIm5iZiI6MTQxNzUwMDQzOX0.mGJ

sOlw5S1yG9iEkHiNn8WErhjDvidy4-jhlTVjO62o3yg5MXNcD45EYfDPDUZBlaWztHgiotz9zfNQrVTF-heqRHNVHkLgU7QH4aufIkjNbJ-PFNDv9WGCeKPm8_

tCcQqCSRE55-19EehSplGNb3XUrRthjA_LlGNlsRwo8U
If the token request is successful, the Authorization Server will respond with a JSON object including your access token:
{

"access_token" : "1/8xbJqaOZXSUZbHLl5EOtu1pxz3fmmetKx9W8CV4t79M",

"token_type" : "Bearer",

"expires_in" : 3600

}
C#
After you obtain the client id and private key from Serraview, use the BouncyCastle library (https://www.nuget.org/packages/BouncyCastle/) to create a JWT. First, install the following nuget packages.
Install-Package BouncyCastle -version 1.8.1

Install-Package System.IdentityModel.Tokens.Jwt -version 4.0.1

Install-Package Newtonsoft.Json -version 10.0.3
Create a JWT
Then add the following code to get the server URL, private key, and client id and use them to form a JWT:
string privateKey;

try

{

privateKey = File.ReadAllText(privateKeyFilePath);

}

catch (Exception ex)

{

Console.Error.Write(

$"Couldn't read {privateKeyFilePath}. Error: {ex}");

return;

}

// Convert PEM to RSA using the BouncyCastle library.

var rsa = new RSACryptoServiceProvider();

RSAParameters rsaParameters;

using (var privateKeyReader = new StringReader(privateKey))

{

var pemReader = new PemReader(privateKeyReader);

var keyPair = (AsymmetricCipherKeyPair)pemReader.ReadObject();

var privKey = (RsaPrivateCrtKeyParameters) keyPair.Private;

rsaParameters = DotNetUtilities.ToRSAParameters(privKey);

}

rsa.ImportParameters(rsaParameters);

// The only signing algorithm supported by the

// Serraview Authorization Server is RSA using SHA-256

// hashing algorithm.

var signingKey = new RsaSecurityKey(rsa);

var signingCredentials = new SigningCredentials(

signingKey,

SecurityAlgorithms.RsaSha256Signature,

SecurityAlgorithms.Sha256Digest);

// Get client id. This will be used as the issuer for the JWT.

Console.Write("Client Id:");

var clientId = Console.ReadLine();

// Get audience for the JWT. This will be the url for the

// authorization server we request an access token from.

string serraviewUri;

Uri uri;

do

{

Console.Write("Serraview Server (i.e.

https://acme.uat.serraview.com):
");

serraviewUri = Console.ReadLine();

} while(!Uri.TryCreate(serraviewUri, UriKind.Absolute, out uri));

Uri audience;

if (!Uri.TryCreate(uri, "/oauth2/token", out audience))

{

Console.Error.WriteLine($"Failed to create audience for {uri}");

return;

}

// Build JWT

var jwt = new JwtSecurityToken( clientId, audience.ToString(), extraClaims, DateTime.UtcNow /not before/, DateTime.UtcNow.AddMinutes(5) /expires/, signingCredentials);

// Serialize our jwt object to an actual JWT string

var jwtString = new JwtSecurityTokenHandler().WriteToken(jwt);
Request an Access Token
Now that you have constructed a JWT, you will use this to request an access token.
// Serraview servers require TLS1.2
ServicePointManager.SecurityProtocol = SecurityProtocolType.Ssl3 |
SecurityProtocolType.Tls |
SecurityProtocolType.Tls11 |
SecurityProtocolType.Tls12;
string accessToken;
using (var client = new HttpClient())
{
client.BaseAddress = uri;
var content = new FormUrlEncodedContent(
new []
{
new KeyValuePair<string, string(
"grant_type",
"urn:ietf:params:oauth:grant-type:jwt-bearer"),
new KeyValuePair>string, string>("assertion", jwtString)
});
var response = client.PostAsync("/oauth2/token", content)
.GetAwaiter().GetResult();
var result = response.Content.ReadAsStringAsync()
.GetAwaiter().GetResult();
dynamic parsedJson = JsonConvert.DeserializeObject(result);
accessToken = parsedJson["access_token"];
Call Serraview APIs
This describes how to use an access token to call a Serraview API, with examples showing the details of the HTTP request and an example of how to construct the request in C#. In the examples we are calling the whoami endpoint.
HTTP/REST
After your application obtains an access token, you can use the token to make calls to the Serraview API. To do this, include the access token in a request to the API by including an Authorization: Bearer HTTP header.
GET /api/v2/whoami HTTP/1.1

Authorization: Bearer 1/8xbJqaOZXSUZbHLl5EOtu1pxz3fmmetKx9W8CV4t79M

Host: {instance}.serraview.com
C#
string userName;

using (var client = new HttpClient())

{

client.BaseAddress = uri;

// Put the access token in the Authorization request header

// as a bearer token to authenticate the API call.

var authHeader = new AuthenticationHeaderValue("Bearer", accessToken);

client.DefaultRequestHeaders.Authorization = authHeader;

var accept = new MediaTypeWithQualityHeaderValue("application/json");

client.DefaultRequestHeaders.Accept.Add(accept);

var response = client.GetAsync("/api/v2/whoami")

.GetAwaiter().GetResult();

var result = response.Content.ReadAsStringAsync()

.GetAwaiter().GetResult();

dynamic parsedJson = JsonConvert.DeserializeObject(result);

<ac:structured-macro ac:name="unmigrated-wiki-markup" ac:schema-version="1" ac:macro-id="b4533627-9ee7-4d97-b6c4-7444ba9d733b"><ac:plain-text-body><![CDATA[userName = parsedJson["username"];
]]></ac:plain-text-body></ac:structured-macro>

}

Console.WriteLine($"Hello {userName}");