Serraview CAD Preparation
Overview
Serraview provides clients with the ability to update AutoCAD (CAD) drawings. This allows a user to:
- Upload new CAD files to Serraview and then the CAD files are batch processed. The batch process will identify all spaces based on their polylines and will update the floorplans.
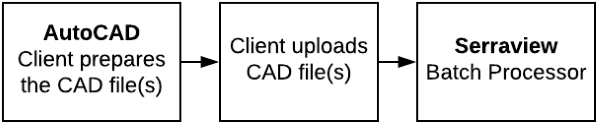
- Export CAD files from Serraview, then the CAD files can be changed and then uploaded back into Serraview.

To support the above processes, the CAD drawings need to be provided using the drawing standards described below. Also, refer to the Serraview CAD Preparation FAQ.
For details on using the Floorplan Importer, refer to Floorplan Importer and Upload Floorplan using the Floorplan Importer Tool.
Terminology
The following terminology is used:
| Term | Description |
|---|---|
| BOMA | Building Owners and Managers Association (BOMA) approved the standard for measuring office buildings. |
| REBNY | The REBNY method is the standard method in and around New York City. |
| Revit Autodesk | Revit is building information modeling software for architects, landscape architects, structural engineers, MEP engineers, designers, and contractors developed by Autodesk |
Drawing Standards
File Format
Drawings must be provided in AutoCAD 2013 format (used in AutoCAD 2013 – AutoCAD 2017) or AutoCAD 2018 format (used in AutoCAD 2018 – AutoCAD 2019).
Serraview exports the file to AutoCAD 2018 format (used in AutoCAD 2018 – AutoCAD 2019).
File Naming Convention
You can name your CAD drawings whatever you like, however, to upload drawings in a batch (rather than one at a time), you need to follow the naming convention outlined below so that Serraview can identify the building and floor that the drawing relates to.
[Building_Name]_[Floor_Name].dwg
The building name and floor number will need to match the Building Name and Floor Number fields in Serraview, including leading zeros if you have used them. For example:385 Bourke_02.dwg. Note For subsequent file uploads make sure you use the same file naming convention.
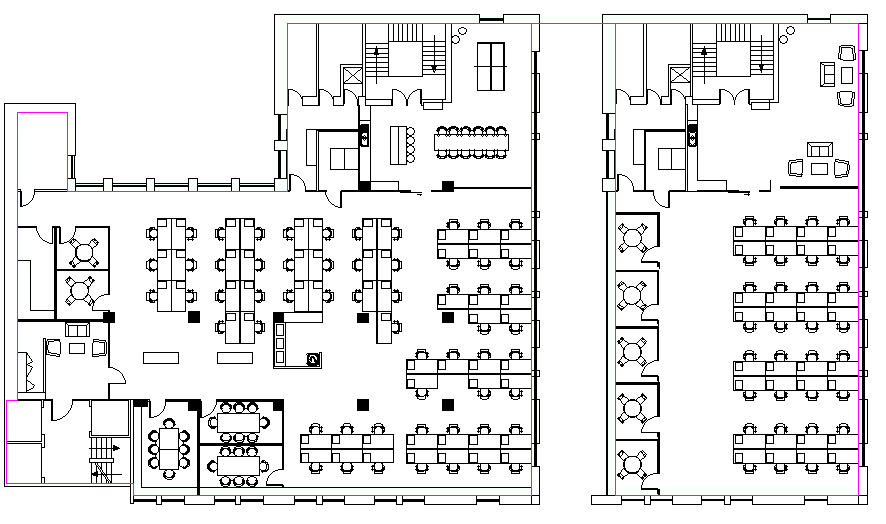
Space Layers
For Serraview to intelligently import your drawings, they must be provided with the following AutoCAD layers and polylines.
We recommend that you use the space type names that match the Space Type Hierarchy Structure in Serraview as this is the standard hierarchy. If you do not use the standard space layers, refer to Custom Space Layers.
|
Standard Space Layer Name |
Description & Polylines |
Example |
|---|---|---|
|
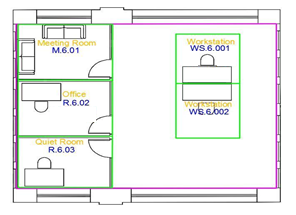
SV-ZONE |
This layer must contain a single closed polyline representing the boundary area of the floorplan. Whether you draw this polyline to the outside surface of exterior walls or the inside surface will depend on the measurement standard that you have chosen to use. For example, if you are using BOMA you draw the polyline against the inside surface, whereas for REBNY you would draw to the outside surface. Polylines with different "normal" or "normal vectors" are not supported. Serraview does not support multiple zones on a single floorplan. We recommend you insert a polyline linking the two zones and then this will be drawn as a single zone.
|
Pink Polyline: |
|
SV-SPACE |
This layer must contain a closed polyline representing each individual space i.e. every office, cube, kitchen, elevator shaft, toilet, etc. must have its own polyline on this layer. If you are wanting to generate an accurate report from Serraview that relies on space measurement (e.g. BOMA, REBNY or chargeback reporting), it is important that you accurately polyline every space (or are happy to consider any unpolylined space as "remaining space – see FAQ for more information). Polylines with different "normal" or "normal vectors" are not supported. All SV-SPACE polylines must be within the SV-ZONE polylines. |
Green Polylines: |
|
SV-TXT-SPACENAME |
This layer must contain a text object positioned within each space polygon containing the unique name for that space e.g. WS.6.001. The center-point of the text object must be within the boundaries of the appropriate SV-SPACE polyline. There are situations where even though the center point is well within the SV-SPACE polyline, if the text is too long, then you will need to either reduce the text size to either fit within the SV-SPACE polyline entirely OR make the text to be small enough until the Floorplan Importer accepts it. |
Blue Text: |
|
SV-TXT-TYPE |
This layer must contain a text object positioned within each space polygon containing the Space Type for that space e.g. Workstation. The Space Type will need to match one of the Space Types that have been configured in Serraview's Mapping Hierarchy. If a match cannot be found (or the layer is not provided), Serraview will code the Space Type as "Untyped". The center-point of the text object must be within the boundaries of the appropriate SV-SPACE polyline. There are situations where even though the center point is well within the SV-SPACE polyline, if the text is too long, then you will need to either reduce the text size to either fit within the SV-SPACE polyline entirely OR make the text to be small enough until the Floorplan Importer accepts it. |
Orange Text: |
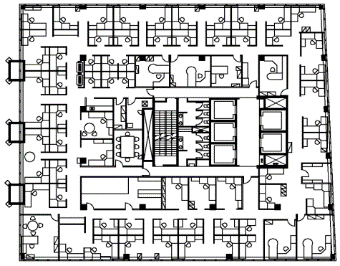
Architectural Layers
You will also need to provide Serraview with the list of layer names that make up the architectural components of the floor (walls, furniture, etc.).
Serraview will combine these layers into the "background image" of the floorplan.
For example:
We recommend you keep the plottable layers consistent across all floors and you can use the following pre-set list of layers. For example, your set of architectural layers may include:
- ARCH-EXT-WALLS
- ARCH-INT-WALLS
- ARCH-FURN
- ARCH-WS
- ARCH-OTHER
Let Serraview know which layers are plottable if you already have your own pre-set list of layers.
Other DWG Settings
Drawing Units: Ensure the drawing units (millimeters, meters, inches, etc.) are set consistently across all your CAD plans.
Layer 0: Do not use "Layer 0". Serraview cannot import data from this layer.
Frozen Layers: Do not freeze any layers described in the File Formats section of this document. Serraview cannot import data from frozen layers.
External References (XRefs): All External References must be bound to the DWG file prior to uploading into Serraview. See FAQ for instructions on how to bind XRefs to your CAD files, in the Serraview CAD Preparation FAQ.