Upload Floorplan using the Floorplan Importer Tool
Prerequisites
Before you use the Floorplan Importer Tool, you will need to make sure you have the following:
- AutoCAD file drawn as per Serraview CAD Preparation.
- Space Type text in the AutoCAD file must match a space type in Serraview's mapping hierarchy.
- DWG Template Schema has been created and configured to read the AutoCAD file.
Users require the secured actions:
- General – Save BAU
- Floorplan Imports - Access
- Import – Floor Plans
If you require access, then contact your System Administrator. For information on how to add secured actions to a role, refer to Manage User Roles.
DWG Template Schema
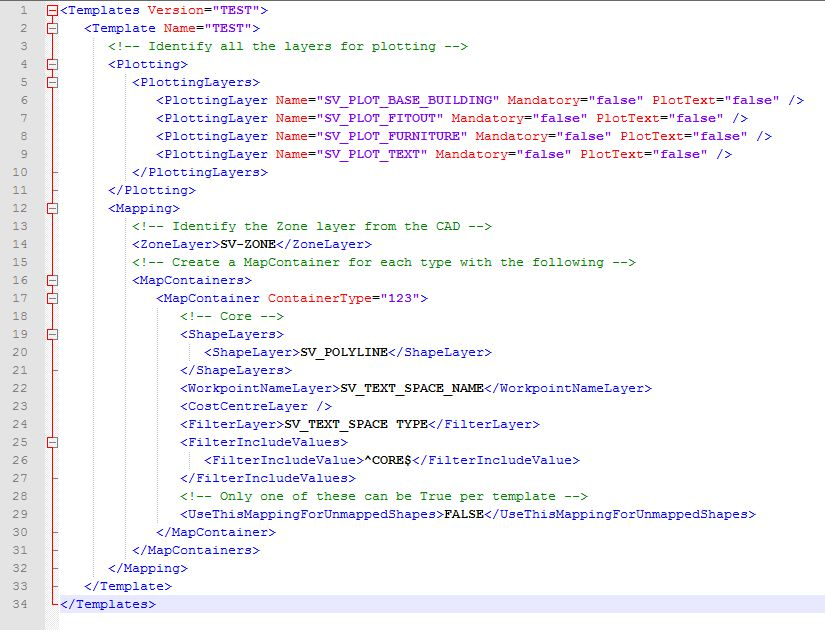
The schema is an XML code that will enable Serraview to read the AutoCAD file and translate it into mapped spaces. This schema is set up by the Serraview Onboarding team and if the schema requires updates then contact Serraview Support.
Each layer and mapping container type (space type) must be identified in this schema.
If your AutoCAD layers or mapping hierarchy changes, the schema must also be updated to reflect this to make sure the FPI tool successfully maps the file.
An example of a DWG Template Schema:
Access the Floorplan Importer Tool
You can upload a floorplan via the Floorplan Importer.
- Navigate to Admin Settings > Data Imports > Floorplan Imports. The Floorplan Importer Tool displays.
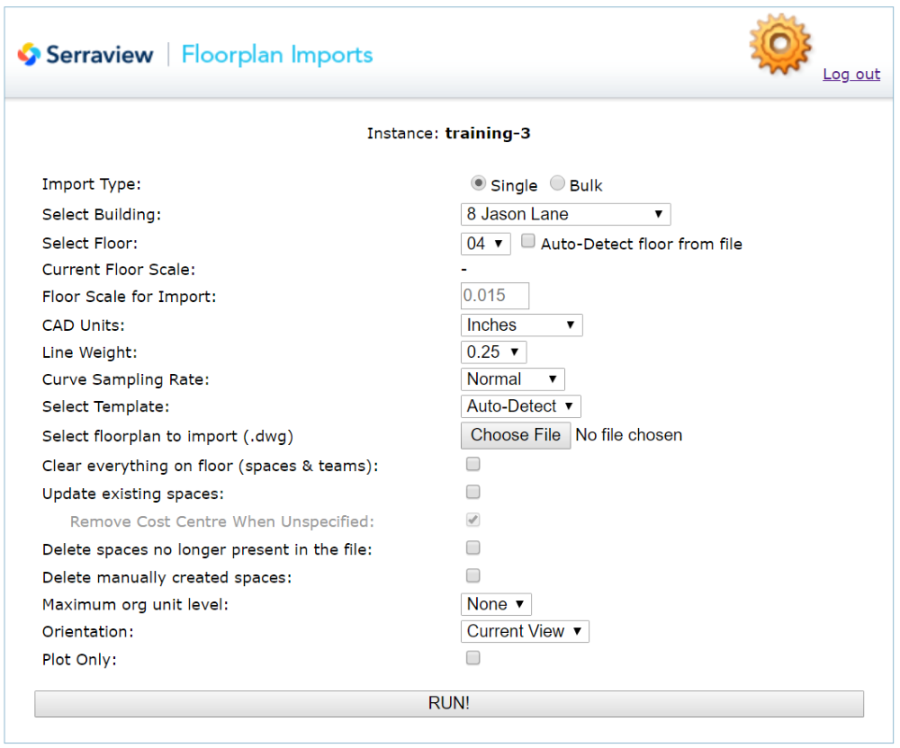
Floorplan Import Tool Options
Below details the options and for more detailed use cases.
|
Field |
Description |
|---|---|
|
Import Type |
From the option buttons, select Single. This will let you upload one floorplan. Bulk Upload If you want to import floorplans in bulk, then we recommend you use the File Upload and the category Automated Floorplan, then contact the Serraview Support team or Customer Success Manager (CSM) if you need this set up. |
|
Select Building |
From the building drop-down, select the building you want to update. |
|
Select Floor |
From the floor drop-down, select the floor you want to update or check the Auto-Detect floor from file. |
|
Floor Scale |
This controls how a floor will scale 1 pixel into the chosen unit of measurement. For example, setting the scale to 0.015 will scale 15 units of measurement into 1 pixel or setting it to 0.03 will scale 30 units of measurement into 1 pixel. Those are the two recommended types of scale measurement we use at Serraview. |
|
CAD Unit |
This shows the measurement units the CAD plan is scaled to. From the CAD Units drop-down, either select inches or millimeters. |
|
Line Weight |
This describes the visual clarity of a line. Depending on your preferences, select your desired line weight or use the pre-set weight. |
|
Templates |
This is used to select the desired floorplan importer schema, as some clients have more than one pre-configured in their Serraview instance. If you choose Auto-Detect this will automatically detect the first template in the schema. If this is not the case, select the number of the template you want to use. Select this option when there is only one template. If there are multiple templates in the schema, you will need to select the template which matches the Layers and Labels in the CAD. Contact the Serraview Support team if you require assistance. |
|
Select floorplan to import (.dwg) |
Click the Choose File button to navigate and select the CAD file. If you want to include a comment then add an underscore to the end of the filename. Everything after the comment will become a comment. The file format is: filename_comment.dwg For example: novemberfloorplan_Updated Floorplan.dwg Where Updated Floorplan is the comment. |
|
Clear everything on floor (spaces & teams) |
Optional - This check box will clear all spaces and allocate teams to the floor you are updating (if the floor already has existing data). If the floor has workpoints assigned to teams/people, selecting this option will remove those teams/people from the floor. |
|
Update existing spaces |
Optional - This check box will update the floor with the any new spaces that are present in the file that are not currently present. |
|
Delete spaces no longer present in the file |
Optional - This check box will delete spaces that are no longer present in the CAD file you have loaded. |
|
Delete manually created spaces |
Optional - The check box will delete any spaces that were manually mapped. |
|
Maximum org unit level |
Optional - If you need a maximum org unit level, then from the drop-down, select the org unit level. |
|
Orientation |
Optional - From the drop-down, select either Current View or World. |
|
Plot Only |
Optional - If you want to edit a background image (.gif) without changing the mapping at all, select Plot Only to just map the 'Plotting Layers'. |
Floorplan Importer Tool Usage
The following are ways you can use the Floorplan Importer Tool.