Add, Edit, Hide, or Delete a Floor
Administrators can add or update floors; if needed, a floor can be deleted.
Add a Floor
From the menu, click the Manage ![]() icon.
icon.
From the sub-menu, click Buildings/Floors. The Manage Building and Floor screen displays.
For the building you want to add the floor to, click the + Add Floor button to the far right.
The New Floor dialog displays.
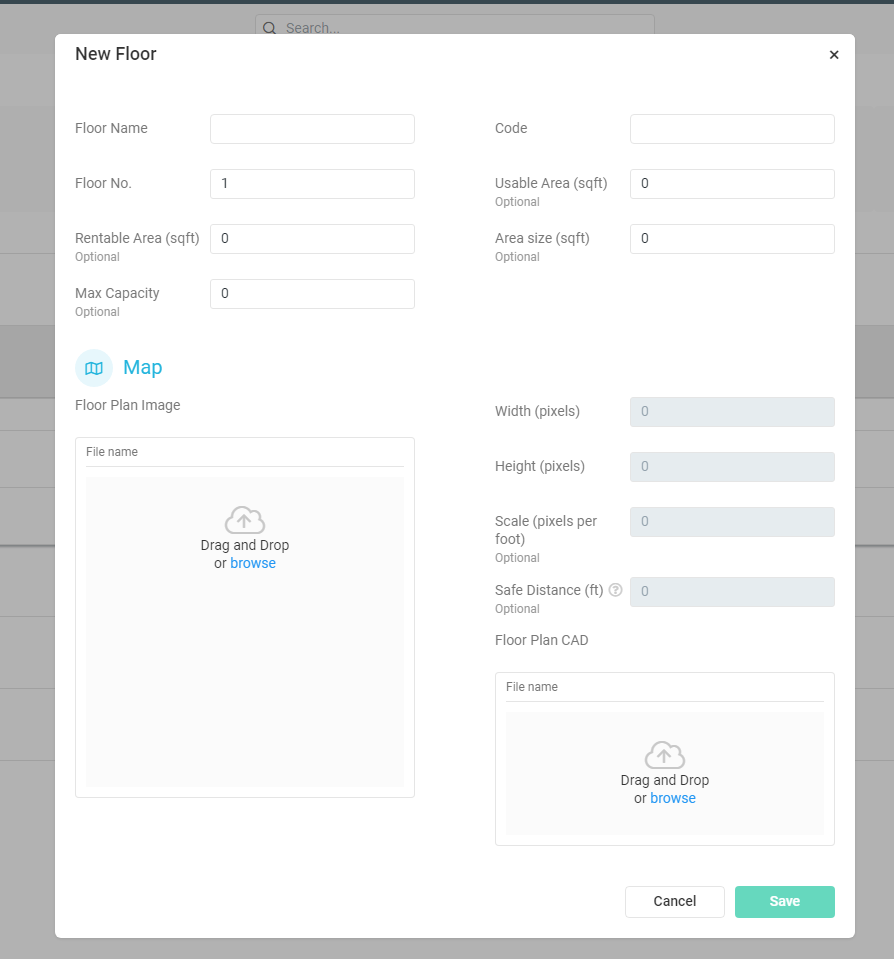
Complete the following to enter in the new floor's details:
Floor Details
- Floor Name (required) - The name of the Floor displayed under the Building profile in the Portfolio. Choose an easily identifiable floor name, such as the floor number (e.g., 1st Floor) or the most commonly used to describe that floor within the organization (e.g., Engineering Floor).
- Floor No. - The numerical story of the building on which the floor is located. The number listed here may be the same as used for the Code.
- Max Capacity - The highest number of people that the floor can support.
- Code (required) - An abbreviation of the floor number or name that appears in Space Codes on the floor map. Choose a short abbreviation to keep Space Codes concise (e.g., NY-12-25).
- Rentable Area - This total, rentable floor area will be used to calculate costs and other real estate reporting figures throughout the platform.
- Usable Area - The usable floor area is used to calculate square footage utilization.
- Area Size - The size of the floor area and this size will display on the Portfolio Details screen.
Map
- Floor Plan Image or Floor Plan CAD - You have a choice for the Floor Plan either you can upload a high-resolution floor plan image OR a floor plan CAD. For more details, see Add a Floorplan.
- Width, Height, Scale - These details are necessary to ensure your floor map space icons are properly aligned and scaled to your floor map image and CAD file.
- Safe Distancing - Manually set up the safe distancing around each space on your floor map. This ensures your employees maintain a recommended safe distancing spacing for health purposes. Before you start, check the safe distancing requirement from your local authority. See Set up Safe Distancing.
When you have finished, click the Save button to create the Floor.
Remember to ...
You’ll need to refresh the SpaceIQ browser to view this newly added floor profile in the Portfolio.
Edit a Floor
You can edit a floor, and complete the following:
- Expand the building that contains the floor you want to edit.
- Click the Floor Name. The floor dialog displays.
- Click the Edit
 icon to edit.
Go to Floor Plan
Now the floor is ready, you can head to the Floor Map area, and click the Go To Floor Plan ![]() icon.
icon.
If you click the icon and nothing happens, you need to refresh the browser to view the newly created floor.
Hide or Show a Floor
If you ever need to hide a floor, click the Hide floor ![]() icon. When a building or floor is hidden, it won't be visible in the Kiosk or in the SpaceIQ Mobile or Web app to user accounts with the permission of Viewers or IT.
icon. When a building or floor is hidden, it won't be visible in the Kiosk or in the SpaceIQ Mobile or Web app to user accounts with the permission of Viewers or IT.
If you hide every floor in a building, you'll also hide the building.
Delete a Floor
Remember, to delete a floor, you must remove all employees by unseating them.
- Expand the building that contains the floor you want to edit.
- Click the Floor Name. The floor dialog displays.
- Click the Delete icon to delete the floor.