Azure Integration
Customer IT / SpaceIQ Onboarding Team
This article describes how to configure the Azure integration for SpaceIQ.
Contents
- Prerequisites
- Integration Activities
- Step 1. Activate the Azure Integration in SpaceIQ
- Step 2. Create a new custom SpaceIQ app in Azure
- Step 3. Copy the SpaceIQ app Sign On Details
- Step 3.1 Copy and paste the SAML Identify Provider Issuer
- Step 3.2 Copy and paste the X.509 Certificate
- Step 3.3 Copy and paste SAML Redirect URL
- Step 3.4 Optional - Azure Portal URL
- Step 3.5 Activate the Azure Interaction
- Step 3.6 Copy and paste the SAML Identifier (Entity ID) URL and the SAML Callback Endpoint URL
- Step 4. Add Users and Groups
- Step 5. Set up Provisioning with the SCIM Bearer Token
- Step 6. Attribute Mappings from SpaceIQ to an Azure User Profile
- Step 7. Start Provisioning
- Troubleshooting Tips
- Additional Resources
Prerequisites
Before you configure SCIM-based provisioning for SpaceIQ, make sure you are familiar with SCIM-based authentication.
You will need Microsoft Azure admin privileges to complete this integration, and for the SpaceIQ setup, you must have a SpaceIQ Admin or an IT role.
If you are looking for SpaceIQ Sign-on with Office 365, you will need a paid subscription to Office 365 with Azure Active Directory.
Integration Activities
Step 1. Activate the Azure Integration in SpaceIQ
From the SpaceIQ application, complete the following steps:
- In the top-right corner, click on your Profile Name, and then click on Settings.

- From the left menu, click Integrations.
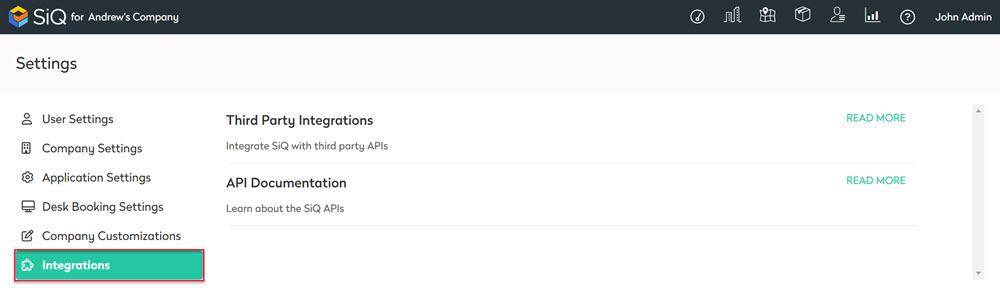
- From the Third Party Integrations area, click the READ MORE link.
The Integrations screen displays.
You can search for Azure in the Search field or navigate to Azure tile. To navigate, complete the following:
- From the left menu, click Provisioning & SSO.
- For Azure, click the Activate button.
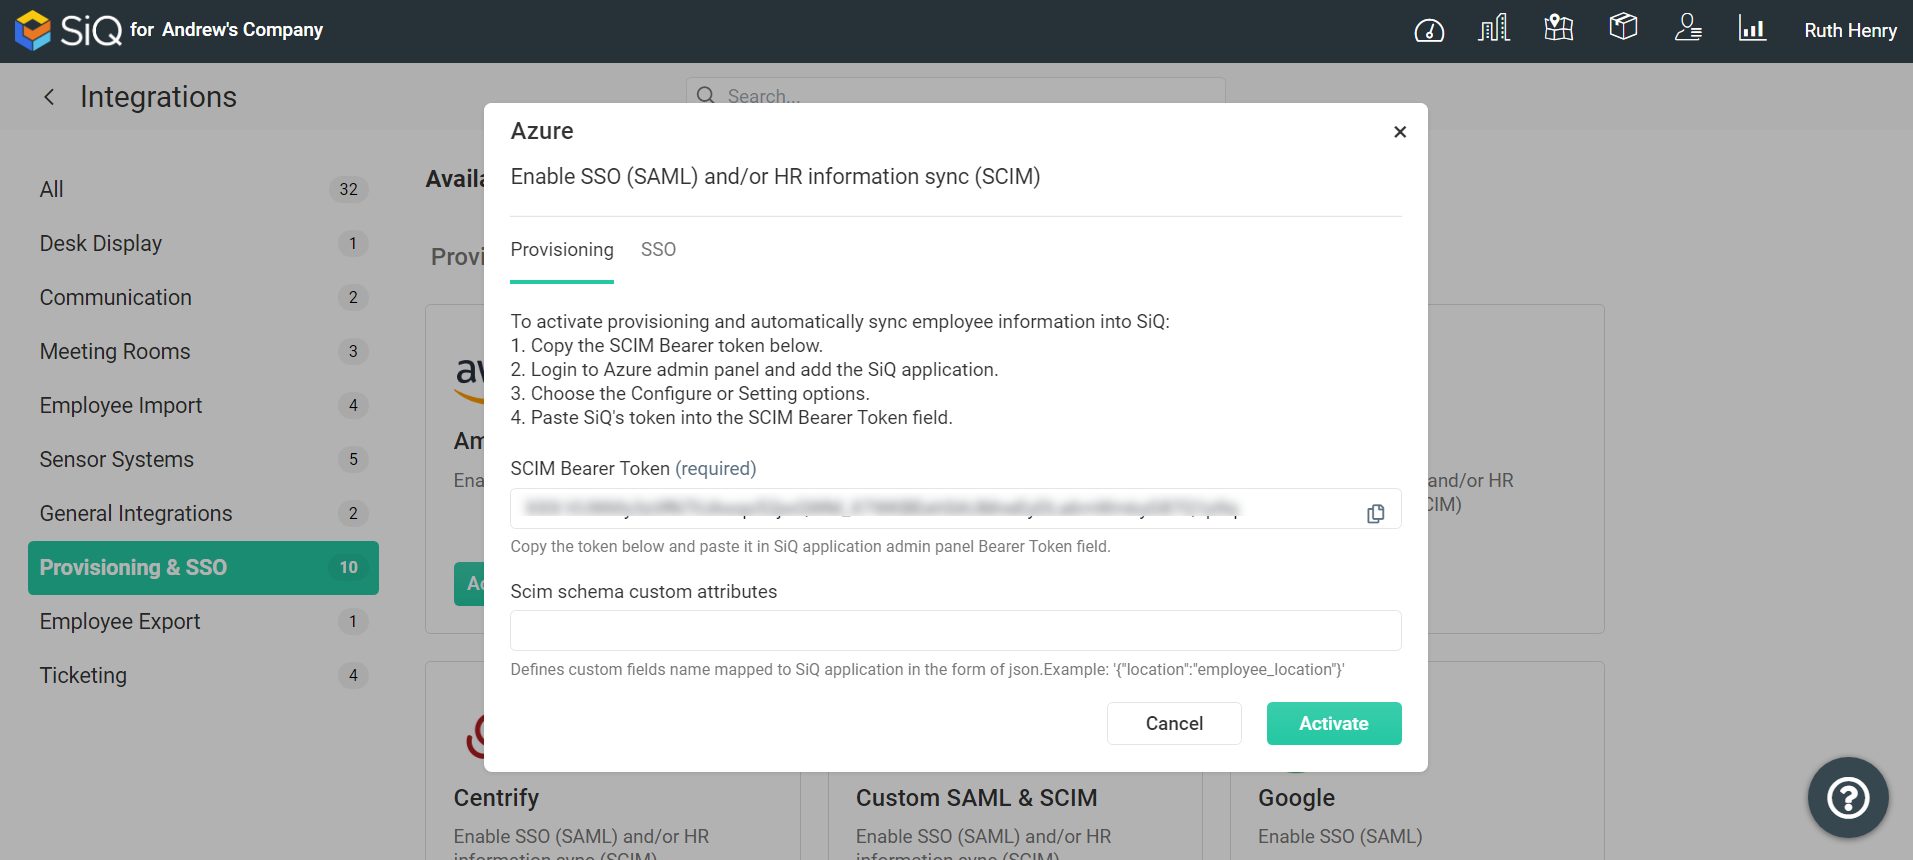
The Azure dialog displays a Provisioning tab and an SSO tab.
Provisioning Tab
This is where the SCIM Bearer Token is found; refer below for this setup.
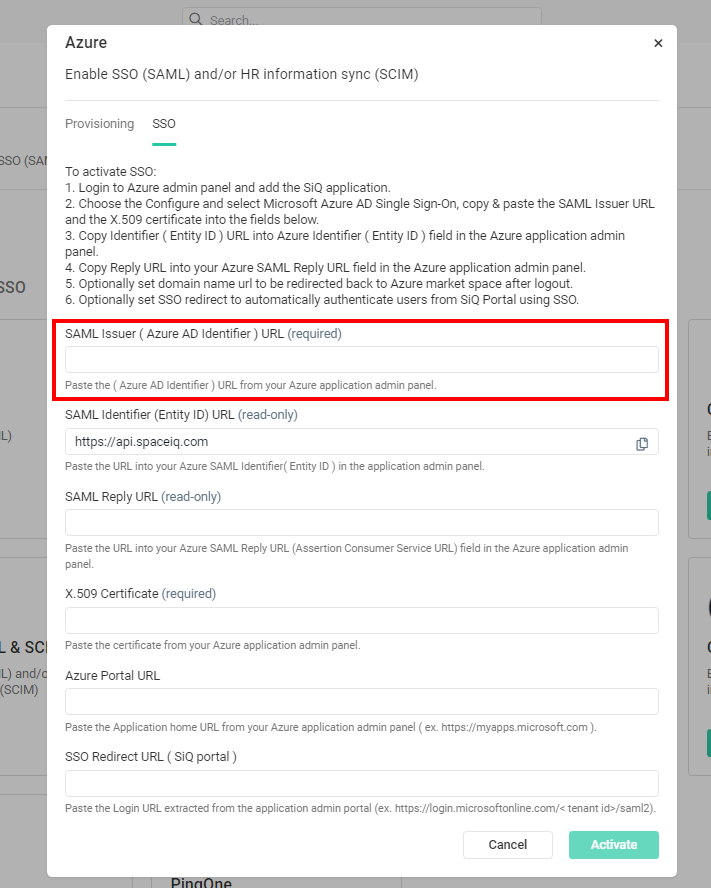
SSO Tab
This is where the SSO integration is set up; refer below for this setup.
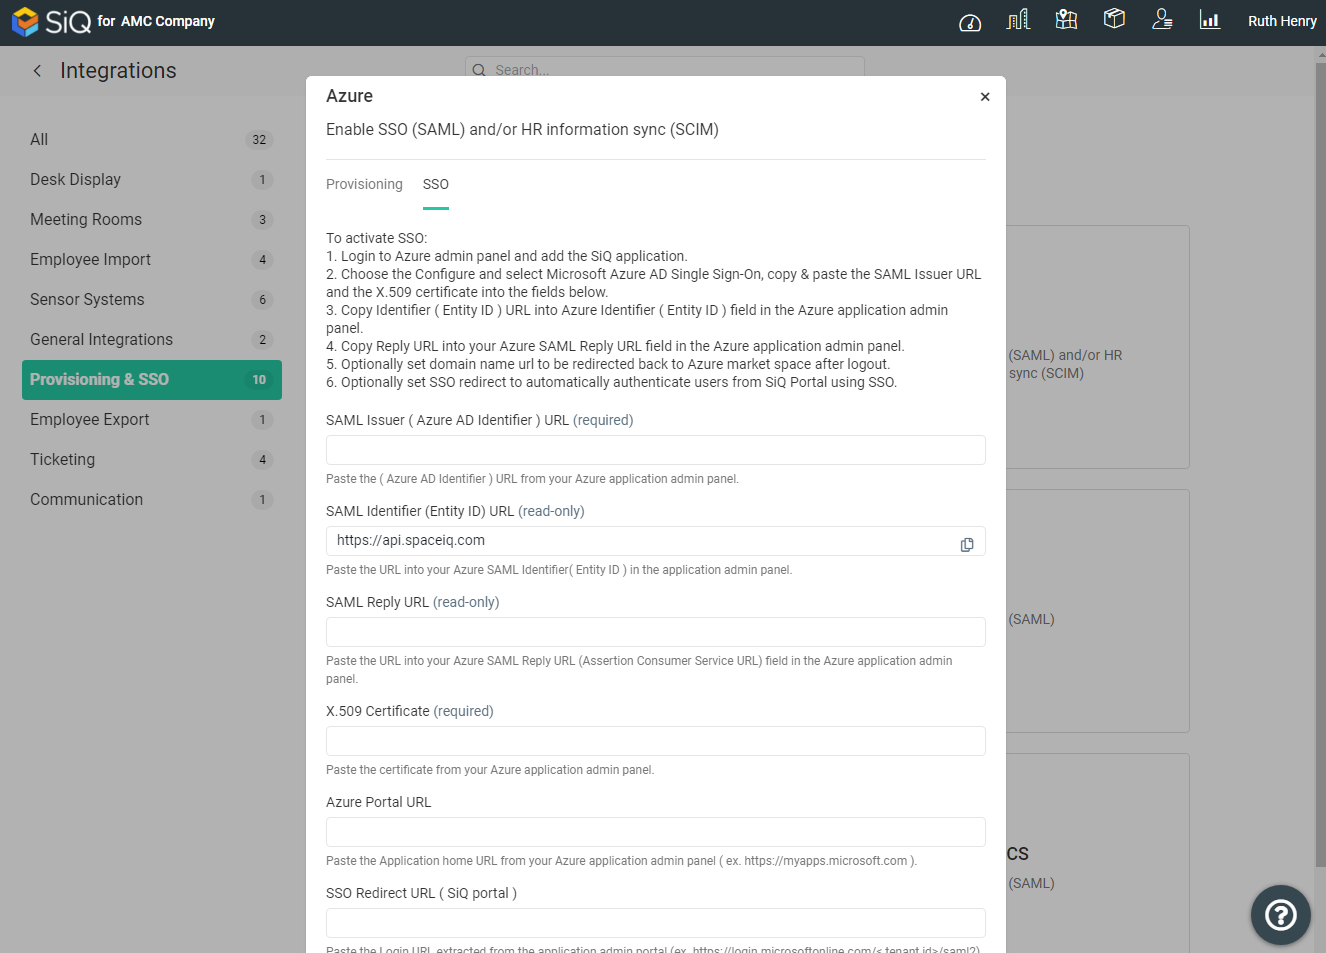
- In the SAML Issuer URL field, paste the Azure AD Identifier value copied from the Azure AD application configuration window.
- Copy the SAML CallBack Endpoint URL (read-only) value and paste the value in the Reply URL box in the Basic SAML Configuration section in the Azure portal.
- Copy the SAML Audience URI (read-only) value and paste the value in the Identifier box in the Basic SAML Configuration section in the Azure portal.
- In the X.509 Certificate field, paste in the copy from Azure. Download the certificate file in Notepad in Azure and copy the X.509 Certificate content.
- Click the Activate button.
Step 2. Create a new custom SpaceIQ app in Azure
In Azure, you will need to create a custom app (or a non-gallery app).
From Azure, complete the following:
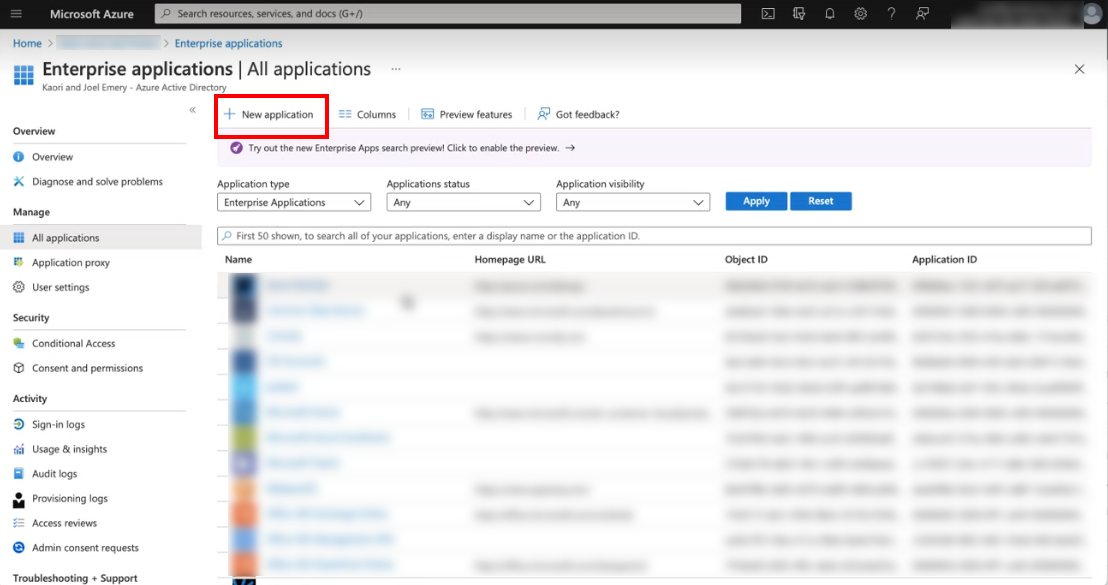
- Sign in to the Azure portal.
- Browse to Azure Active Directory > Enterprise Applications.
- Click the + New application button.
- Click the + Create your own application button.
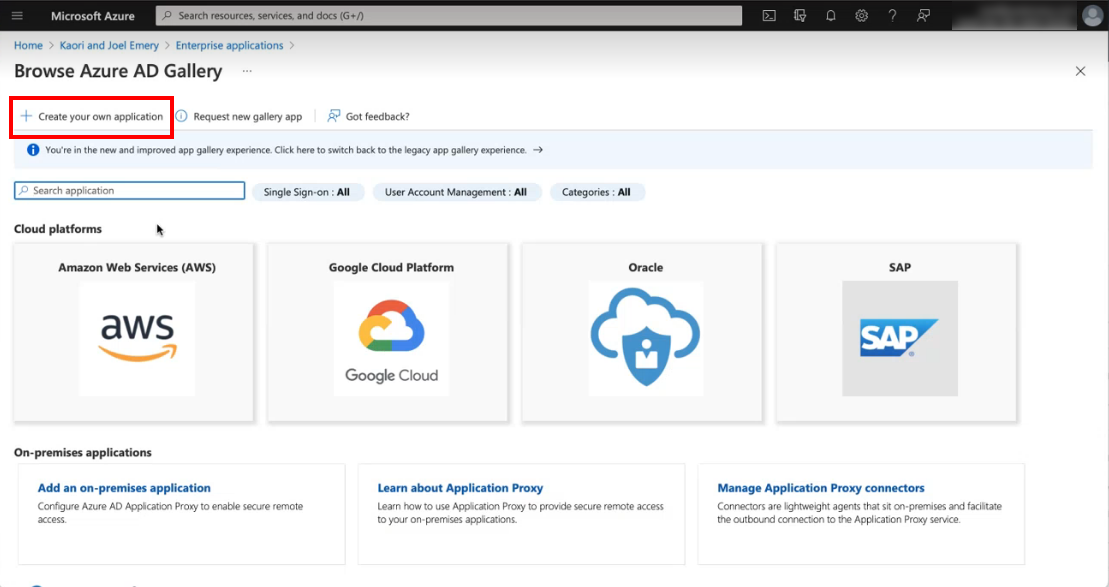
The Create your own application screen displays.
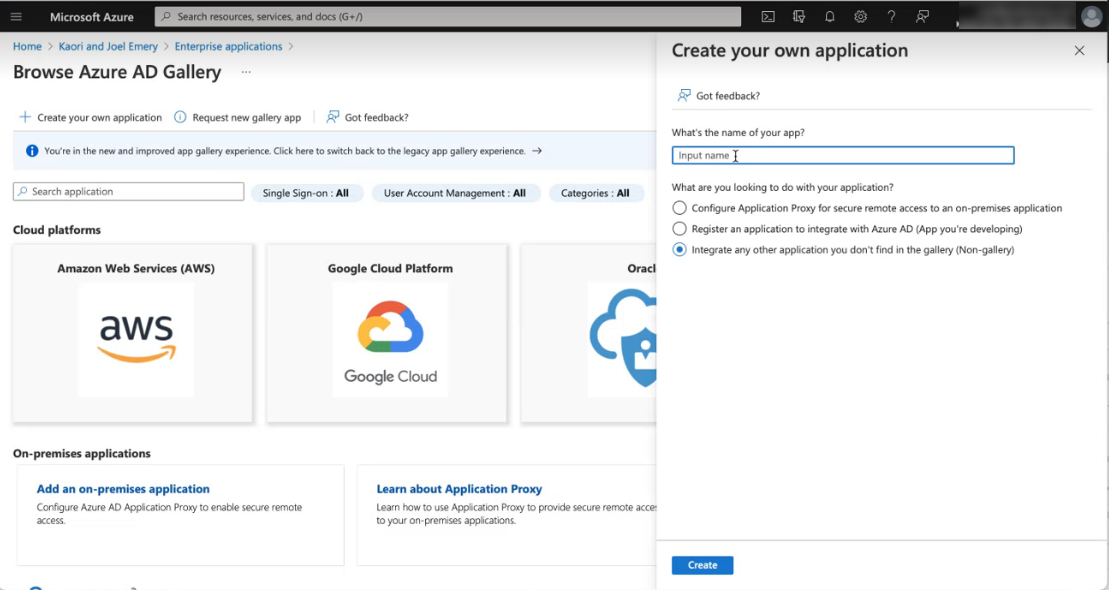
- In the What's the name of your app? field, enter the name. For example, SpaceIQ or SpaceIQ4.
- Click the Create button.
The custom SpaceIQ app is created.
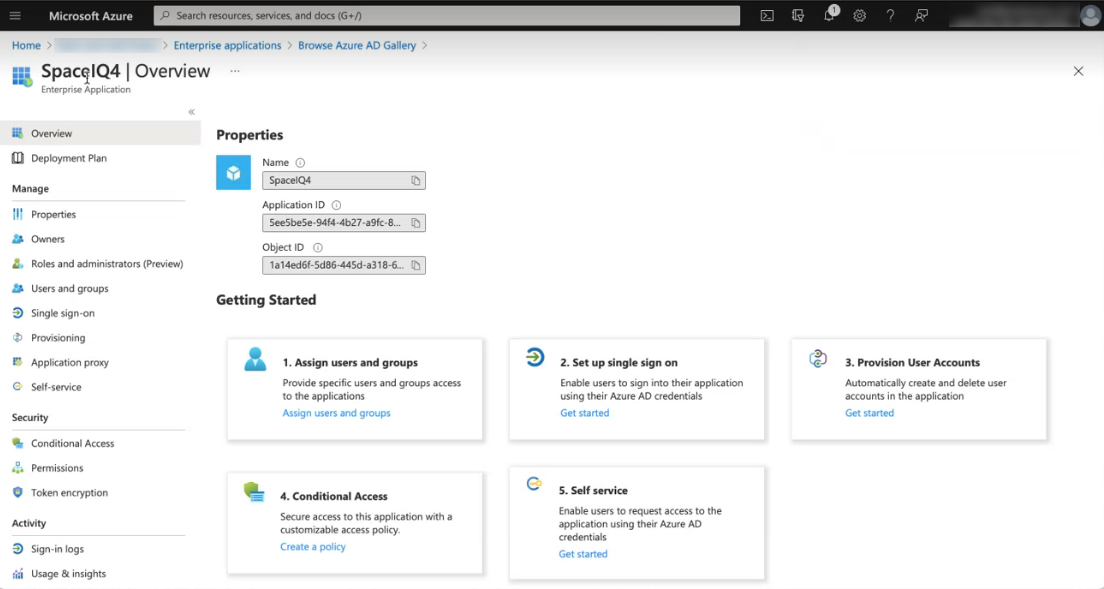
Step 3. Copy the SpaceIQ app Sign On Details
From Azure's SpaceIQ app, you will need to copy the Sign On details from Azure into your SpaceIQ Web App.
- From the screen above, click the 2. Set up single sign on tile.
The Single Sign On screen displays.
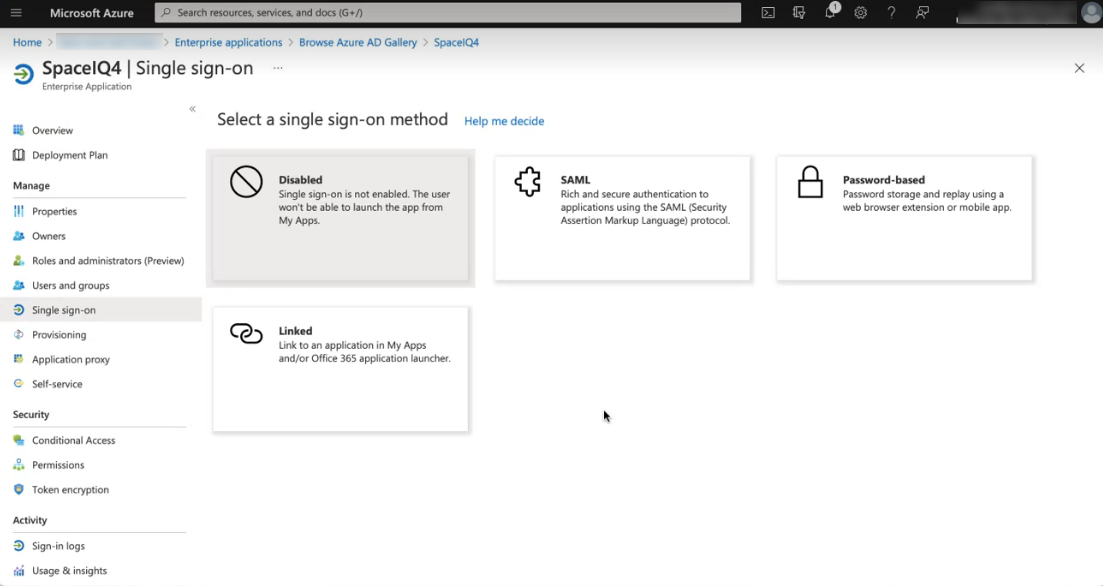
- Click the SAML tile.
The SAML based sign-on screen displays.
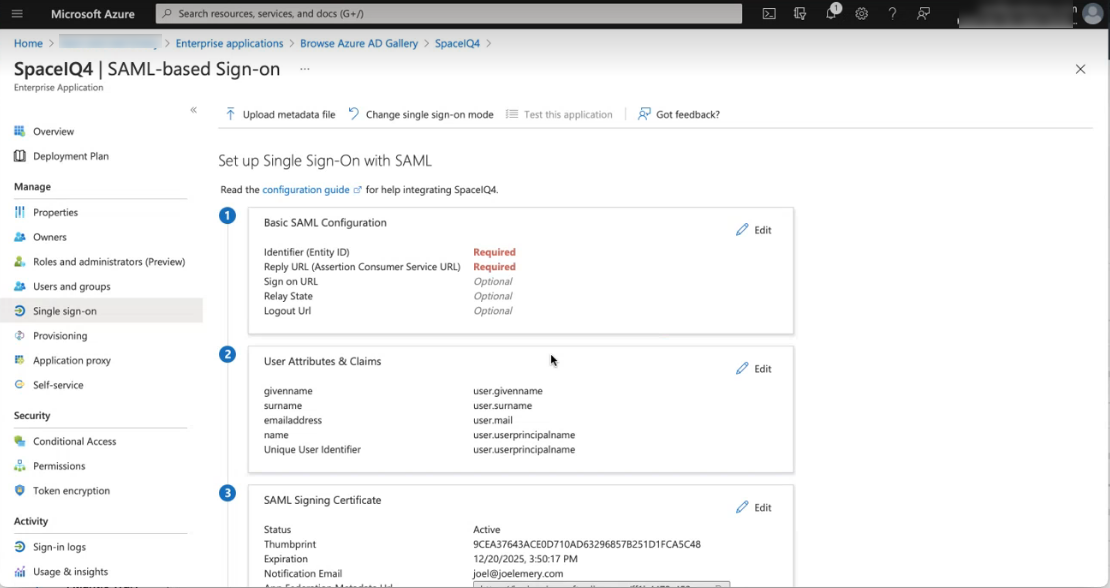
Step 3.1 Copy and paste the SAML Identify Provider Issuer
- Scroll to the SAML Signing Certificate area.
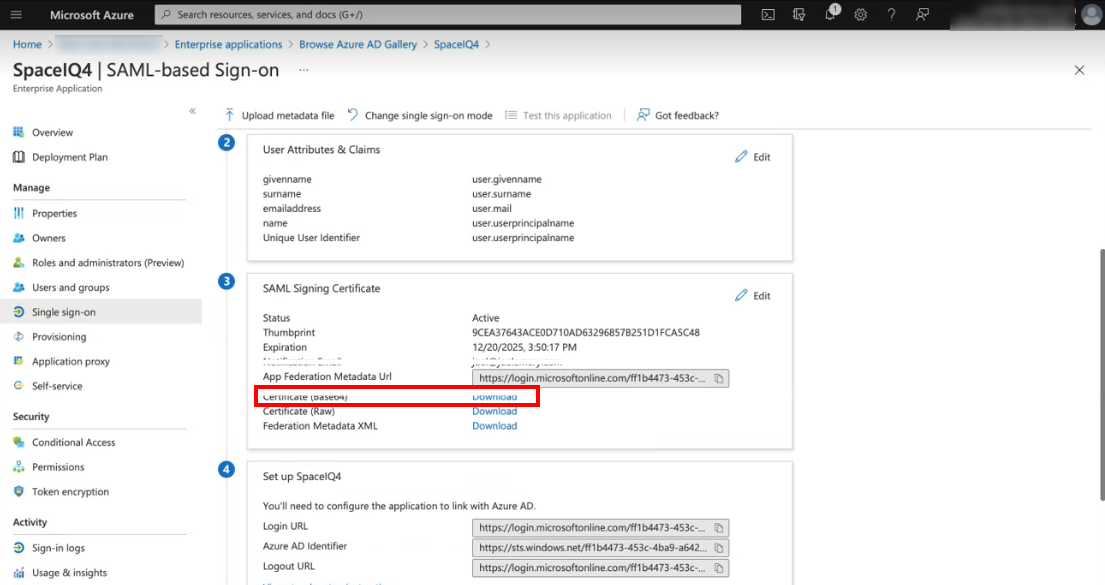
- For the Certificate (Base64), click the Download link to download the certificate.
- Open the Certificate (Basse64) and then copy it.
- In a new browser tab, paste in the App Federation Metadata Url. Note: You can paste this into a text or code editor.
Return to your SpaceIQ Web App and complete the following:
- From the SSO tab, in the SAML Identify Provider Issuer field, paste in the certificate.
Step 3.2 Copy and paste the X.509 Certificate
Return the XML file and complete the following:
- Highlight and copy the X509Certificate.
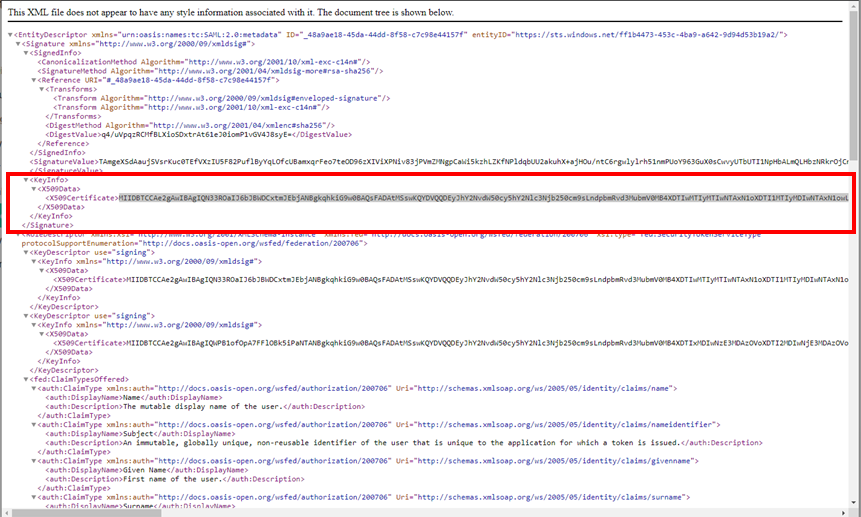
In the SpaceIQ Web App, complete the following:
- In the X.509 Certificate field, paste in the certificate.

Step 3.3 Copy and paste SAML Redirect URL
Return the XML file and complete the following:
- Scroll to the end of the file to find the SingleLogoutService Binding.
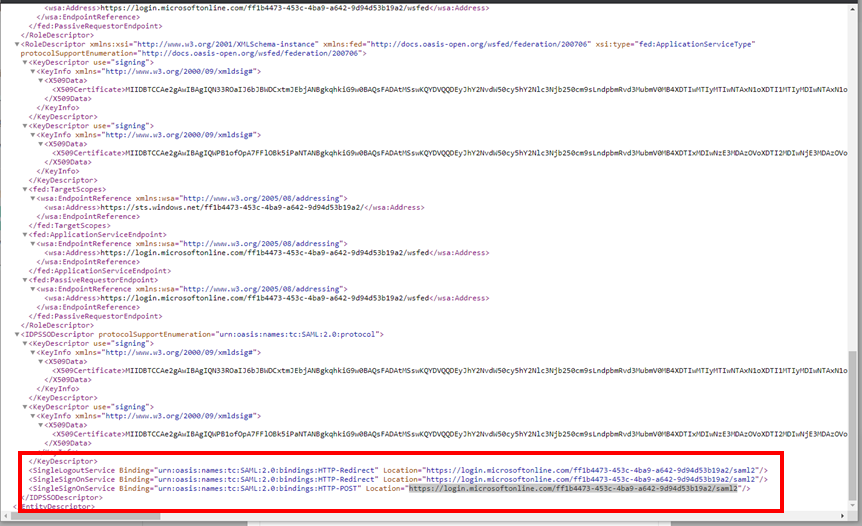
- Highlight and copy the HTTP-POST entry.
Return to your SpaceIQ Web App and complete the following:
- From the SSO tab, in the SSO Redirect URL (SiQ Portal) field, paste in the HTTP-POST entry.
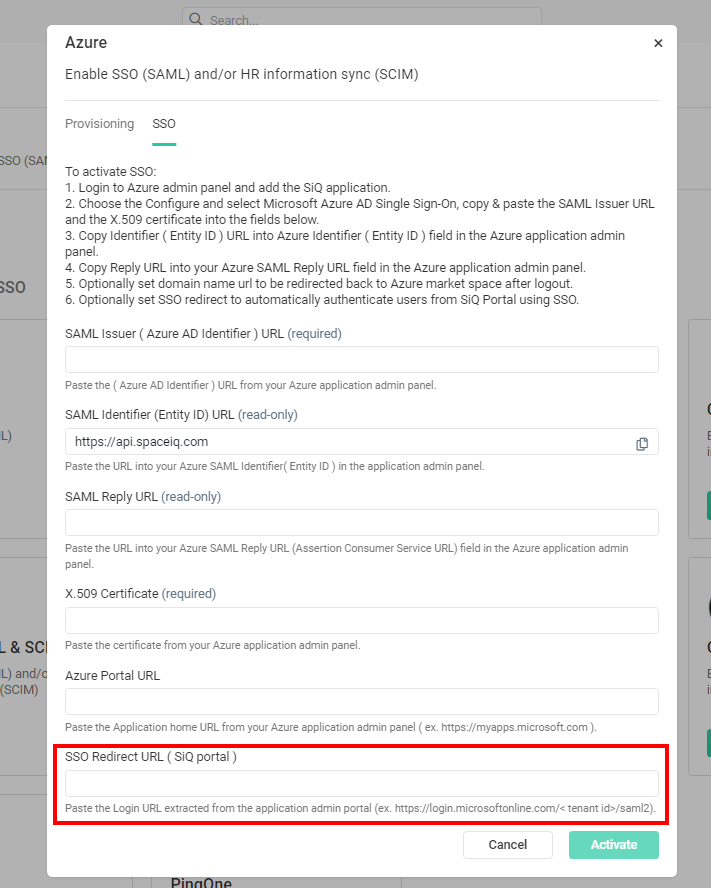
Step 3.4 Optional - Azure Portal URL
- In the Azure Portal URL field, enter the https//myapps.microsoft.com.

Step 3.5 Activate the Azure Interaction
- Click the Activate button.
The Azure Integration displays in the active integrations list.
Step 3.6 Copy and paste the SAML Identifier (Entity ID) URL and the SAML Callback Endpoint URL
- Click the Azure Integration. The Azure dialog displays.
- Click the SSO tab.
The SAML Callback Endpoint URL is now generated.
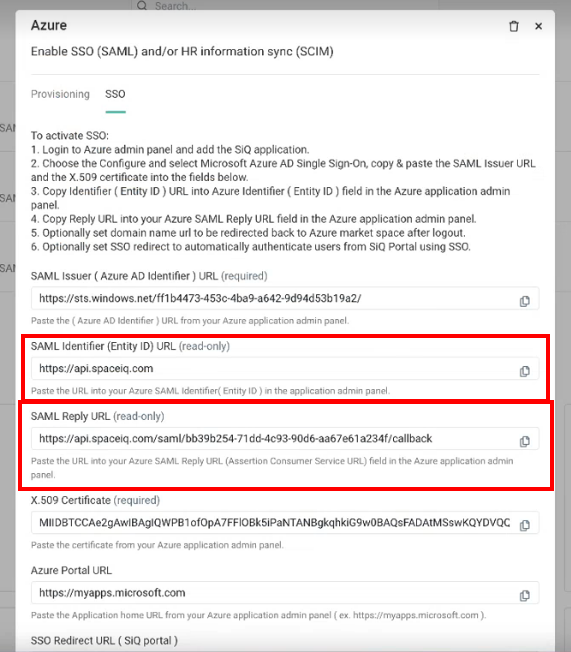
- For the SAML Identifier (Entity ID) URL field, click the Copy
 icon.
icon. - For the SAML Reply URL, click the Copy icon.
Return to Azure.
- Navigate to the SAML Single-On with SAML screen.
- From the Basic SAML Configuration area, click the Edit button.
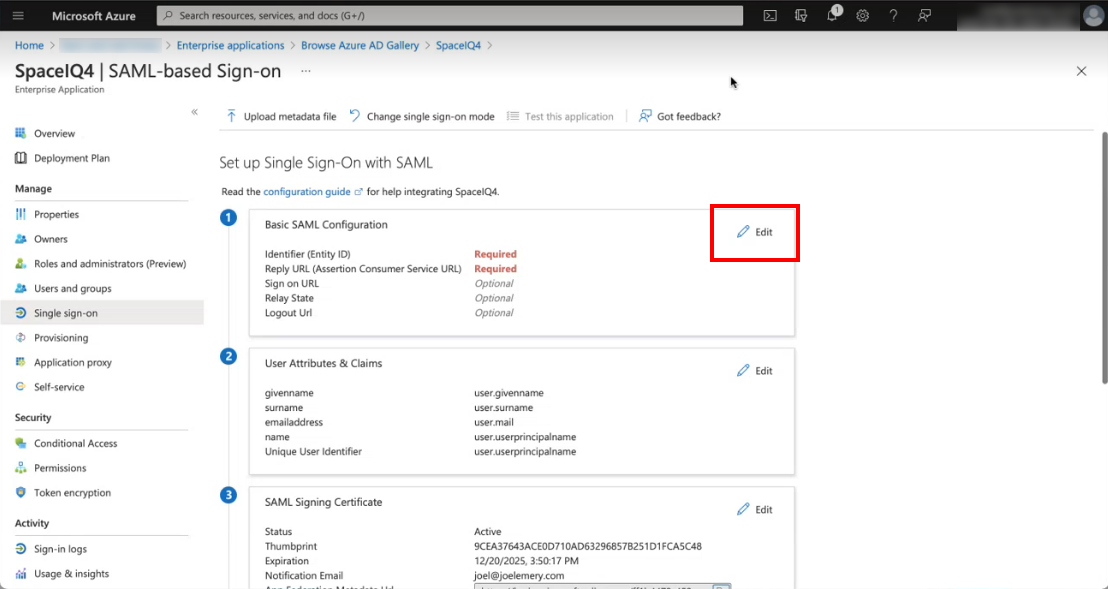
The Basic SAML Configuration form displays.
- In the Identifier (Entity ID) field, paste in the SAML Identifier (Entity ID) URL and then check the Default check box to set this as the default.
- Paste in the SAML Reply URL in the Reply URL (Assertion Consumer Service URL) field.
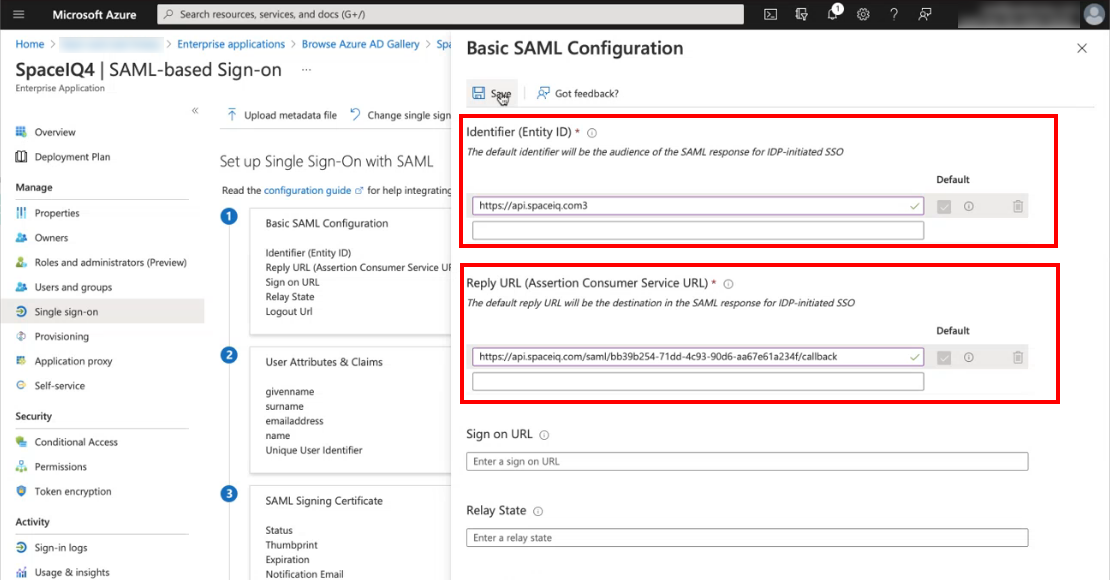
- Click the Save button.
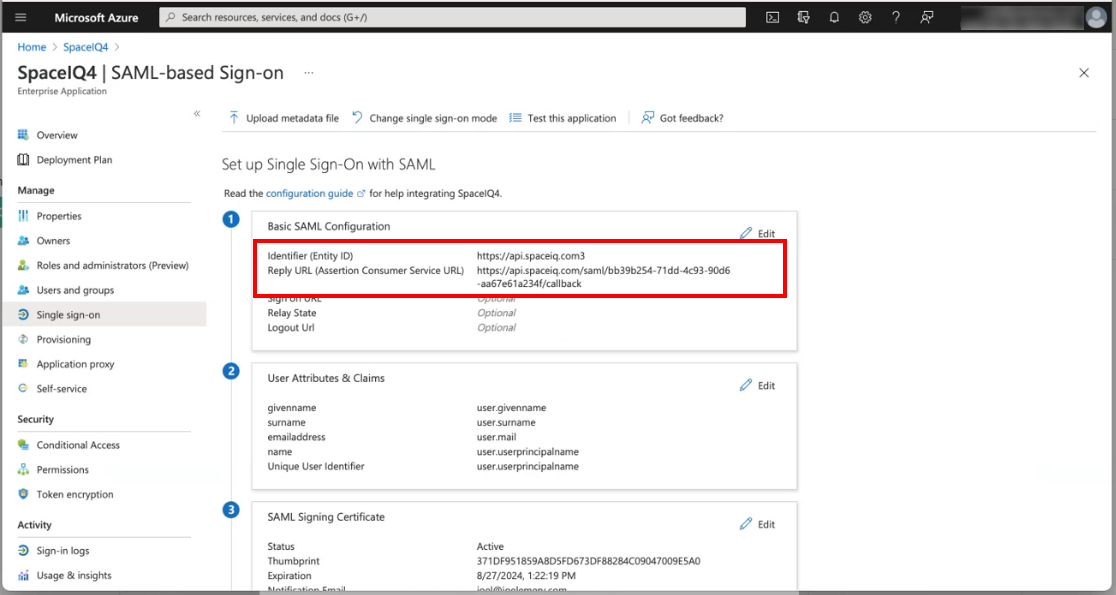
When saved, the following fields will be populated.
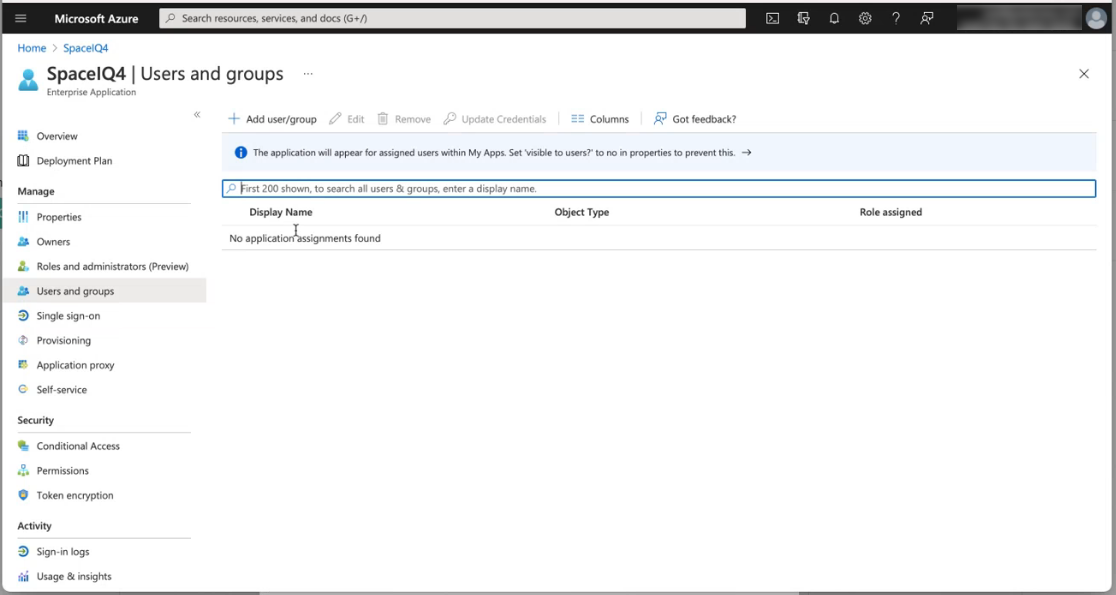
Step 4. Add Users and Groups
- From the left menu, click Users and groups.
- From this area, add your users and groups.
Refer to Microsoft Azure's official documentation to learn how to add users and groups.
Step 5. Set up Provisioning with the SCIM Bearer Token
- From the left menu, click Provisioning.
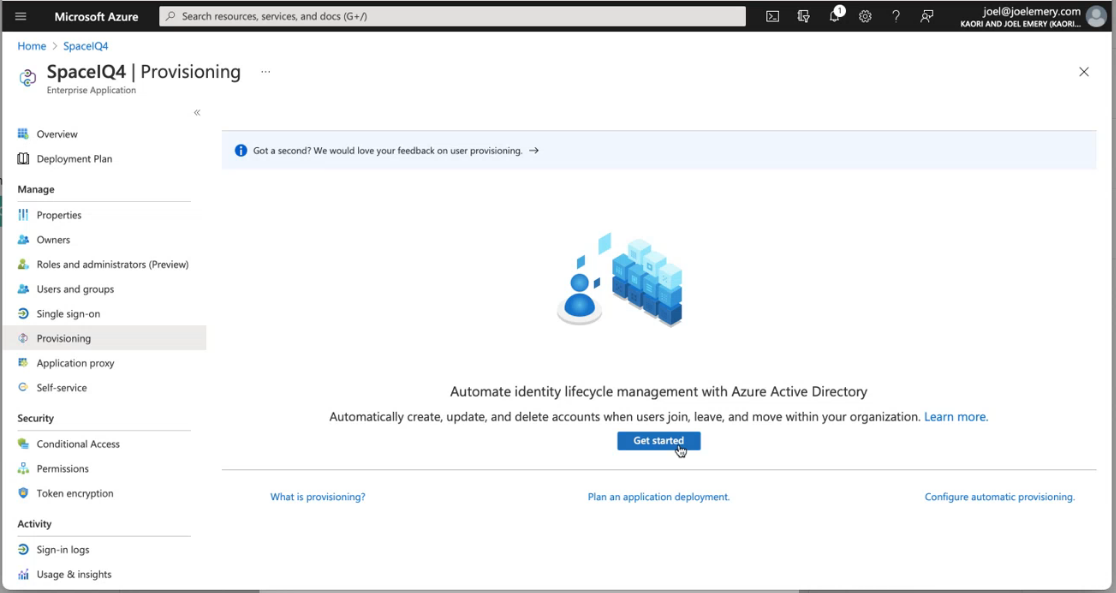
- Click the Get started button.
The Provisioning screen displays.
- From the Provisioning Mode drop-down, select Automatic.
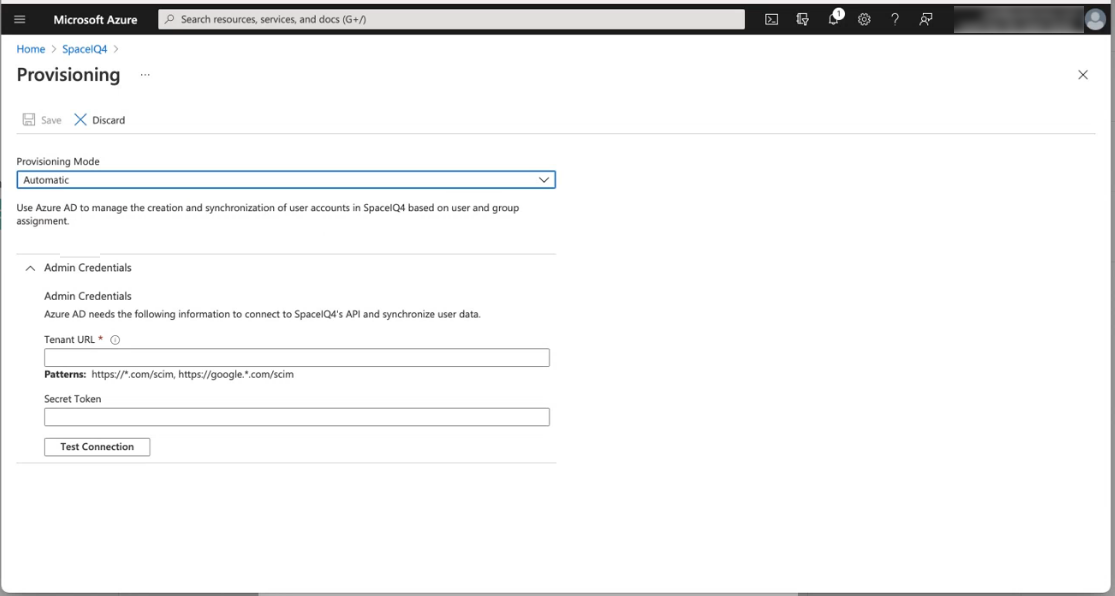
- In the Tenant URL field, enter the URL of the application's SCIM endpoint: https://api.spaceiq.com/scim
Return to the SpaceIQ Web App and complete the following:
- Click the active Azure integration. The Azure dialog displays.
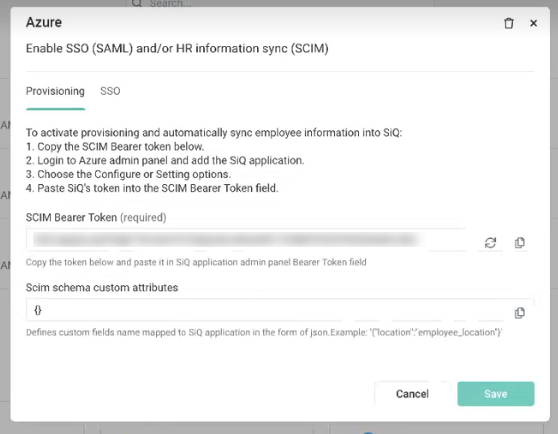
- For the SCIM Bearer Token click the Generate Token
 icon to generate the token.
 - Click the Save button.
- Click the active Azure integration.
- For the SCIM Bearer Token, click the Copy icon to copy the token and past it to a secure temporary location as you will use this to configure Azure's SiQ instance.
Return to Azure.
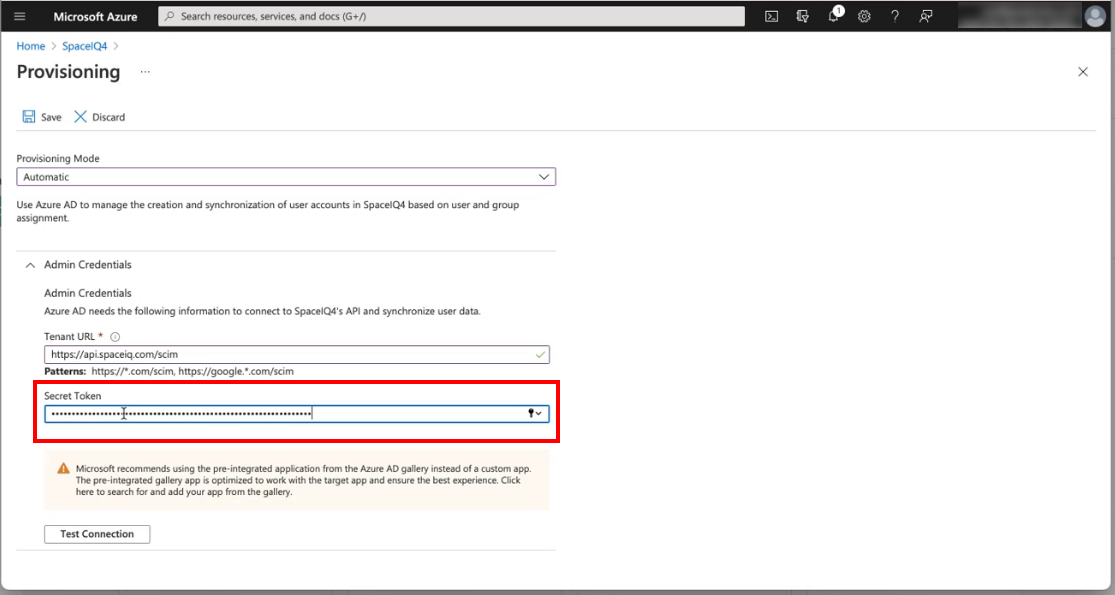
- Click the Test Connection button to have Azure Active Directory attempt to connect to the SCIM endpoint. If the attempts fail, the error information will display. Save this information for further troubleshooting.
- If the attempts to connect to the application succeed, click Save to save the admin credentials.
Step 6. Attribute Mappings from SpaceIQ to an Azure User Profile
From Azure, complete the following:
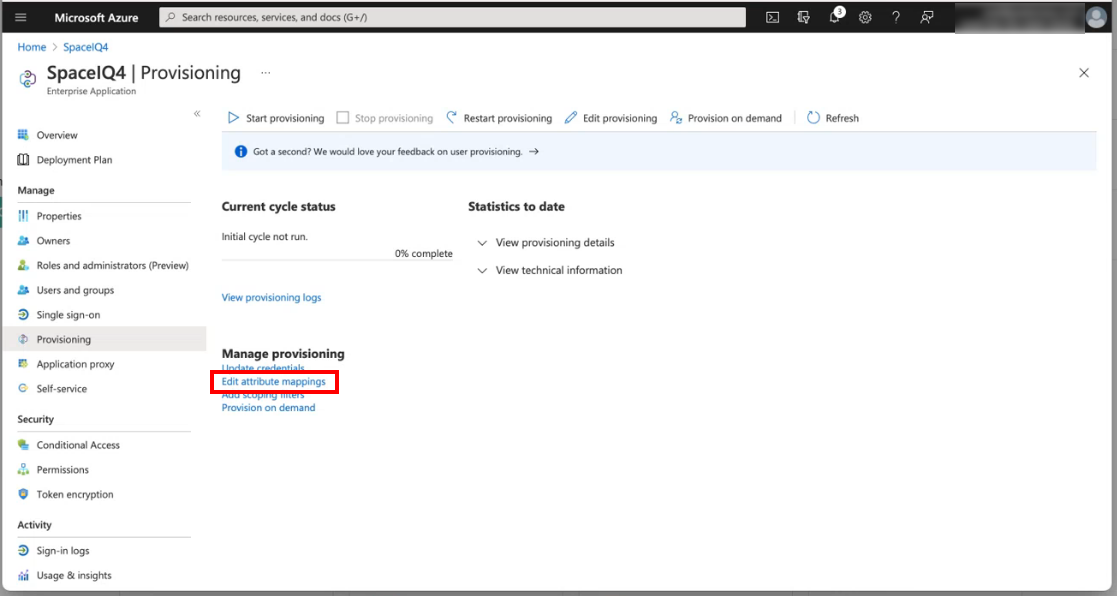
- From the left menu, click Provisioning. The Provisioning screen displays.
- Click the Edit attribute mappings.
- Click the Mappings drop-down.
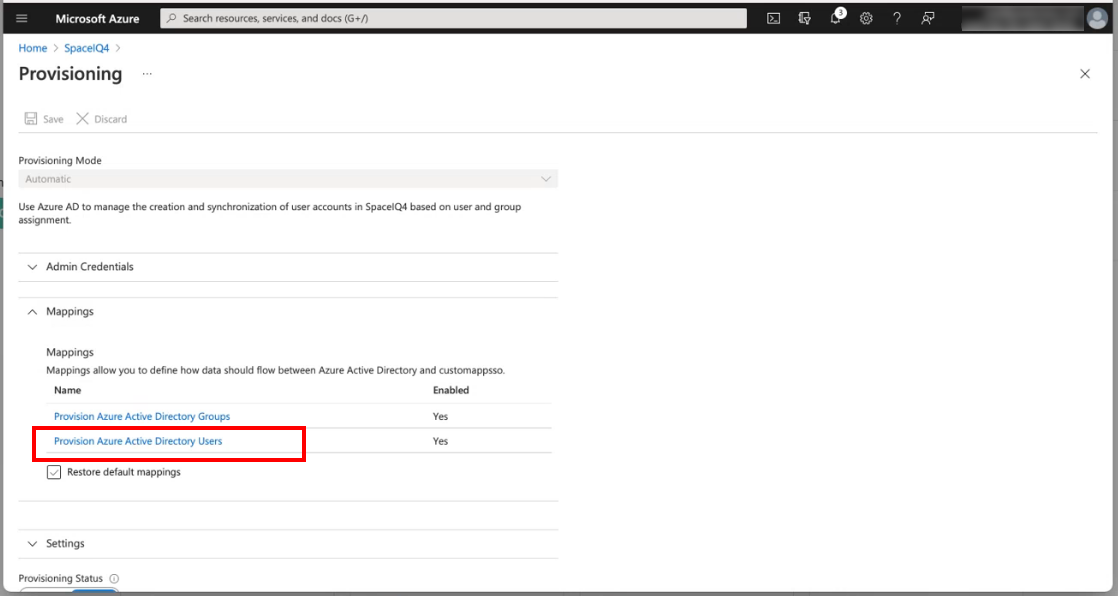
- Click the Provision Azure Active Directory Users.
The Attribute Mapping screen displays.
The Target Object Actions check boxes for Create, Update, and Delete must remain checked as this pushes JSON data to SpaceIQ.
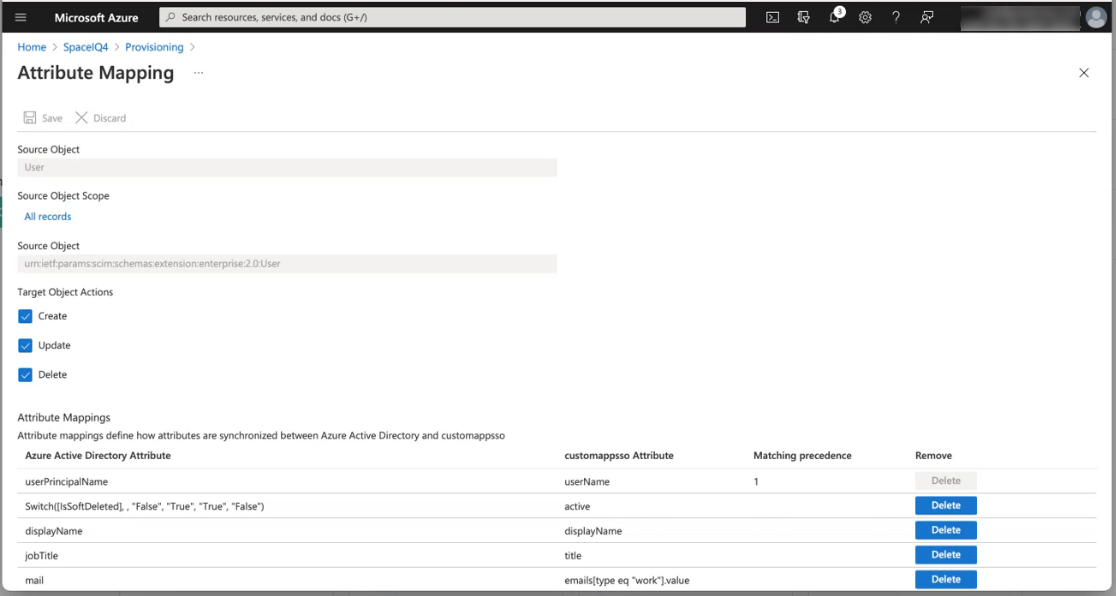
- Scroll down to see the attribute mapping. This displays the attribute mapping defaults.
The columns consist of:
- Azure Active Directory Attribute
- Custom App SSO Attribute
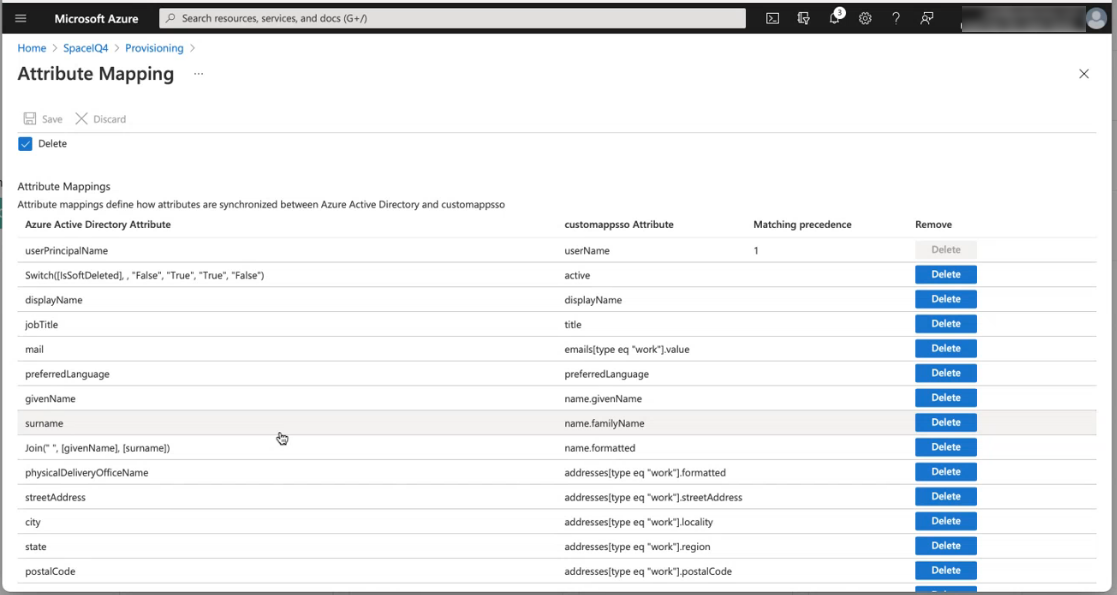
As shown in the Azure Mapping Editor, the base profile Azure imports from SpaceIQ consists of 20+ attributes. Some of these attributes are mapped to the Azure user profile by default.
Custom Attributes
Azure's SpaceIQ application has been enhanced to support user-defined custom attributes, which enables Azure to import more than 20 attributes to SiQ.
These attributes must be created and mapped in Azure and then define the Custom Field Name mappings in the SpaceIQ app. The recommended mappings from SpaceIQ to Azure are preconfigured in SpaceIQ's based profile. See Azure Custom Attribute Mapping.
Step 7. Start Provisioning
When your configuration is complete, then:
- Navigate to the Provisioning screen and click the Start provisioning button.
- Click Save to start the Azure Active Directory provisioning service.
Troubleshooting
User and Department Data
- Users without First Name and/or Last Name in their SpaceIQ profiles cannot be imported to Azure as new users.
- Azure users without Departments cannot be imported to SpaceIQ as new users.
- In the event that a department also has teams (sub-departments), SpaceIQ expects. Organizations/Divisions that contain top-level organization and departments also contain a Team name
Example: Organization: Engineering with Department: QA
Additional Resources
Additional instruction details can be found in Microsoft's Azure Help Center.