Custom SAML & SCIM Integration
Customer IT / SpaceIQ Onboarding Team
SpaceIQ offers several Third-party Integration Applications, allowing customers to seamlessly integrate employee provisioning and authentication via industry standards SAML (SSO) and SCIM protocols.
While many of the leading Third-party Providers have already been pre-integrated with the SpaceIQ Web app, other vendors have not yet formally integrated platforms.
The Custom SAML and SCIM integration allows providers without a pre-integration process to integrate through SAML and SCIM into SpaceIQ as long as their specific vendor’s platform supports a common “custom integration” feature.
The following provisioning features are supported:
- Single Sign-On via SAML
- Push New Users (SCIM 2.0)
- New users created through Custom IDP will also be created in the SpaceIQ application.
- Push Profile Updates (SCIM 2.0)
- Updates made to the users’ profile through Custom IDP will be pushed to the SpaceIQ application.
- Push User Deactivation (SCIM 2.0)
- Deactivating or disabling the user's access to the application through Custom IDP will delete the user from the SpaceIQ application. Note: For this application, deactivating a user means removing all of the user's data and removing the user's account.
This article describes how to configure the Custom SAML & SCIM integration for SpaceIQ.
Contents
- Prerequisites
- Integration Activities
- Step 1. Activate Provisioning & SSO in SpaceIQ
- Step 2. Add a new SpaceIQ app into Third-party Provider
Prerequisites
Before you configure SCIM-based provisioning for SpaceIQ, make sure you are familiar with SCIM-based authentication.
You will need the Third-party Provider's admin privileges to complete this integration, and for the SpaceIQ setup, you must have a SpaceIQ Admin or an IT role.
Integration Activities
Step 1. Activate Provisioning & SSO in SpaceIQ
From the SpaceIQ application, complete the following steps:
- In the top-right corner, click on your Profile Name, and then click on Settings.

- From the left menu, click Integrations.
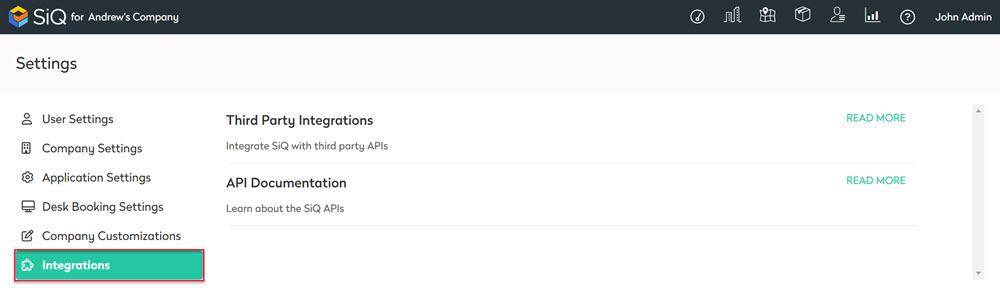
- From the Third Party Integrations area, click the READ MORE link.
The Integrations screen displays.
You can search for Custom SAML & SCIM in the Search field or navigate to Custom SAML & SCIM tile. To navigate, complete the following:
- From the left menu, click Provisioning & SSO.
- For Custom SAML & SCIM, click the Activate button.
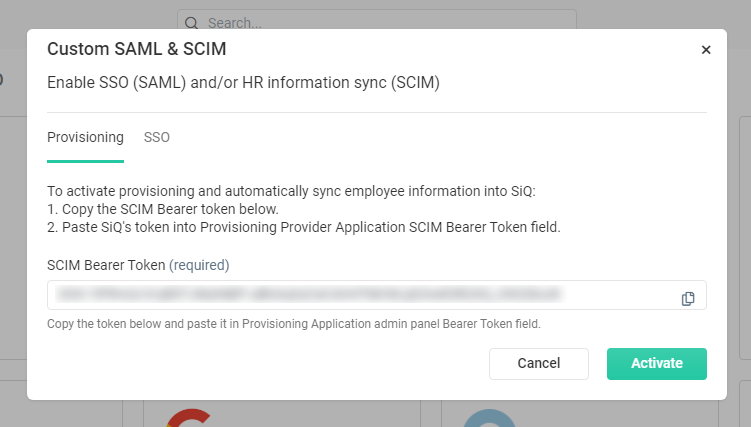
The Custom SAML & SCIM dialog displays and it contains a Provisioning tab and an SSO tab.
Provisioning Tab
This is where the SCIM Bearer Token is found.
SSO Tab
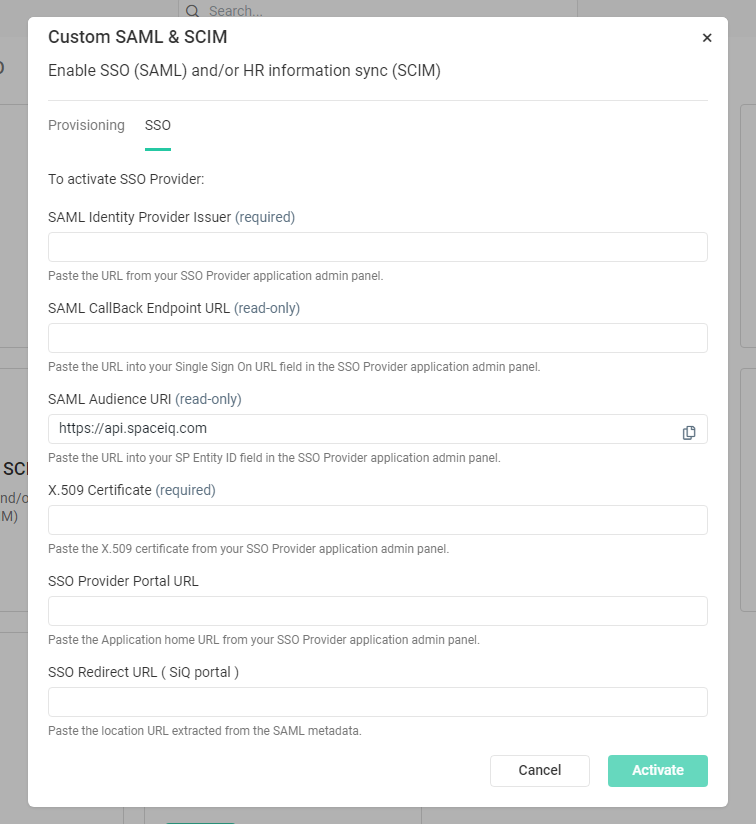
From the SSO tab, complete the following:
- In the SAML Identity Provider Issuer URL field, paste the Issuer URL copied from the Third-Party Provider.
- In the X.509 Certificate field, paste the certificate you downloaded from the Third-Party Provider.
- Click the Activate button.
- Click the active Custom SAML & SCIM. The Custom SAML & SCIM dialog displays the following details the can be copied into your Third-part SSO Provider Admin Console.
- Copy SAML CallBack Endpoint URL and paste it into Single Sign On URL field in the Third-party SSO Provider Admin Console.
- Copy SAML Audience URL and paste it into SP Entity ID field in the Third-party SSO Provider Admin Console.
- Optional - In the SSO Provider Portal URL field, enter the Application home URL to be redirected back to SSO Provider market space after logout.
- Optional - In the SSO Redirect URL (SiQ Portal) field, enter the SSO redirect to authenticate users from the SpaceIQ Portal using SSO automatically.
- To save any details, click the Activate button.
Step 2. Enable the Provisioning in Third-party Provider
Return to the SpaceIQ Web App and complete the following:
- Click the active Custom SAML & SCIM. The Custom SAML & SCIM dialog displays.
- From the SCIM Bearer Token field, click the Copy
 icon.
icon.
From the Third-party Provider, complete the following:
- Enable the automatic provisioning by following the IdP (Identity Provider) documentation.
- Add the SCIM Bearer Token.
Troubleshooting Tips
Users without a First Name, Last Name, or Department in their SpaceIQ profiles cannot be imported as new users.
If a department also has teams (sub-departments), SpaceIQ expects Organizations/Divisions that contain top-level organization and department details also contain the Team Name. For example:
| Organization: Engineering with Department: QA |
More details about:
- SpaceIQ attribute mapping refers to Employee Attribute Mapping.
- SCIM Schema, refer to System for Cross-domain Identity Management: Core Schema.