Google Integration
Customer IT / SpaceIQ Onboarding Team
SpaceIQ supports integration with the Google identity management system. This details how to configure the Google integration.
It is not possible to import (or pull) new users or profile updates from within SpaceIQ. The information must be pushed from Google.
Contents
Prerequisites
- You will need Google with super administration privileges to complete this integration and for the SpaceIQ setup, you must have a SpaceIQQ Admin or an IT role.
The steps for Google in this document are based on the official documentation from Google, found within this URL
Set up SSO using SAML for SpaceIQ
This section describes how to set up SSO using SAML (Security Assertion Markup Language) (SAML), so your users can use their Google Cloud credentials to sign in to SpaceIQ app.
Step 1. Find the Google Identity Provider (IdP) information
From the Google Admin Console, complete the following:
- Sign in to admin.google.com as an Administrator.
- From the Admin console Home page, navigate to Apps > Web and mobile apps.
- Click the Add app > Search for apps.
- In the Search field, enter SiQ.
- In the search results, hover over the SiQ SAML app and click Select.
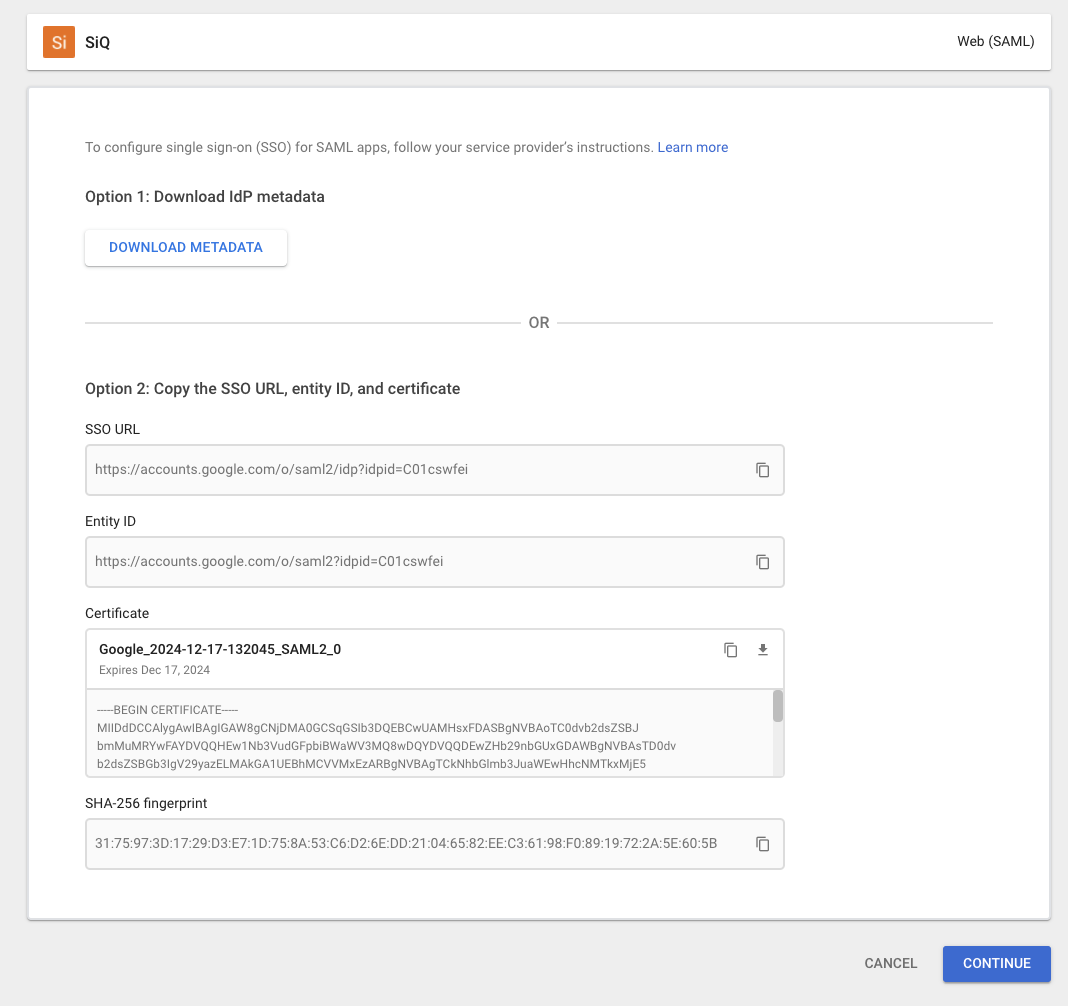
From the Google Identity Provider details screen:
- Copy the Entity ID from Google and then paste this into SAML Single Sign-on URL field in SiQ.
- Copy the SSO URL field from Google and then paste this into SSO Redirect URL field in SiQ.
- Download the Certificate.
Leave the Admin console open.
Step 2. Activate the Google Integration in SpaceIQ
From the SpaceIQ application, complete the following steps:
- In the top-right corner, click on your Profile Name, and then click on Settings.

- From the left menu, click Integrations.
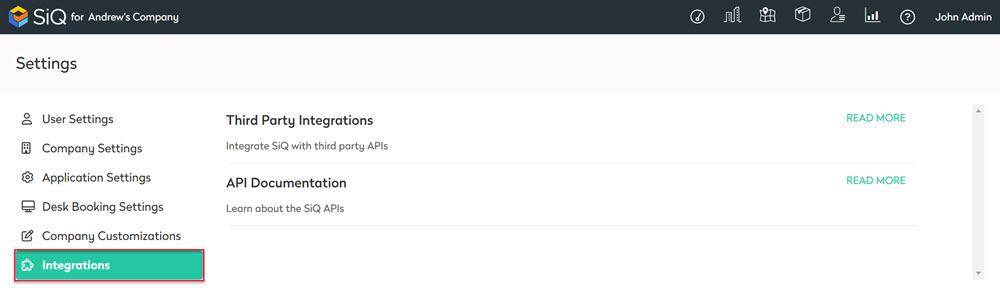
- From the Third Party Integrations area, click the READ MORE link.
The Integrations screen displays.
You can search for Google in the Search field or navigate to the Google tile. To navigate, complete the following:
- From the left menu, click Provisioning & SSO.
- For Google, click the Activate button.
The Google dialog displays and contains the Provisioning tab and the SSO tab.
- Click the SSO tab.
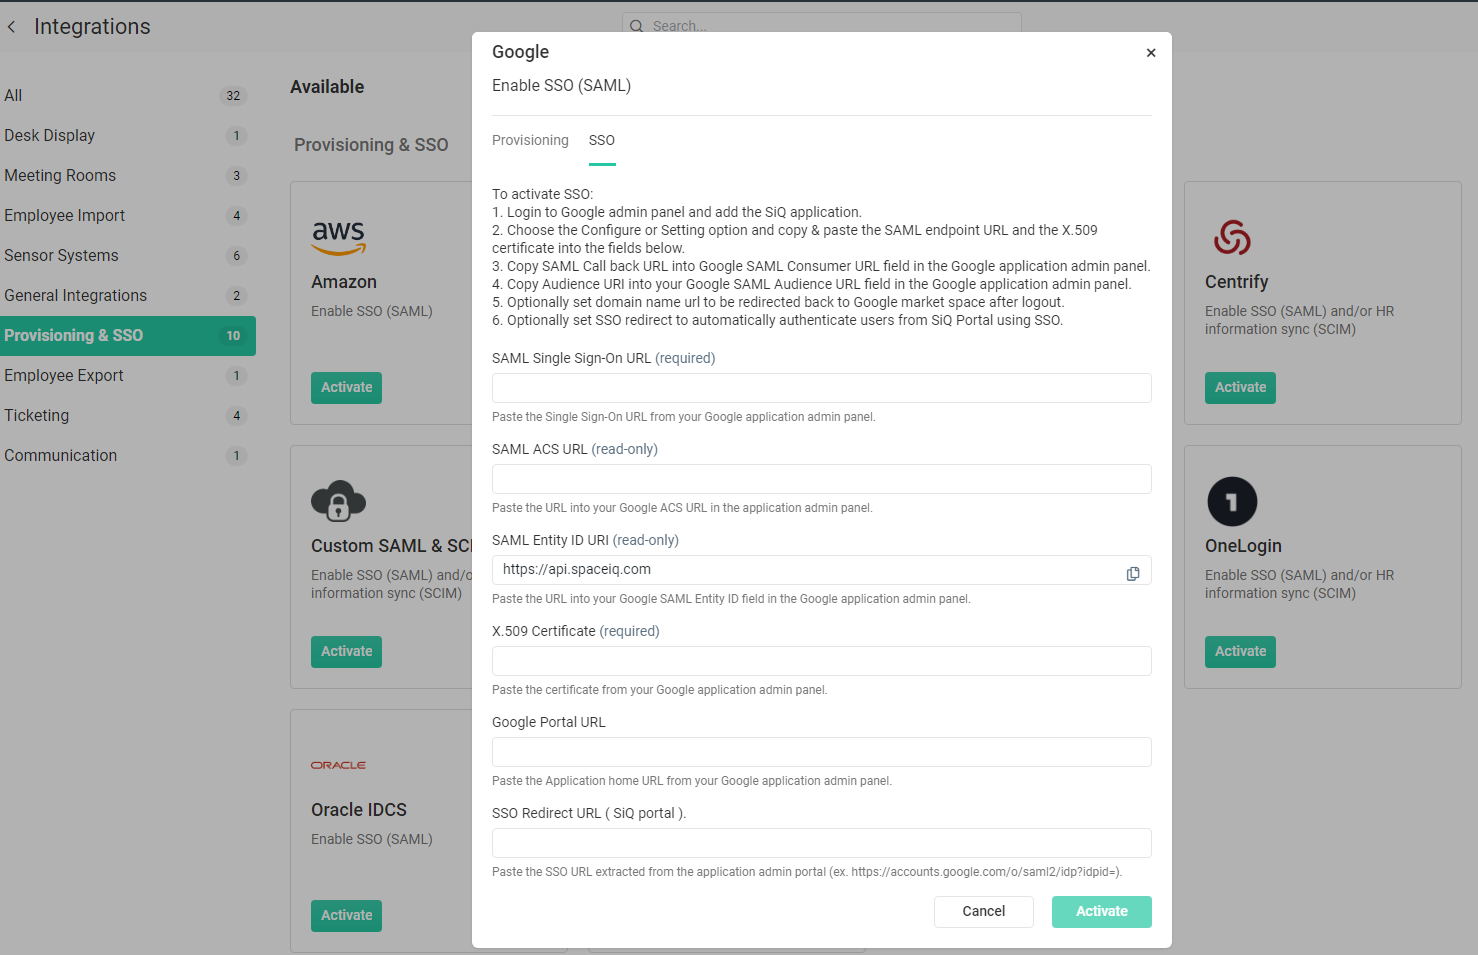
- In the x.509 Certificate field, paste the certificate you downloaded in Step 1.
- From the SAML Entity ID URI field, copy and save the SAML Entity ID Url, which contains your unique SiQ ID. You'll need this URL when you finish configuration in the Admin console in the next step.
Step 3. Complete the SSO Configuration in Google
From the Google Admin Console, complete the following:
- In the Google Identity Provider details screen, click the Continue button.
- On the Service provider details screen, replace the default ACS URL with the SAML Entity ID Url you copied from Step 2.
- Click the Continue button. Note: Attribute mapping is not required for SpaceIQ.
- On the Attribute mapping screen, click the Finish button.
Step 4. Enable the SpaceIQ app in Google
From the Google Admin Console, complete the following:
- From the Admin console Home page, navigate to Apps > Web and mobile apps.
- Open the SpaceIQ app.
- Click User access.
- To turn on or off a service for everyone in your organization, click On for everyone or Off for everyone, and then click the Save button.
- (Optional) To turn service on or off for an organizational unit:
- At the left, select the organizational unit.
- Select On or Off.
- Click Override to keep your setting if the service for the parent organizational unit is changed.
- If Overridden is already set for the organizational unit, choose an option:
- Inherit - Reverts to the same setting as its parent.
- Save - Saves your new setting (even if the parent setting changes).
- (Optional) Turn on the service for a group of users, and use access groups to turn on a service for specific users within or across your organizational units.
- Ensure your SpaceIQ user account email IDs match those in your Google domain.
Step 5. Test that the SSO is Working
SpaceIQ only supports IdP initiated SSO. You can’t use SSO if you sign in directly to SpaceIQ.
From the Google Admin Console, complete the following:
- From the Admin console Home page, navigate to Apps > Web and mobile apps.
- Open the SpaceIQ application.
- At the top left, click Test SAML login.
- SpaceIQ should open in a separate tab. You will be automatically redirected to your SpaceIQ account.
If it doesn’t, use the information in the resulting SAML error messages to update your IdP and SP settings as needed, then retest SAML login.
Configure the SpaceIQ auto-provisioning
This section describes how to set up automated user provisioning for the SiQ app. Afterward, you can then authorize, create, modify, or delete a user's identity in Google Workspace. Any changes are also reflected in the SiQ app.
Step 6. Copy SpaceIQ SCIM Bearer Token
After you have set up the SSO, you can complete the configuration for the automated user provisioning.
From the SpaceIQ Web app, complete the following:
- Click the Provisioning tab.
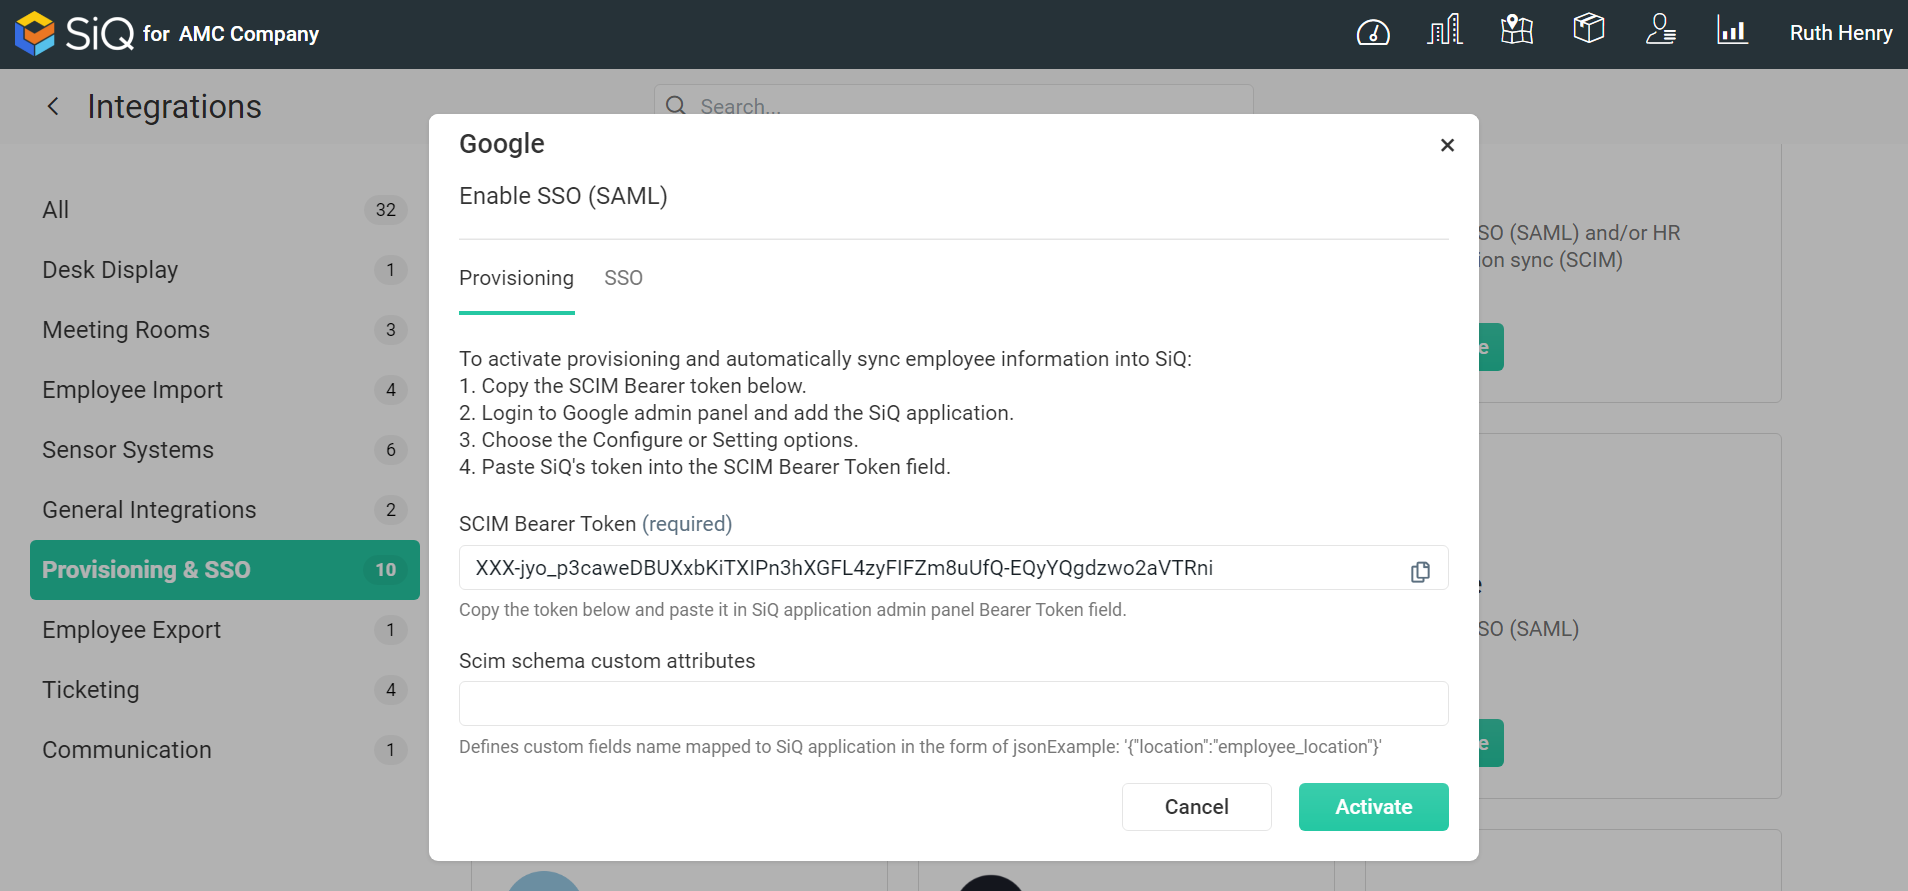
- Copy and save the token from the SCIM BearerToken field to a secure location for later use.
Step 7. Set up auto-provisioning for the SpaceIQ application in Google
From the Google Admin Console, complete the following:
- From the Admin console Home page, navigate to Apps > Web and mobile apps.
- Open the SpaceIQ application.
- In the Auto-provisioning section, click Configure auto-provisioning.
- Enter the token you copied from SpaceIQ from Step 6.
- Click the Continue button.
- Verify that all mandatory SpaceIQ attributes (those marked with an *) are mapped to Google Cloud Directory attributes. If not, click the Down arrow and map to the appropriate attribute.
- Click the Continue button.
- (Optional) Restrict provisioning to specific groups:
- In the Search groups field, enter all or part of the group name. A list of available groups displays. Select a group to add it, and open a new search field.
- If necessary, add more groups and choose a scope.
- To remove any group you added, click the X icon next to it.
- When complete, click the Continue button.
- Choose how long deprovisioning actions will be delayed before taking effect. The amount of time before de-provisioning takes effect can be set to: within 24 hours or after one, 7, or 21 days. Tip: Always set more time before hard deleting a user's account than for suspending a user's account. Select at least one of these options:
- When an app is turned off for the user, hard delete their account after [number of days].
- When a user is suspended on Google, hard delete their account after [number of days].
- When a user is deleted from Google, hard delete their account after [number of days].
- Click the Finish button.
- In the Auto-provisioning section, click the activation slider. Note: The activation slider is disabled if SpaceIQ isn’t turned on for any users. Click User access and turn the app on to enable the slider.
- In the confirmation dialog box, click Turn on.
When provisioning is on, Google starts collecting usage information. You'll see the usage information in the Auto-provisioning section. No numbers will be next to the event names until you enable provisioning. The following event names provide the usage information for the last 30 days:
- Users created
- Users suspended
- Users deleted
- Failures
Attribute Mappings from SpaceIQ to a Google User Profile
The Google user profile can be set up with custom attributes. Some of these attributes are mapped to the Google user profile by default.
Custom Attributes
Google's SpaceIQ application has been enhanced to support user-defined custom attributes, which enables Google to import more than 20 attributes to SpaceIQ. These attributes will be created and mapped manually.
- These attributes must be created and mapped in Google see Step 7 above.
- Then from SpaceIQ define the custom fields name mapped to the SpaceIQ app. From the Provisioning tab, enter the mapping code in the Scim schema custom attributes field. For example,
| {"CostCenter":"Cost_Center","Department":"department"} |
Troubleshooting
User and Department Data
- Users without a First Name or/and a Last Name in their SpaceIQ profiles cannot be imported in as new users.
- Google Users without a department will be created with a default department named “__No_Department__".
- In the event that a department also has teams or sub-departments, SpaceIQ will expect Organizations/Divisions to also contain Team/Sub-Department name.
For example:
Organization: Engineering, with Department: QA
Changed Admin Password for SpaceIQ
If the admin password for SpaceIQ has been changed, automatic provisioning will stop working. In this case, the original authorization is revoked by SpaceIQ, and you must reauthorize automatic provisioning.
From the Google Admin Console, complete the following:
- From the Admin console Home page, navigate to Apps > Web and mobile apps.
- Open the SpaceIQ application.
- Click the Auto-provisioning section to open the settings screen.
- Under App authorization, click Reauthorize.
- Enter the token you copied from SpaceIQ from Step 6 and then click Re-authorize. After reauthorization completes, you're returned to the Auto-provisioning settings screen in the Admin console.