Salesforce Integration
Customer IT / SpaceIQ Onboarding Team
Salesforce is an enterprise-grade customer-relationship management service supporting marketing automation, analytics, and application development. It can be extended with custom ticketing functionality.
SpaceIQ has built a custom integration using Salesforce's API interfaces to let SpaceIQ planners push Move the information to Salesforce (only "Now" Moves, not future Moves). Also, the Move Plan's Undo feature will remove the moves from Salesforce.
Prerequisites
You will need Salesforce admin privileges to complete this integration, and for the SpaceIQ setup, you must have a SpaceIQ Admin or an IT role.
Integration Activities
From the SpaceIQ application, complete the following steps:
- In the top-right corner, click on your Profile Name, and then click on Settings.

- From the left menu, click Integrations.
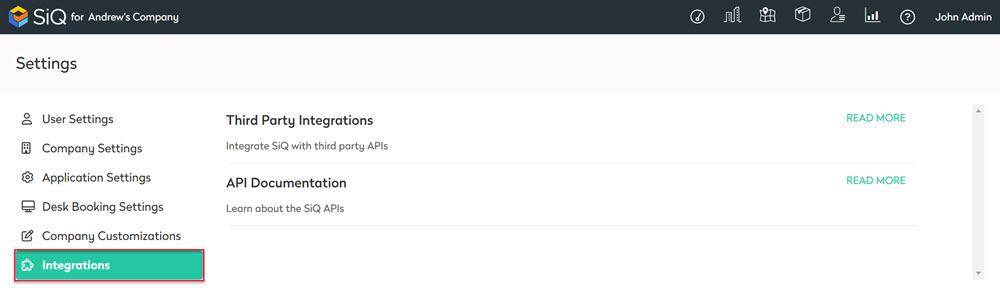
- From the Third Party Integrations area, click the READ MORE link.
The Integrations screen displays.
You can search for Salesforce in the Search field or navigate to the Salesforce tile. To navigate, complete the following:
- From the left menu, click Ticketing.
- For Salesforce, click the Activate button.
The Salesforce dialog displays, and it contains the Ticketing Integration tab.
Ticketing Integration Tab
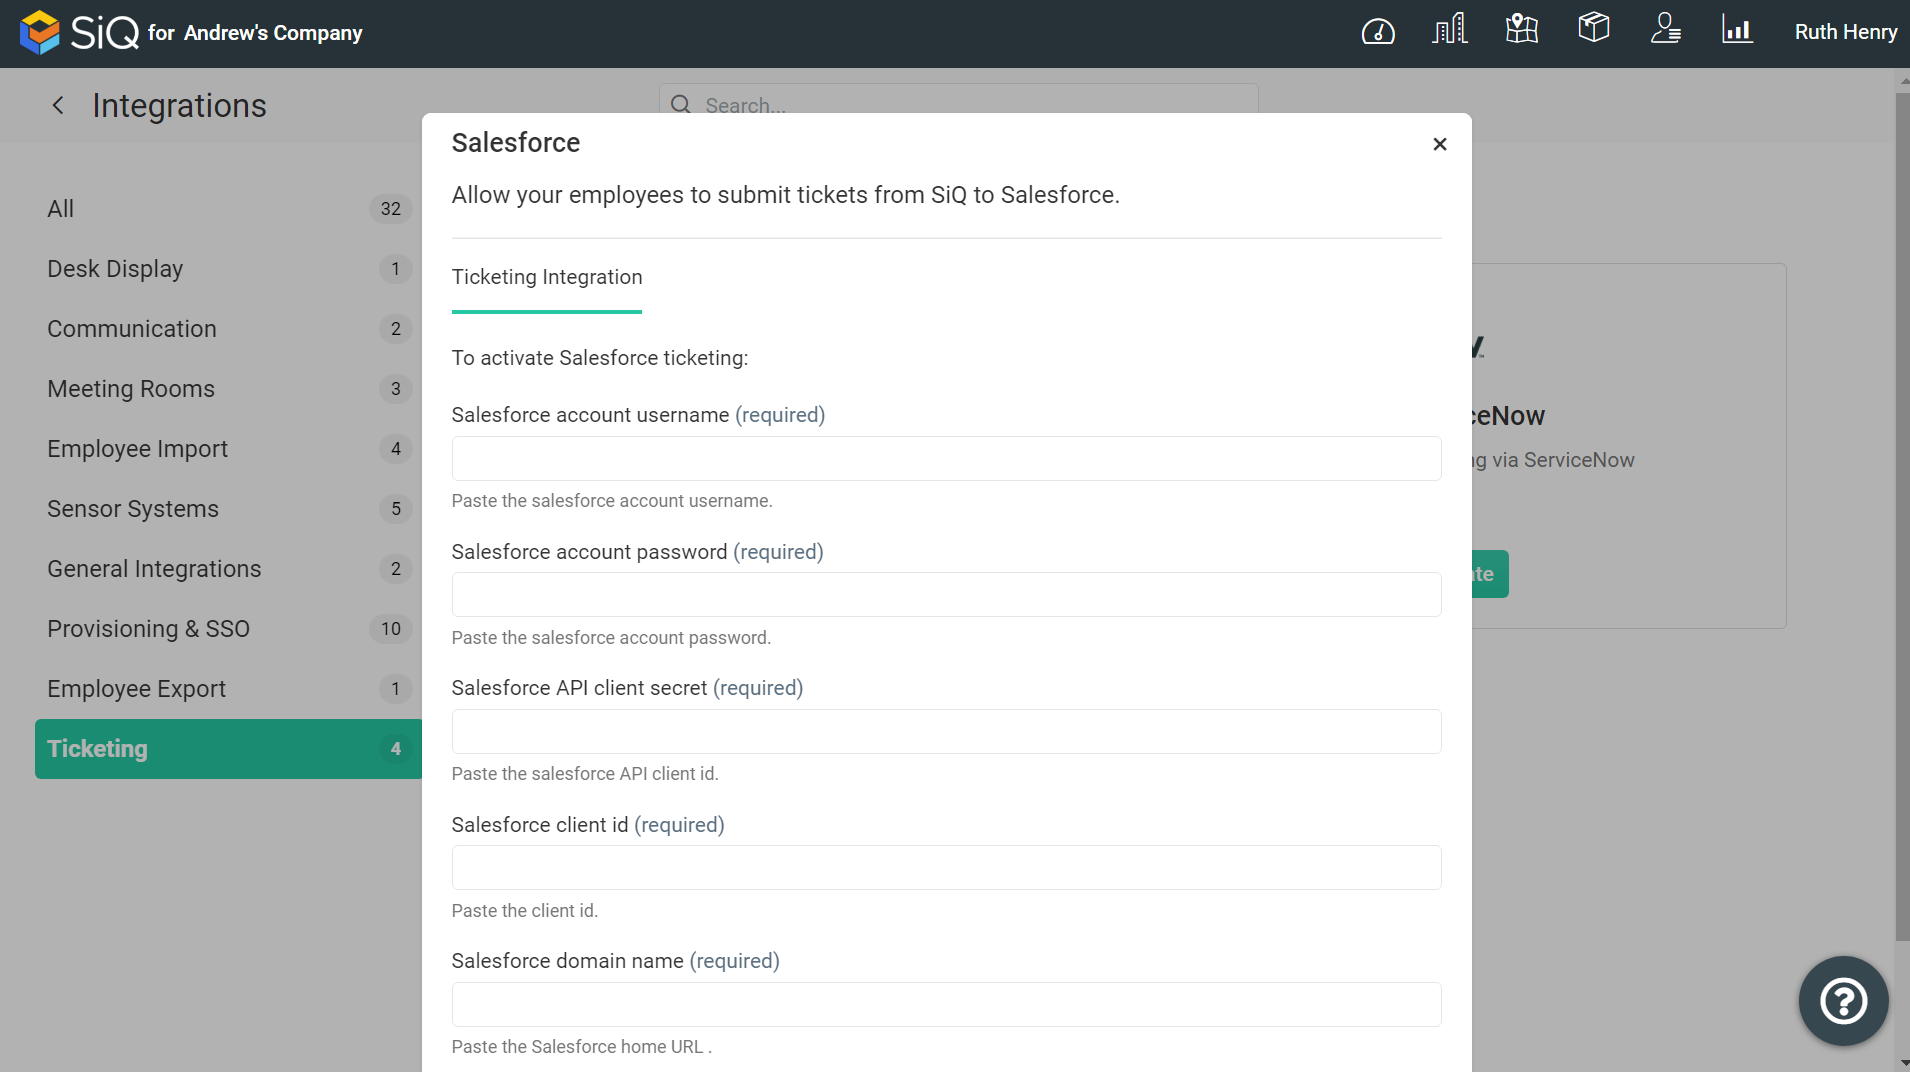
Complete the following fields and note that each field explains where the value is found in Salesforce.
- Salesforce account username (required) - Your API Only User's username.
- Salesforce account password (required) - The password associated with the API Only User.
- Salesforce API client secret (required) - Also called the Consumer Secret. See the section below called Located Client ID and Client Secret for more instructions on locating this value.
- Salesforce client id (require) - Also called the Consumer Key. See the section below called Locate Client ID and Client Secret for more instructions on locating this value.
- Salesforce domain name (required) - This is taken from the URL found in your browser when you log in to your company's account in Salesforce. For example, https://mycompany.salesforce.com/.
Step 2. Set up Salesforce
We will use the Salesforce Classic interface for all of these steps. Instructions will be different if you are using Lightning. We recommend switching to Classic at least temporarily if you are having trouble in Lightning.
Where Salesforce's documentation is adequate, we will refer you to their support material. Where it is not, we will fill in the blanks in this article.
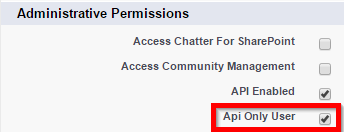
Step 2.1 Set up an API Only Profile
We recommend you create an API-only integration user inside Salesforce, which can be used to share information with SpaceIQ.
First, set up an API only profile, which you will later assign to the user.
Salesforce Documentation
- Information about profiles within Salesforce.
- Instructions on how to create a custom profile.
Ensure the API Only User option is checked when creating your custom profile.
Step 2.2 Create a User and Assign the API Profile
The API-only integration user must be created by a Salesforce System Administrator.
The integration user's credentials will be used by all users in your SpaceIQ organization. An Admin User can also be used instead of an API-only user for this purpose. Still, it is recommended practice to limit role permissions to only those functions actually required by the role.
Salesforce Documentation
- Instructions on how to create a secure Salesforce API user.
When you are done, you can use this newly created integration user account - under the API Only profile - to initialize the connection between SpaceIQ and Salesforce.
Step 2.3 Custom Case Fields
In order for ticketing to work properly, custom fields must be set up in Salesforce (inside cases). These fields will be populated by SpaceIQ while propagating tickets to Salesforce.
Log in to Salesforce as an admin.
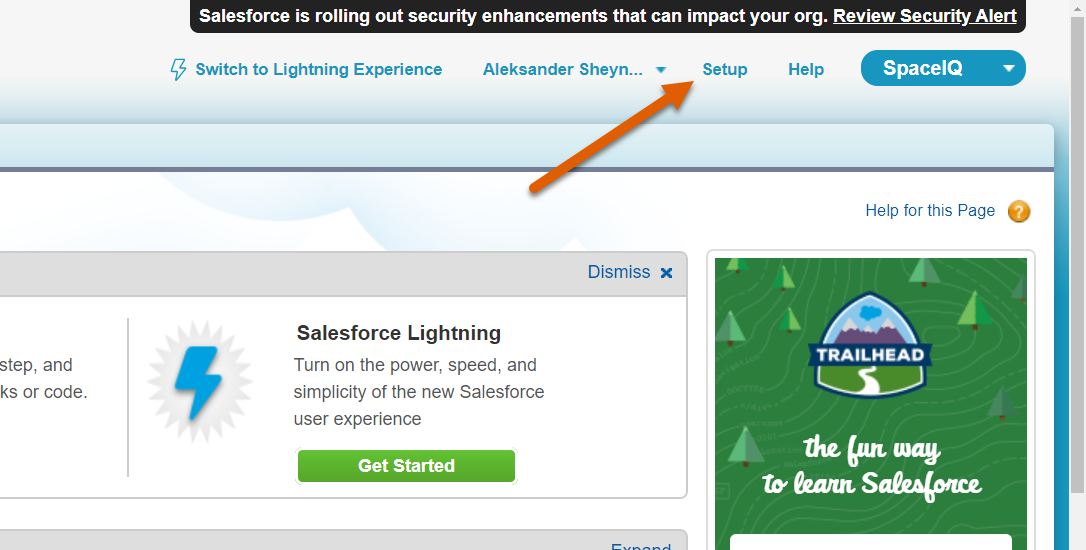
Click on the Setup link in the top right corner.
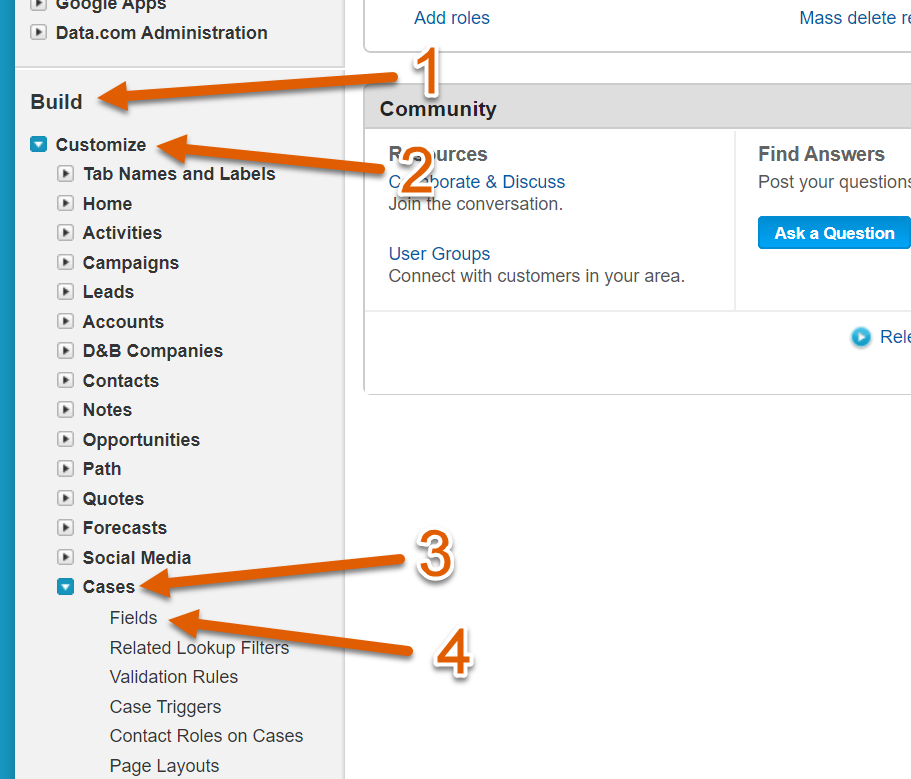
On the left side of the screen, you'll need to scroll down until you see the Build section [1].
Click on Customize [2] to expand it.
There you'll look for Cases [3], and, finally, Fields [4].
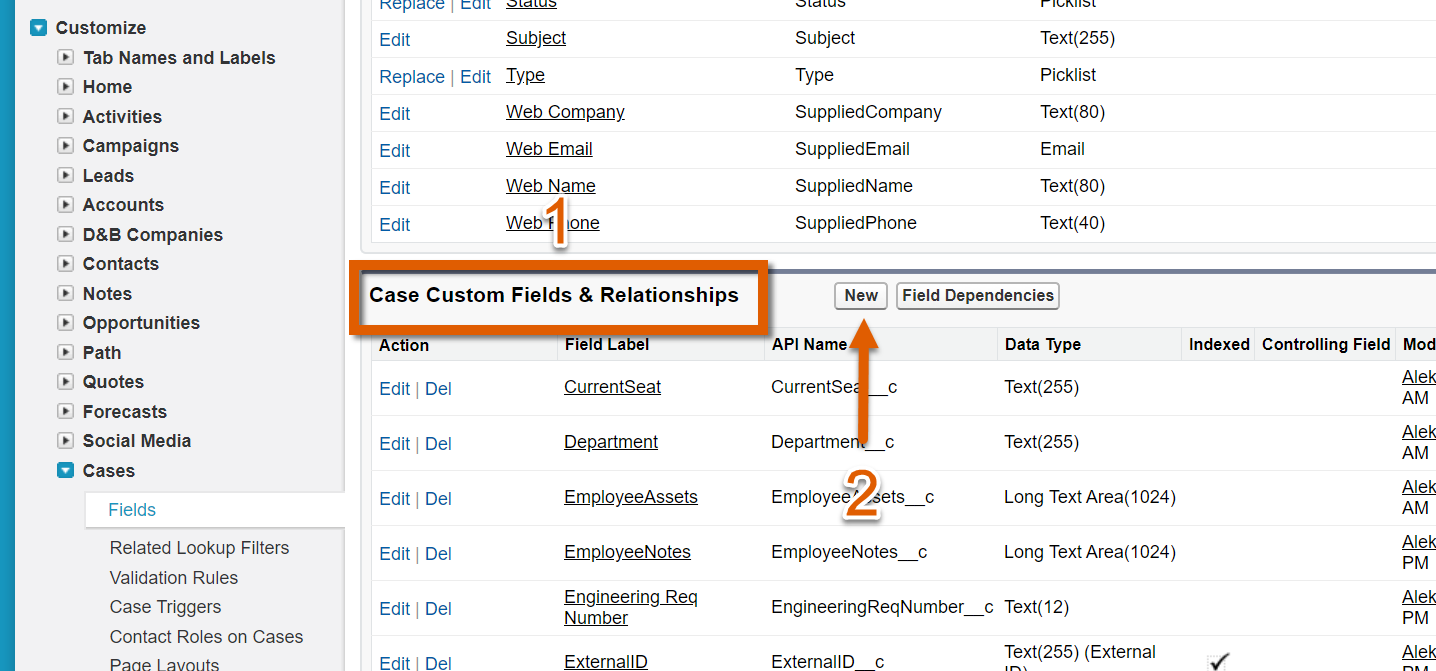
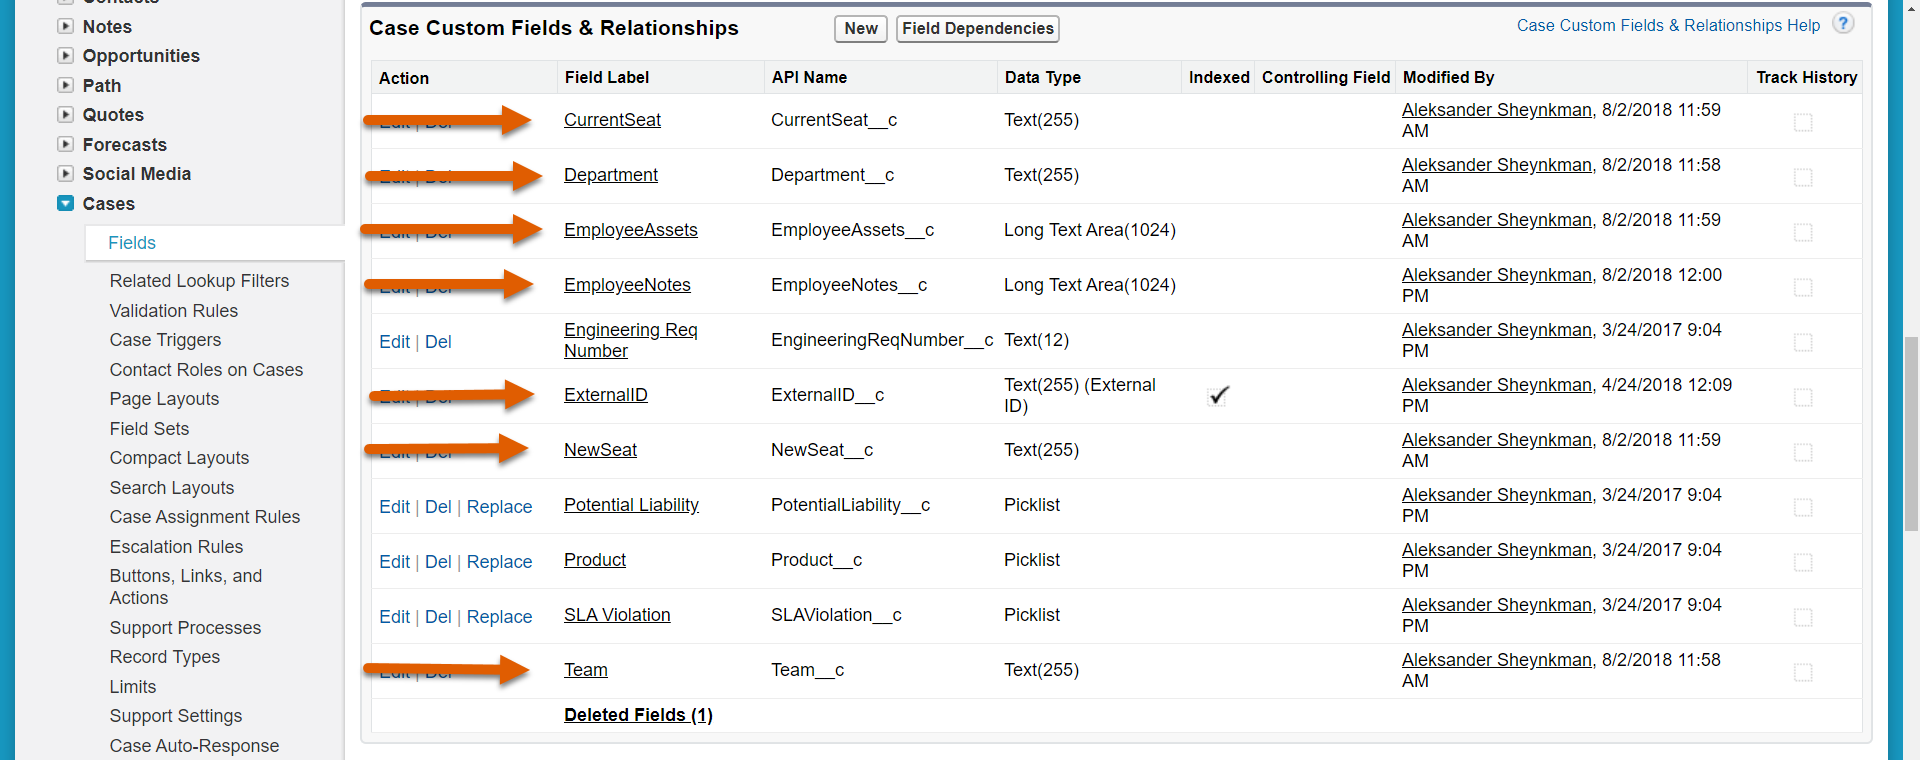
On the Case Fields page, scroll down until you see the Case Custom Fields & Relationships header [1].
Click on the New button [2] to continue.
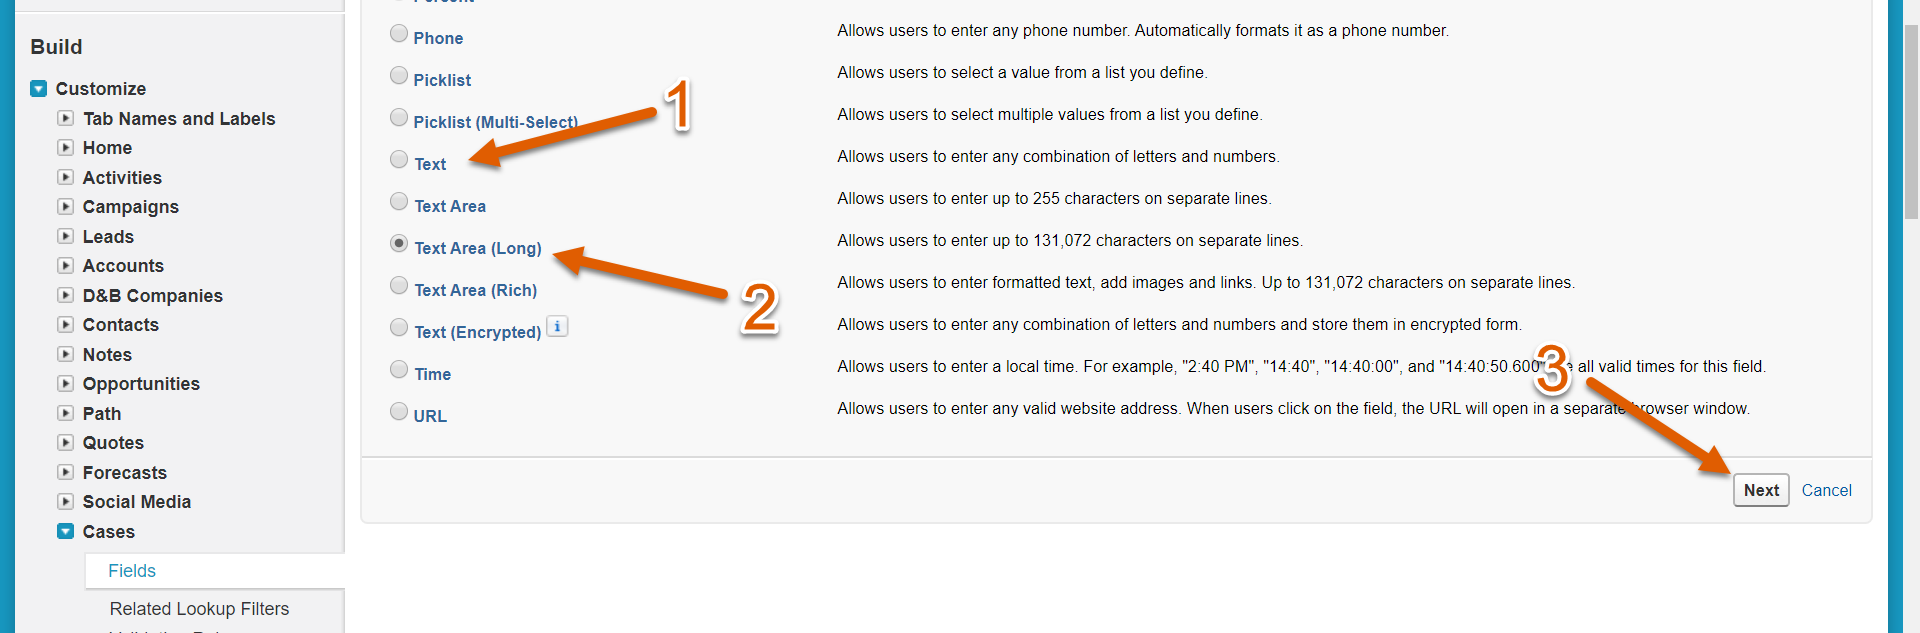
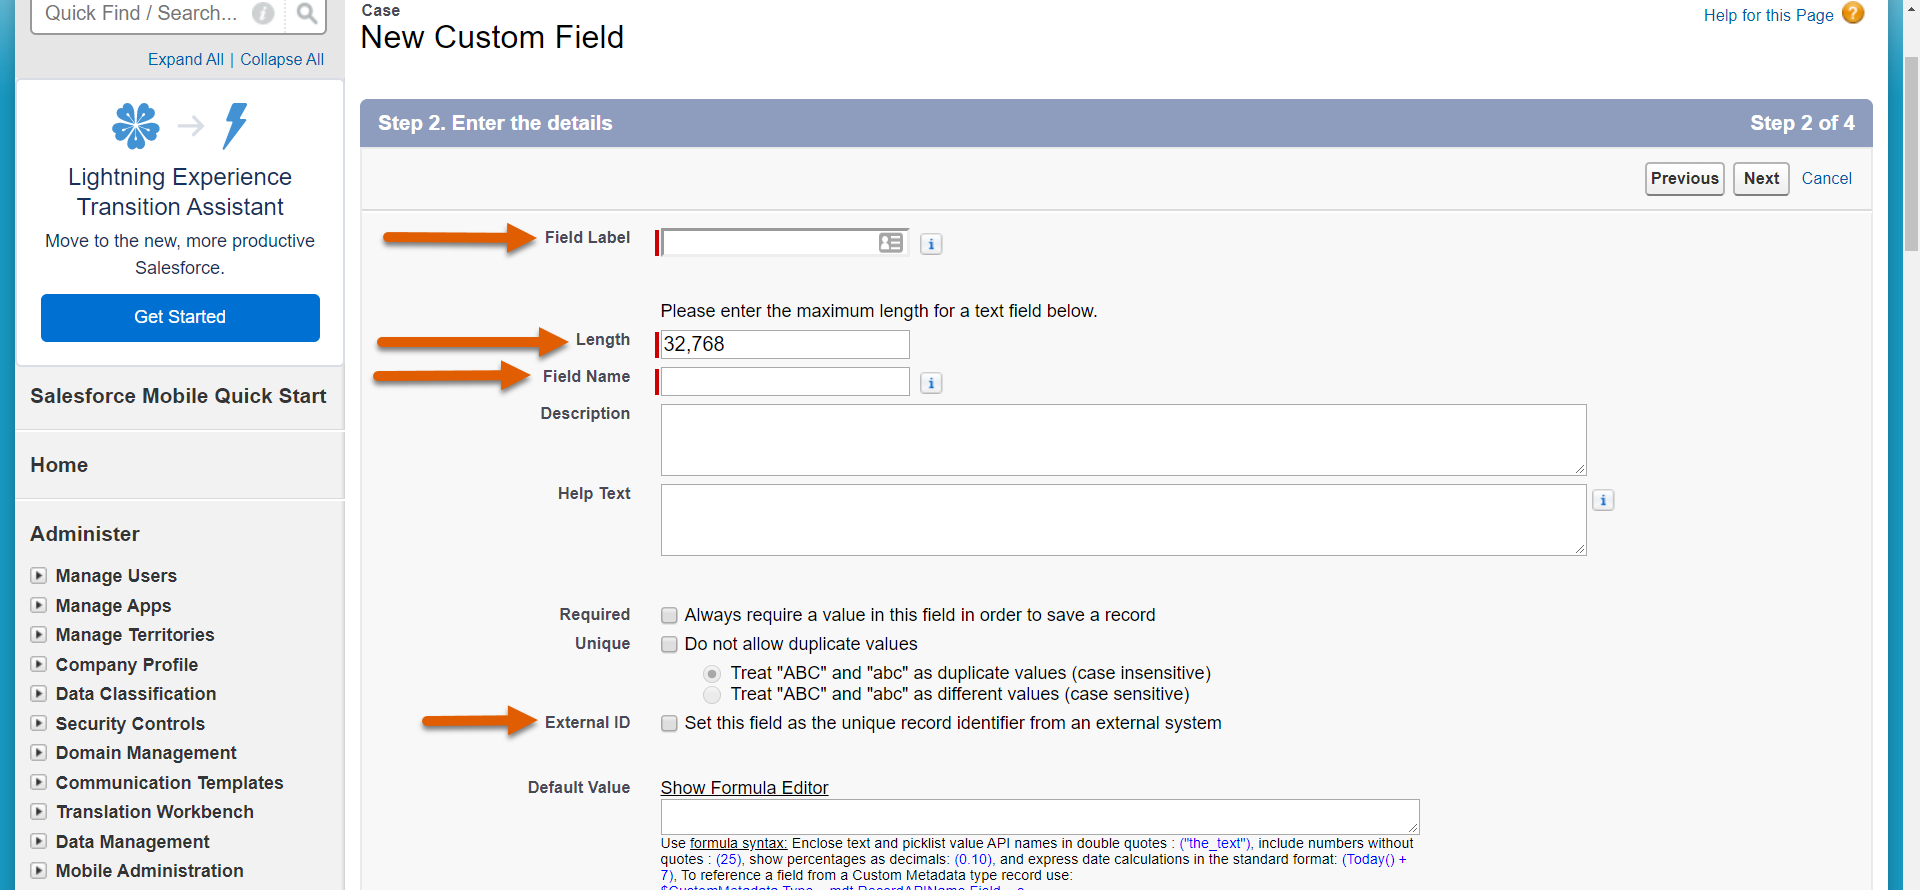
On the next screen, you'll first need to select a field called Data Type.
Look at the table below in the Data Type column when selecting your Data Type.
Choose either Text [1] or Text Area (Long) [2], depending on which row you are creating.
You will need to repeat this process for each row in the table below.
Click the Next button [3] to continue.
Then enter the rest of the values from the table in their appropriate locations.
| Field Label | Field Name | External ID | Length | Data Type |
|---|---|---|---|---|
|
ExternalID |
ExternalID |
checked |
255 |
Text |
|
Department |
Department |
unchecked |
255 |
Text |
|
Team |
Team |
unchecked |
255 |
Text |
|
CurrentSeat |
CurrentSeat |
unchecked |
255 |
Text |
|
NewSeat |
NewSeat |
unchecked |
255 |
Text |
|
EmployeeAssets |
EmployeeAssets |
n/a |
1,024 |
Text (Long) (visible lines 2) |
|
EmployeeNotes |
EmployeeNotes |
n/a |
1024 |
Text (Long) (visible lines 2) |
When you are all done, you should see all seven of the custom case fields in your Case Custom Fields & Relationships list.
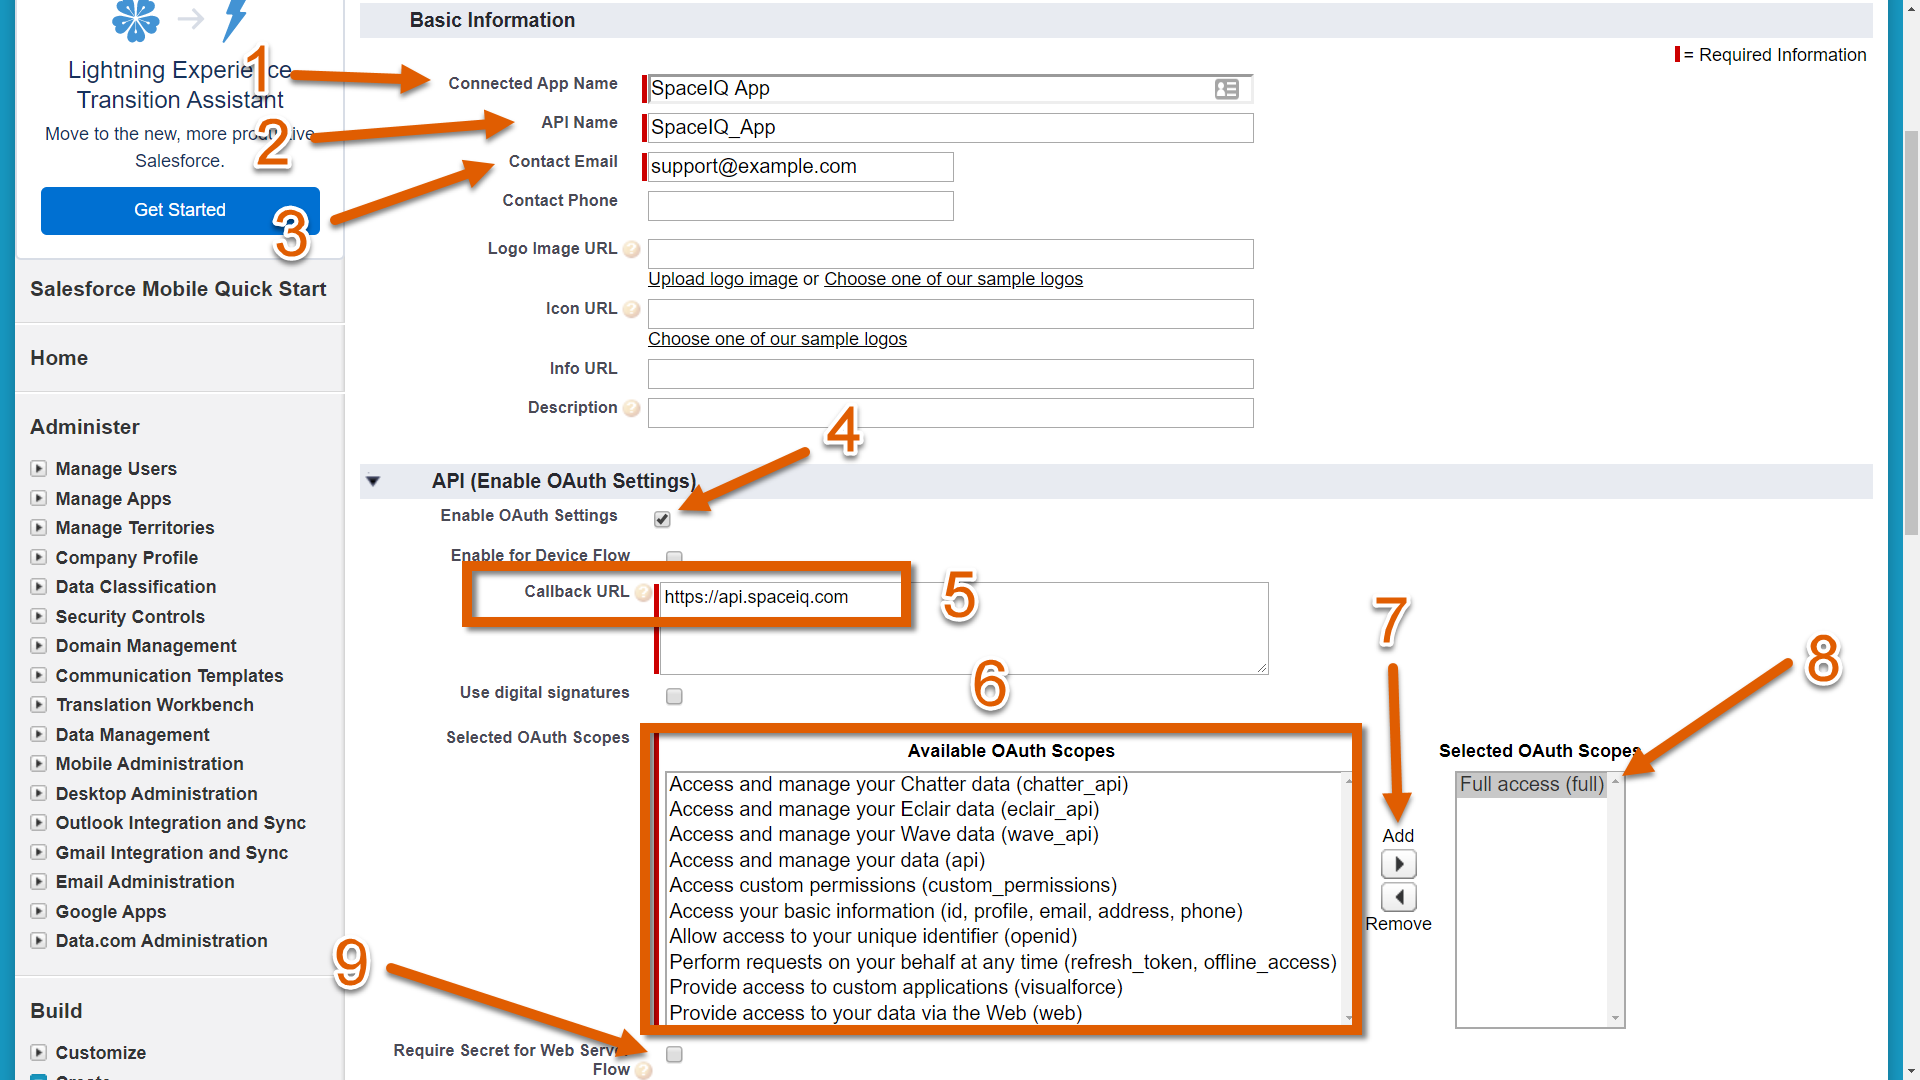
Step 2.4 Create a New Connected App
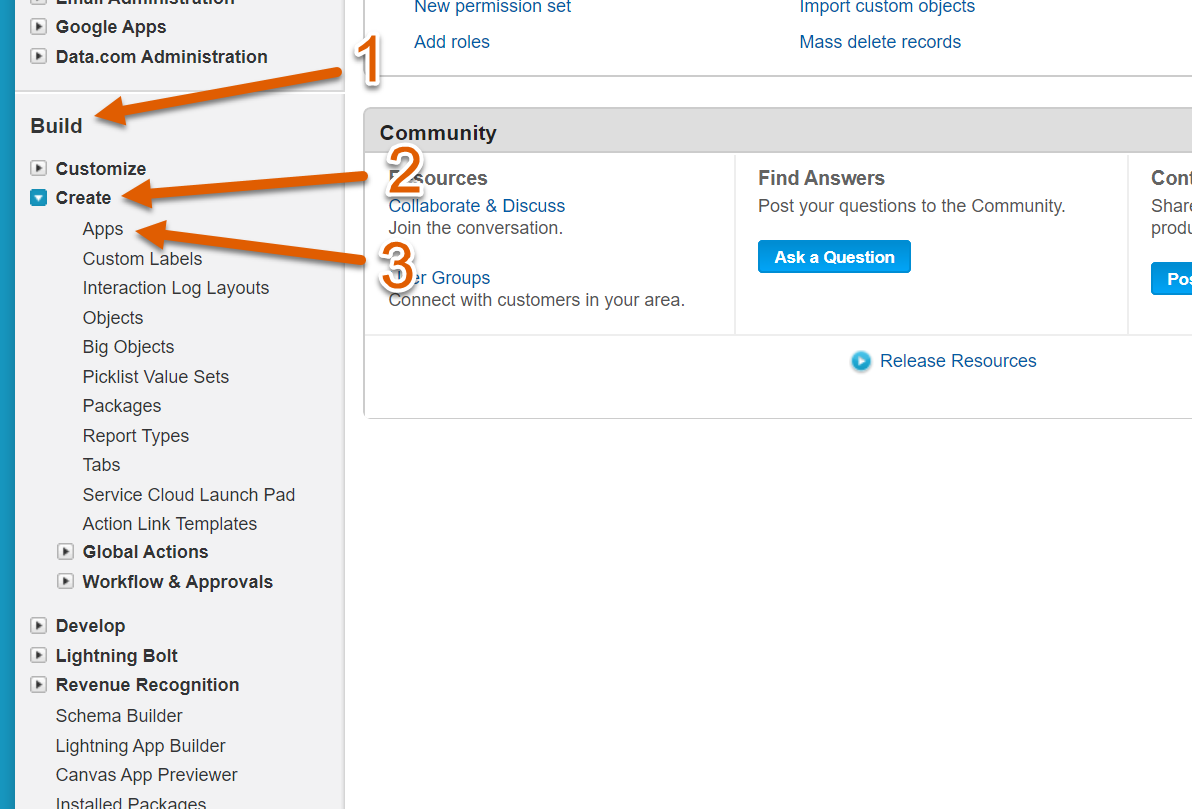
Navigate to the Setup screen in Salesforce as described above, and look for the Build section on the left [1]. Expand the Create menu [2] and click on Apps [3]:
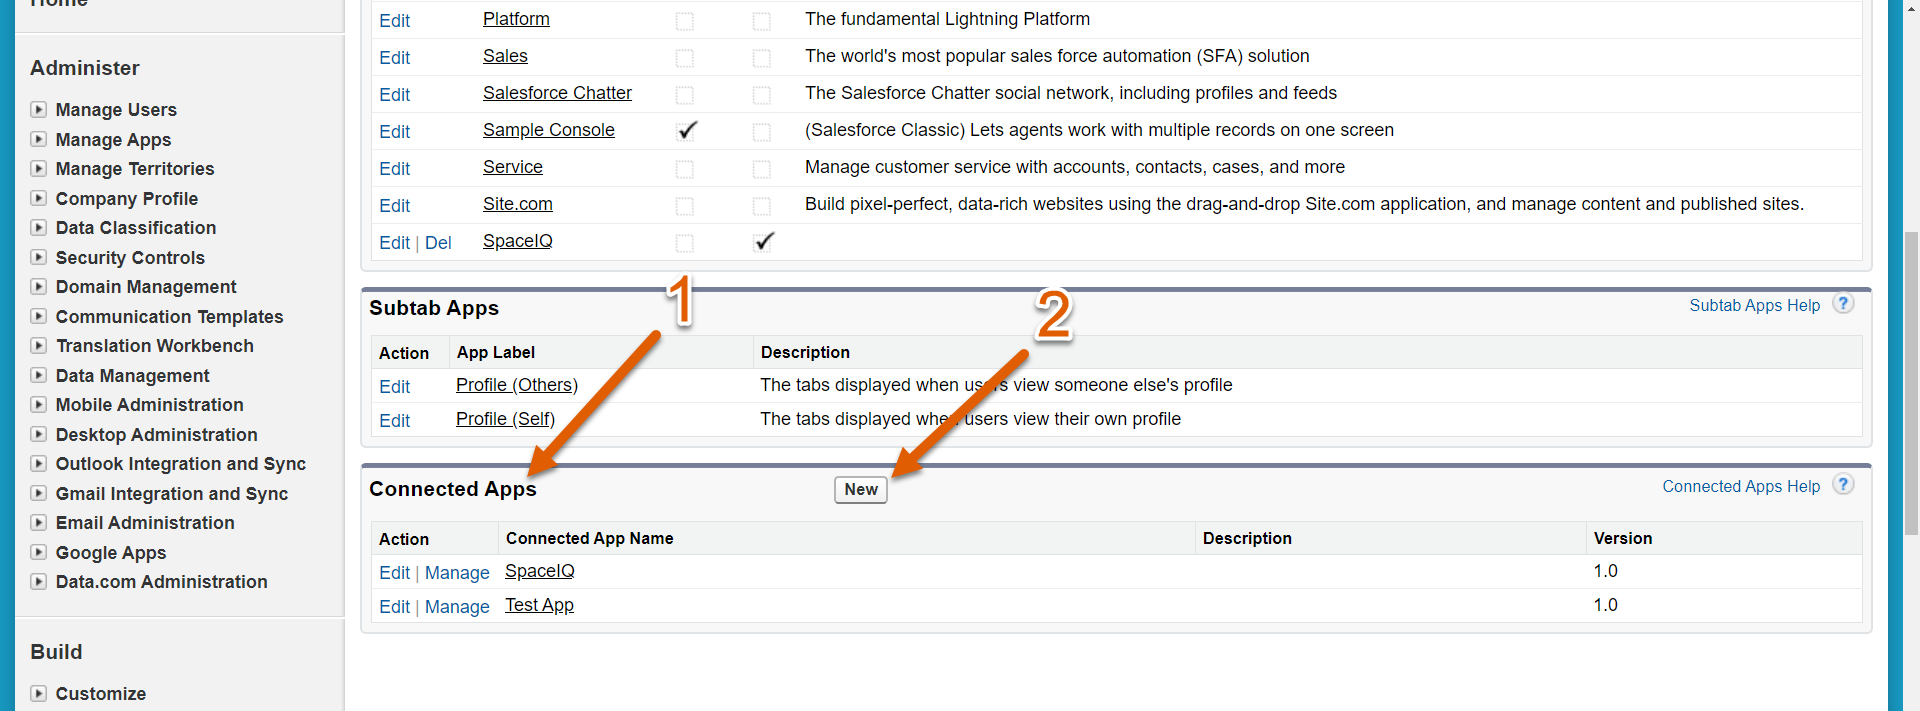
On the Apps page, scroll down until you see the Connected Apps section [1].
Click on the New button[2].
On the Connected App creation screen, you will need to provide any name in the Connected App Name field [1].
The API Name [2] can be the same and should auto-populate.
Enter an appropriate contact email [3] for whoever in your organization manages your integrations.
Check the box for Enable OAuth Settings [4] and enter https://api.spaceiq.com for the Callback URL value [5].
Select Full access (full) in the list of Available OAuth Scopes [6], then click the Add arrow icon [7] so that selection appears in the list of Selected OAuth Scopes [8].
Finally, uncheck the Required Server for Web Server Flow check box [9].
You can scroll to the bottom and click the Save button when all that is done.
After your connected app has been successfully created, return to your Connected Apps list. You may need to wait 2-10 minutes for the newly connected app to be functional.
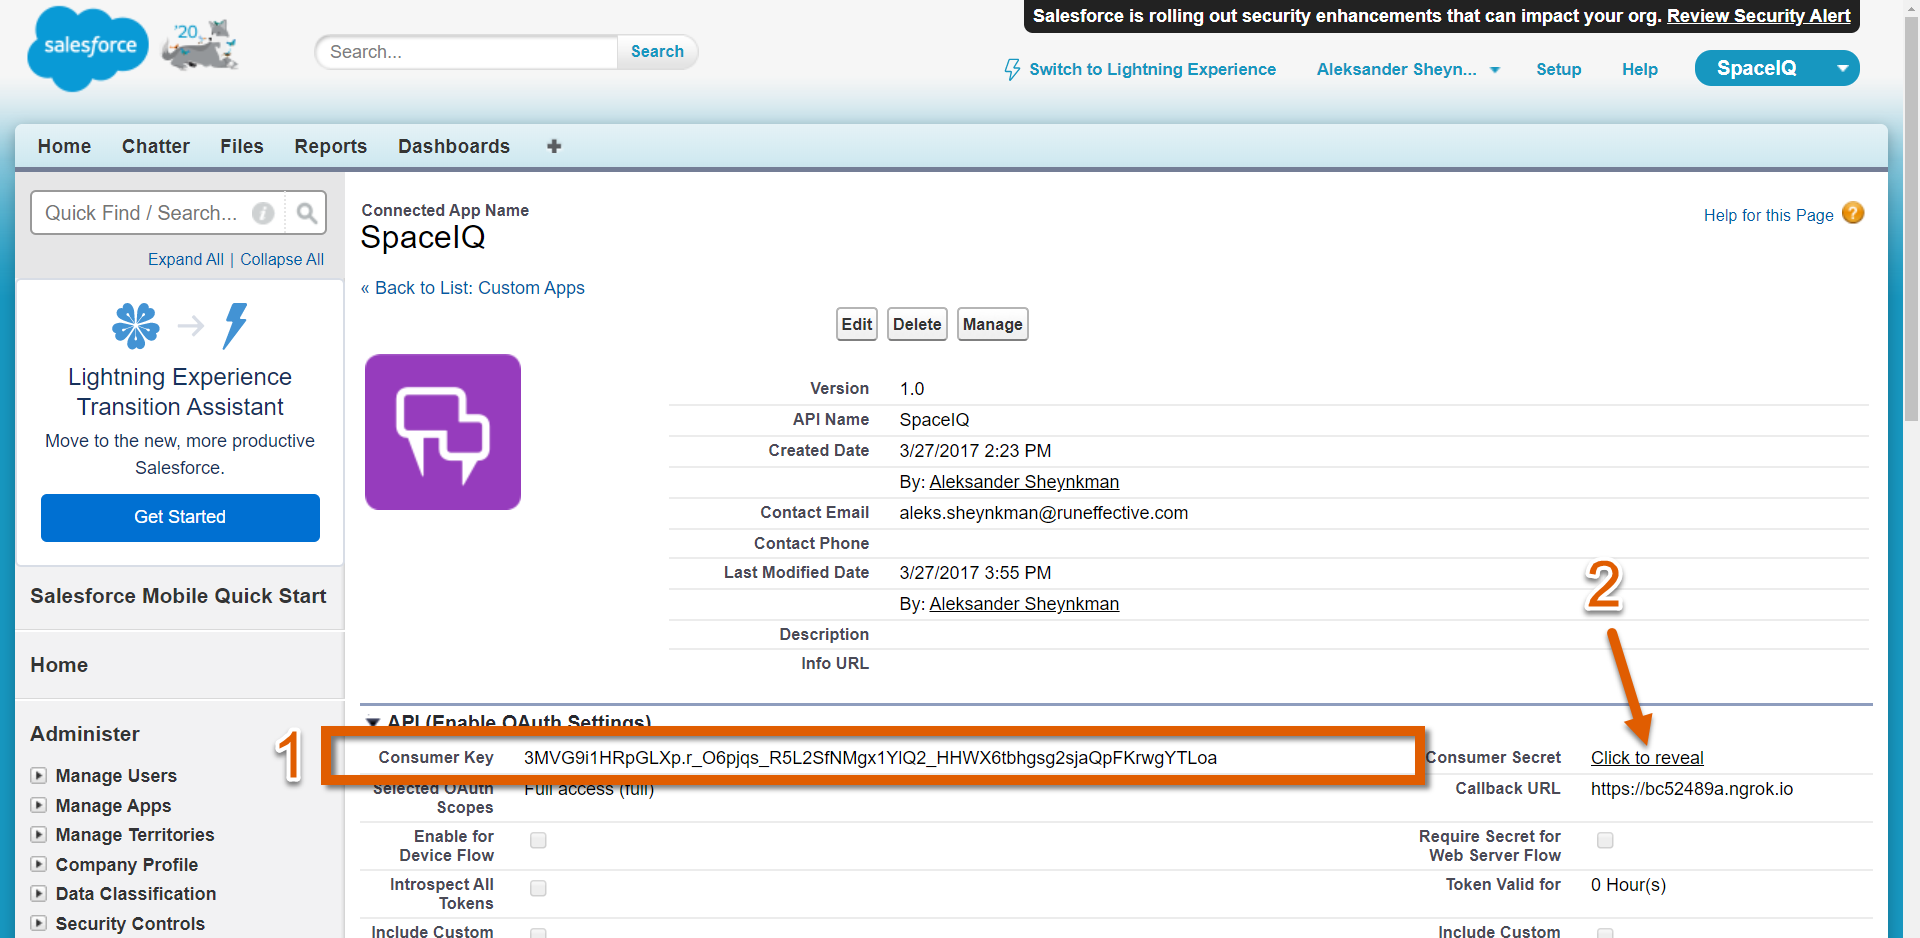
Step 2.5 Locate Client ID and Client Secret
After you create a Connected App in Salesforce, as described above, you can find the Client ID and Client secret (also called the Consumer Key and Consumer Secret).
Navigate to the Setup page in Salesforce.
Click on Create [1] under the Build section, and open the Apps page [2].
Scroll down to Connected Apps [3].
Click on the name of your newly created SiQ integration app [4] (the exact name of your app may vary depending on what name was assigned during creation).
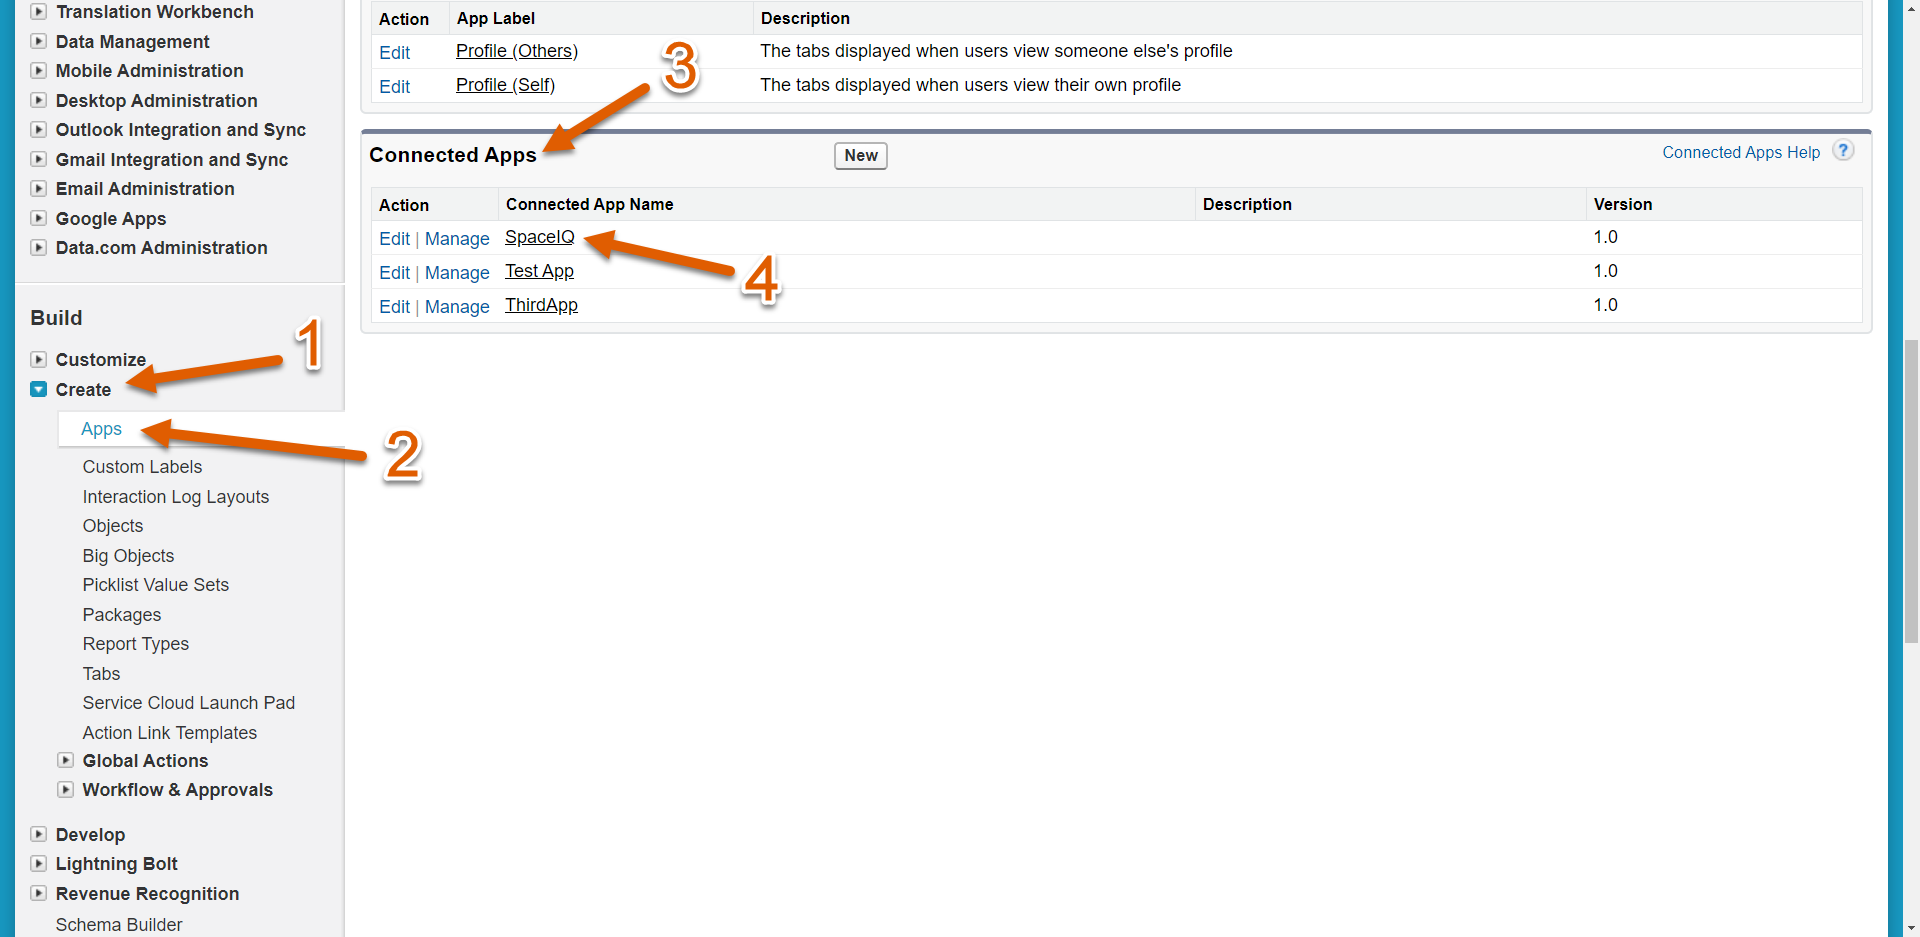
On the connected app page, look for the Consumer Key field [1] (the Client ID) and copy/paste it into SpaceIQ's integration screen as seen above.
You must click to reveal your Consumer Secret [2] (also called the Client Secret). Copy and paste that into SpaceIQ as well.