Azure AD SAML
SAML allows you to have a Teem account without needing to know another login and makes logging into Teem effortless and secure, as users are automatically logged in so long as they’re simultaneously logged in to the SAML account. It can also automatically provision/de-provision users as they’re activated/deactivated within your SAML provider.
There are four major steps in setting up SAML for Teem and Azure AD. First is creating and configuring the application in Azure AD. The second is configuring SAML in the Teem application. The third is aligning the data in both systems. Finally, testing to ensure you've set everything up properly. This article will walk you through each of these four steps.
SAML for Azure AD and Teem Setup
Prerequisites
An Azure account with an active subscription and one of the following roles on your Azure Portal: Global Administrator, Cloud Application Administrator, Application Administrator, or owner of the service principal.
A Teem account with an active subscription and one of the following roles on your Teem site: Global Administrator or be part of a group with the Edit Organization and Calendars permission enabled permission enabled
Add Teem Application to Azure AD and Configure Settings
-
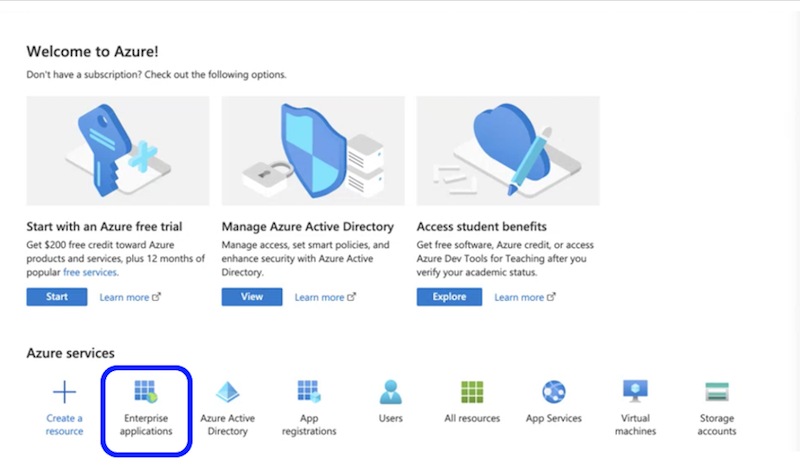
Sign into portal.azure.com
-
Find and select Enterprise applications in the Azure Services list. The icon could be in different places but looks like this:
-
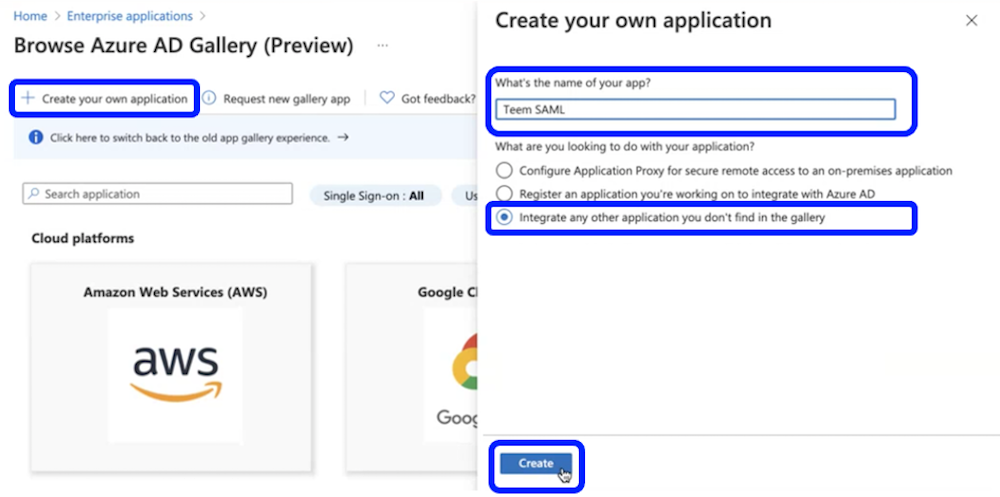
Under Enterprise applications, select a Create your own application at the top left-hand side of the screen.
-
You should be on the Browse Azure AD Gallery (Preview) page, and you will want to select Create your own application.
-
In the fly-out Create your own application menu pane, complete the following:
What's the name of your app text box: enter "Teem SAML" or you may specify your own naming convention
What are you looking to do with your application? Select Integrate any other application you don’t find in the gallery
Select Create at the bottom of the fly-out pane
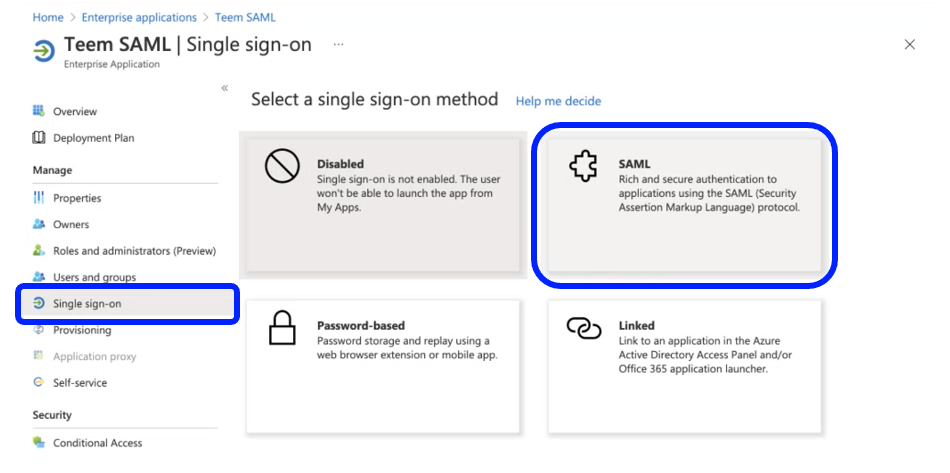
- Once the application is created, the application Overview page will display. Select Single Sign On on the left menu. Select SAML from the Select a single sign-on method menu.
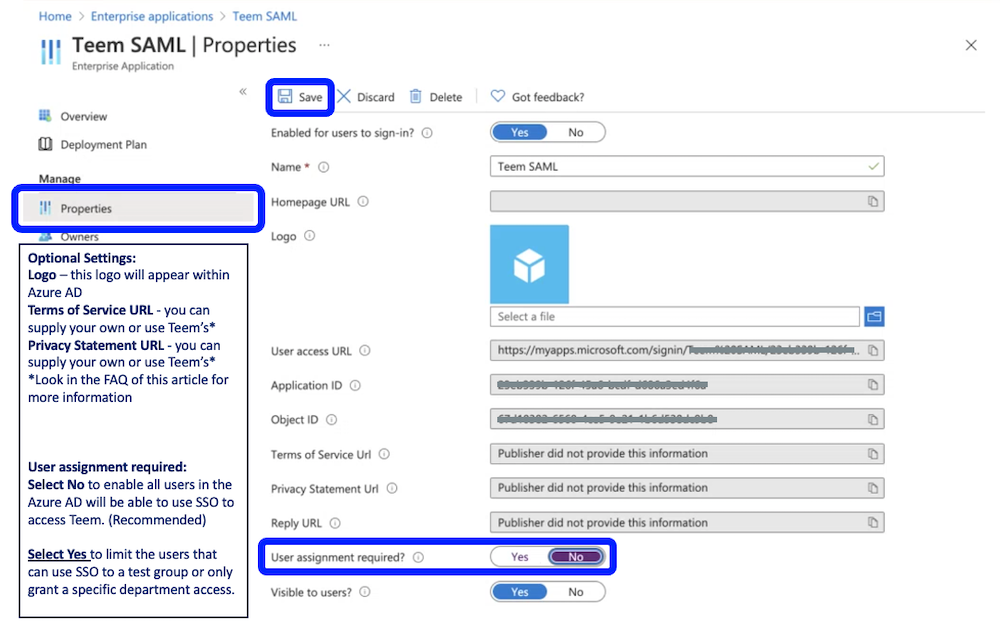
- (Optional) Select Properties. Once there you can change settings, like add a logo, and URLs to Teems service agreements. You may want to consider changing the User assignment required to No, thereby allowing any user in your organization to use the SAML Sign-On. No changes are required on this page.
Configure Teem for Azure AD SAML
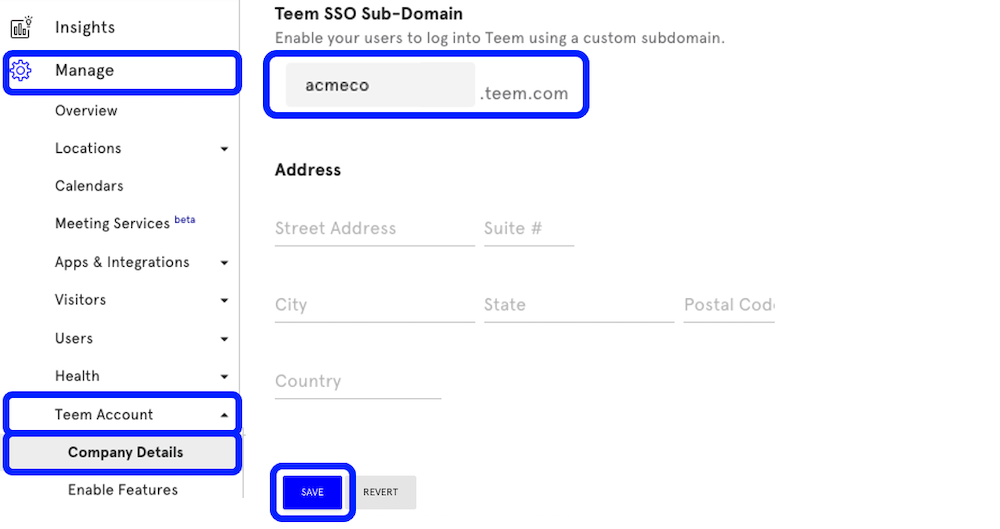
Set Your Unique Teem Sub-Domain
Navigate to app.teem.com, and click on Manage from the menu on the left. Click Teem Account, then Company Details. In the field for Teem SSO Sub-Domain, enter your preferred sub-domain. This is typically the name of your organization. For example, if my company was called Acme Company, I'd enter "acmeco" in the sub-domain field, and it would make my sub-domain site https://acmeco.teem.com. Useful Tip: Spaces and symbols are not allowed in sub-domains.
Add SAML Settings to Teem and Create Uuid
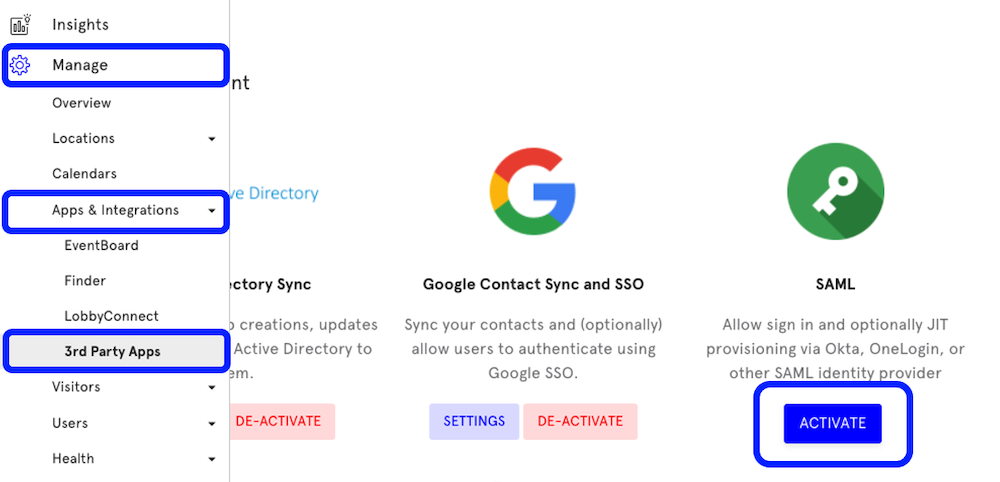
Navigate to app.teem.com, and click on Manage from the menu on the left. Click App & Integrations, then 3rd Party Apps. Locate SAML and click the Activate button under the SAML logo.
You will then see the Integration Settings form. Teem will automatically create the Uuid when this form is saved. Complete the required field with placeholders and select SAVE. The Uuid number will display in the Gray Details box. Copy this number. You will need to input this into Azure AD.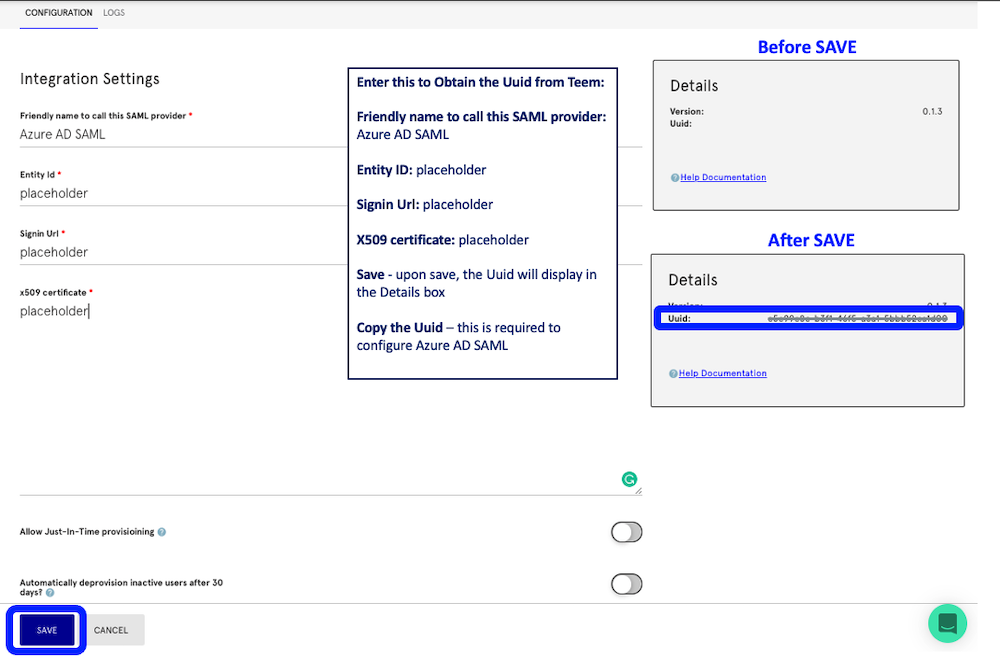
Add Teem settings in Azure AD
In the Azure portal, continue with setting up the Basic SAML Configuration. If you are starting from the Azure portal home screen, select Enterprise applications, search and click the button with the app you named in the Add Teem Application to Azure AD and Configure Settings section of this article.
1. Azure AD Basic SAML Configuration
In section 1 Azure AD Basic SAML Configuration, click edit, and use the following:
- Identifier (Entity ID): Copy and Paste https://teem.com
- Reply URL (Assertion Consumer Service URL): Copy and Paste https://app.teem.com/sso/complete/saml/
- (Optional) Sign-on URL: This URL is created by entering the SSO Sub-Domain into the following: https://<your sub domain>.teem.com/login/. So, if my sub-domain was acmeco, I would have a login URL of https://acmeco.teem.com/login/
- Relay State: Copy the Uuid from the Details pane of the Teem SAML Settings page. To access the Teem SAML Settings page, start in Teem and select Manage, App and Integrations, 3rd Party Apps, find the SAML app and click the Settings button under the SAML logo. This parameter is required.
- (Optional) Logout URL: This URL is created by entering the SSO Sub-Domain into the following: https://<your sub domain>.teem.com/login/. So, if my sub-domain was acmeco, I would have a login URL of https://acmeco.teem.com/logout/
- Click Save at the top of the fly-out pane.

2. User Attributes & Claims
In Azure AD, Under User Attributes & Claims, click edit, and we will set the correct claims.
-
There is one required claim of Name ID. Change this to match how our users are provisioned in Teem. If you are using our Office 365 Azure AD integration to provision users, use the User Principle Name. If our users are provisioned with AD Sync tool and have been set to use email, change this claim to use the email address instead of User Principle Name (user.mail). Please note, these are not always the same.
-
By default, there are multiple additional claims that are given as additional claims. We will not be using any of these claims. You can optionally delete them. Leaving them is not harmful.
-
Select Edit in the User Attributes & Claims section of the screen. The following claims must be added:
First New Claim (please note that values must match exactly)
Name: urn:oid:0.9.2342.19200300.100.1.1
Namespace: <leave blank>
Source: Attribute
Source attribute: <match the name ID> either user.mail, or user.userprincipalname
Do not change Claim conditions
Second New Claim (please note that values must match exactly)
Name: urn:oid:0.9.2342.19200300.100.1.3
Namespace: <leave blank>
Source: Attribute
Source attribute: <match the name ID> either user.mail, or user.userprincipalname
Do not change Claim conditions
Third New Claim (please note that values must match exactly)
Name: urn:oid:2.5.4.4
Namespace: <leave blank>
Source: Attribute
Source attribute: user.surname
Do not change Claim conditions
Fourth New Claim (please note that values must match exactly)
Name: urn:oid:2.5.4.42
Namespace: <leave blank>
Source: Attribute
Source attribute: user.givenname
You can now close the User Attributes & Claims dialog. Once this is complete, the section will look like this: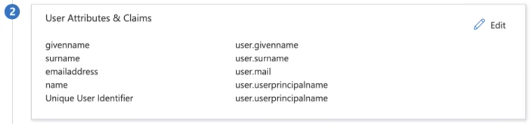
3. SAML Signing Certificate & 4. Set Up Teem SAML
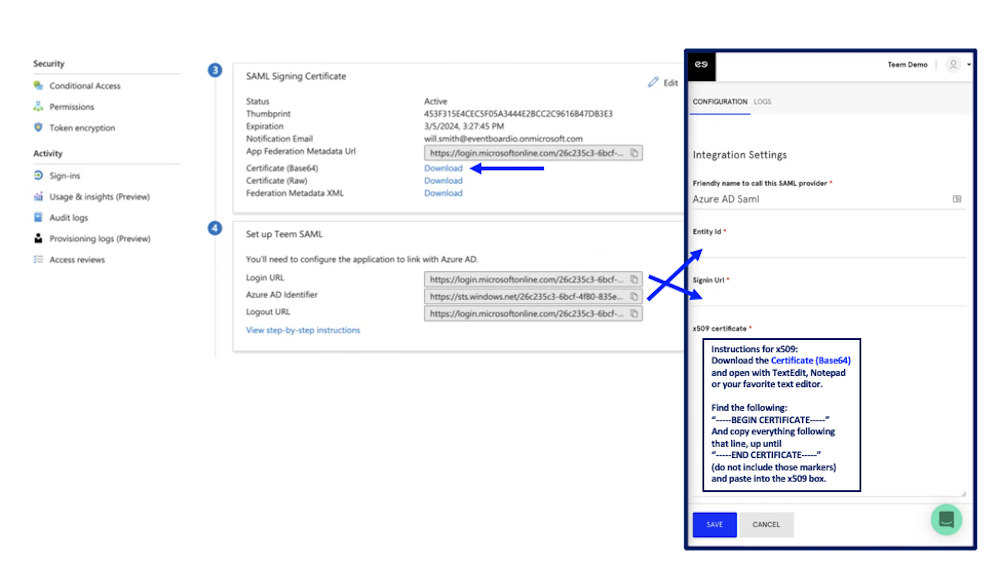
Use the values in these sections 3. SAML Signing Certificate and 4. Set Up Teem SAML to complete the Integration Settings form in Teem. To access this form navigate to Teem. Select Manage, Apps & Integration, 3rd Party Integration, and find SAML and select Settings.
Enter the following into the Teem Integration Settings form:
- Friendly Name to call this SAML Provider: Enter Azure AD SAML
- Entity ID: On the Azure AD Single Sign-on SAML Configuration Page, scroll to section 4. Copy the Login URL and paste it into this field.
- Signin URL: Copy the Azure AD Identifier and paste it into this field.
- X509 certificate: Select the Certificate (Base 64) Download button. Open this file with TextEdit, Notepad, or your favorite text editor. Copy the contents between -----BEGIN CERTIFICATE----- and -----END CERTIFICATE----- (do not include those markers) and paste the certificate into this field.
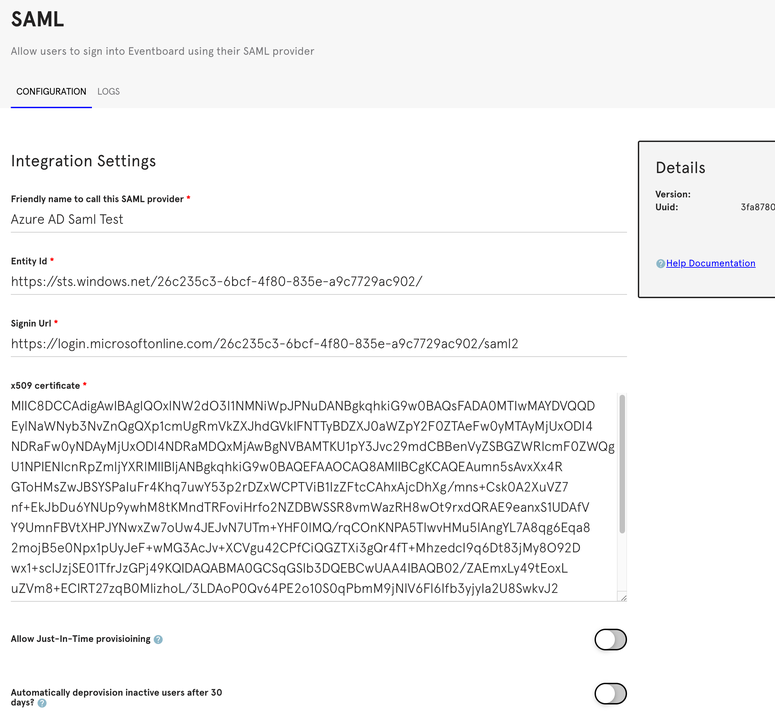
The completed Teem Integration form will look like the image below. Select SAVE.
Test Your Login
Navigate to your sub-domain page that you set up in the first step (https://<subdomain>.teem.com/login). This will bring you to your identity provider and if your email matches up and you are authenticated via your SAML provider, you will be automatically logged in to Teem.
Additional Variables
Your SAML provider may request a few more variables, in addition to those above. The following list provides additional variables that we’ve seen SAML providers request in the past, but if a field is missing please reach out to us and let us know.
Audience= https://teem.com
Recipient= https://app.teem.com/sso/complete/saml/
ACS (Consumer)URL= https://app.teem.com/sso/complete/saml/
LoginURL= https://<your sub-domain>.teem.com/login/
MetaURL= https://app.teem.com/sso/saml/meta/
Custom Parameters:
Email= Email
urn:oid:0.9.2342.19200300.100.1.1= Email
urn:oid:0.9.2342.19200300.100.1.3= Email
urn:oid:2.5.4.4= Last Name
urn:oid:2.5.4.42= First Name
X.509 CertificateStrength= 2048 bit
**Replace <your sub-domain> with the sub-domain that you set in the Set Your Unquie Teem Sub-Domain section of this article.
Provisioning Users
There are two options for provisioning users. First is Just In Time provisioning, which you can optionally turn on by selecting the checkbox at the bottom of the SAML integration settings page. If you do not want to turn on JIT provisioning, you can send us a CSV of users and we can pull that into your account for you.