Crestron Occupancy Sensors Integration
Crestron Occupancy Sensors deliver a powerful and cost-effective solution for reducing energy consumption and enhancing the functionality of lighting and environmental systems. With the Teem Sensor integration, huddle space availability is more visible than ever for your employees. IT, Facilities, and Real Estate teams also benefit from getting powerful data-driven Teem Insights on huddle spaces, conference rooms, and other collaboration areas.
This article involves steps in both the Teem and Crestron instance. We recommend having two tabs open, one for each instance. Within these instances, you will:
- Make sure your API is enabled properly.
- Use your Crestron Fusion Client Passcode to obtain your Authentication Code.
- Set up Mapping.
- Adjust Sensor behavior on the Crestron Fusion side of the integration.
But first, make sure you have these items before diving in.
Prerequisites
- You must be a joint customer of Teem and Crestron.
- You must have an existing Crestron Sensor Infrastructure and Crestron Fusion.
- You must be an Enterprise or Premium Legacy Teem customer.
- You must have a Crestron Fusion Cloud URL that is publicly accessible.
Step 1. Enable the API
1. Sign in to your Crestron Fusion Cloud.
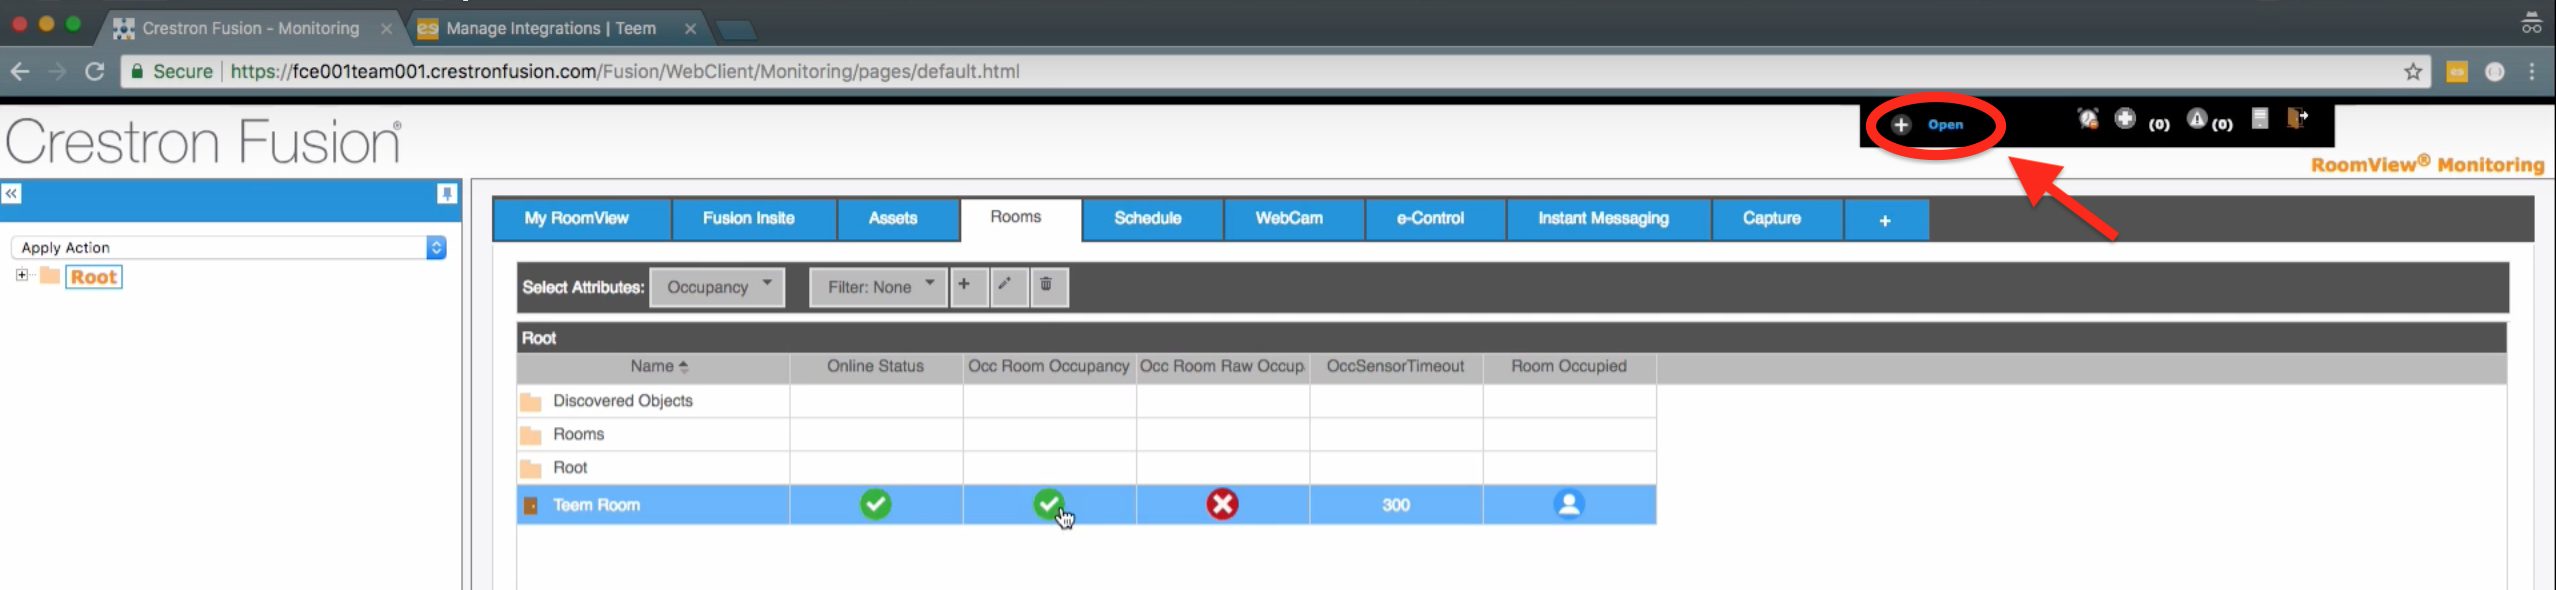
2. When you’re logged in, click Open and then select Configuration in the dropdown menu.
 3. Then click on Configuration on the lower left-hand side.
4. From the left menu, select API.
5. From here, check the Enable API Service box and the Enable API Security box to enable your API.
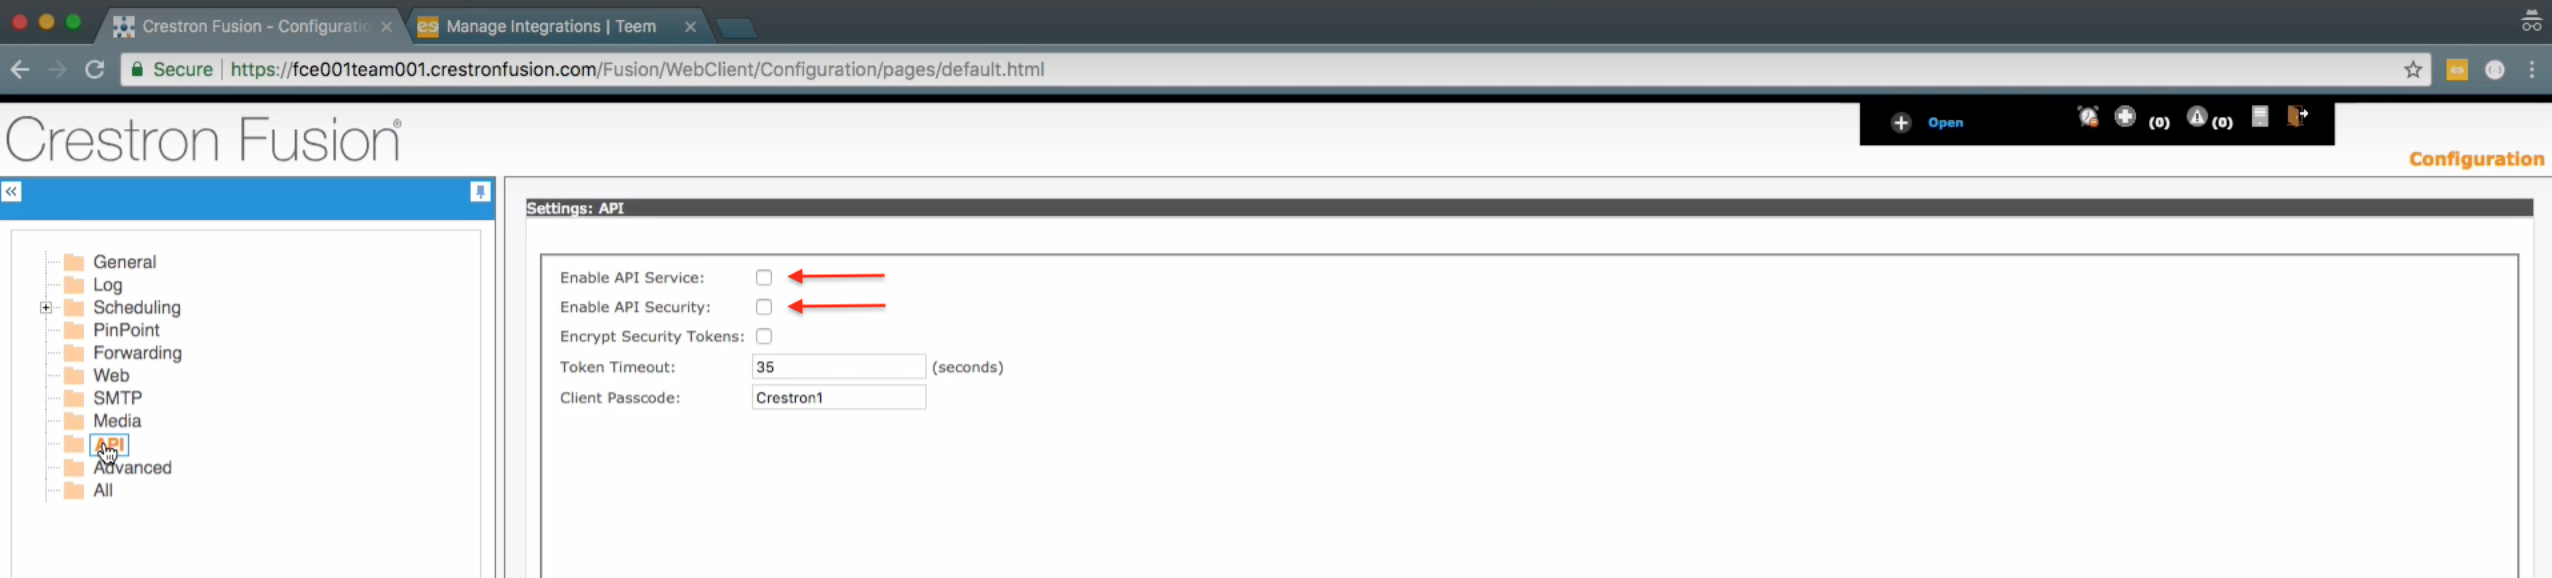 6. DO NOT enable/check Encrypt Security Tokens. This will cause the token to revolve. A revolving token cannot be used for this integration purpose.
7. Next, set the Client Passcode. Remember this passcode, because you will need it to obtain your Authentication Code.
By default, it’s set to Crestron1. This MUST be changed for successful integration.
Step 2. Obtain your Authentication Code
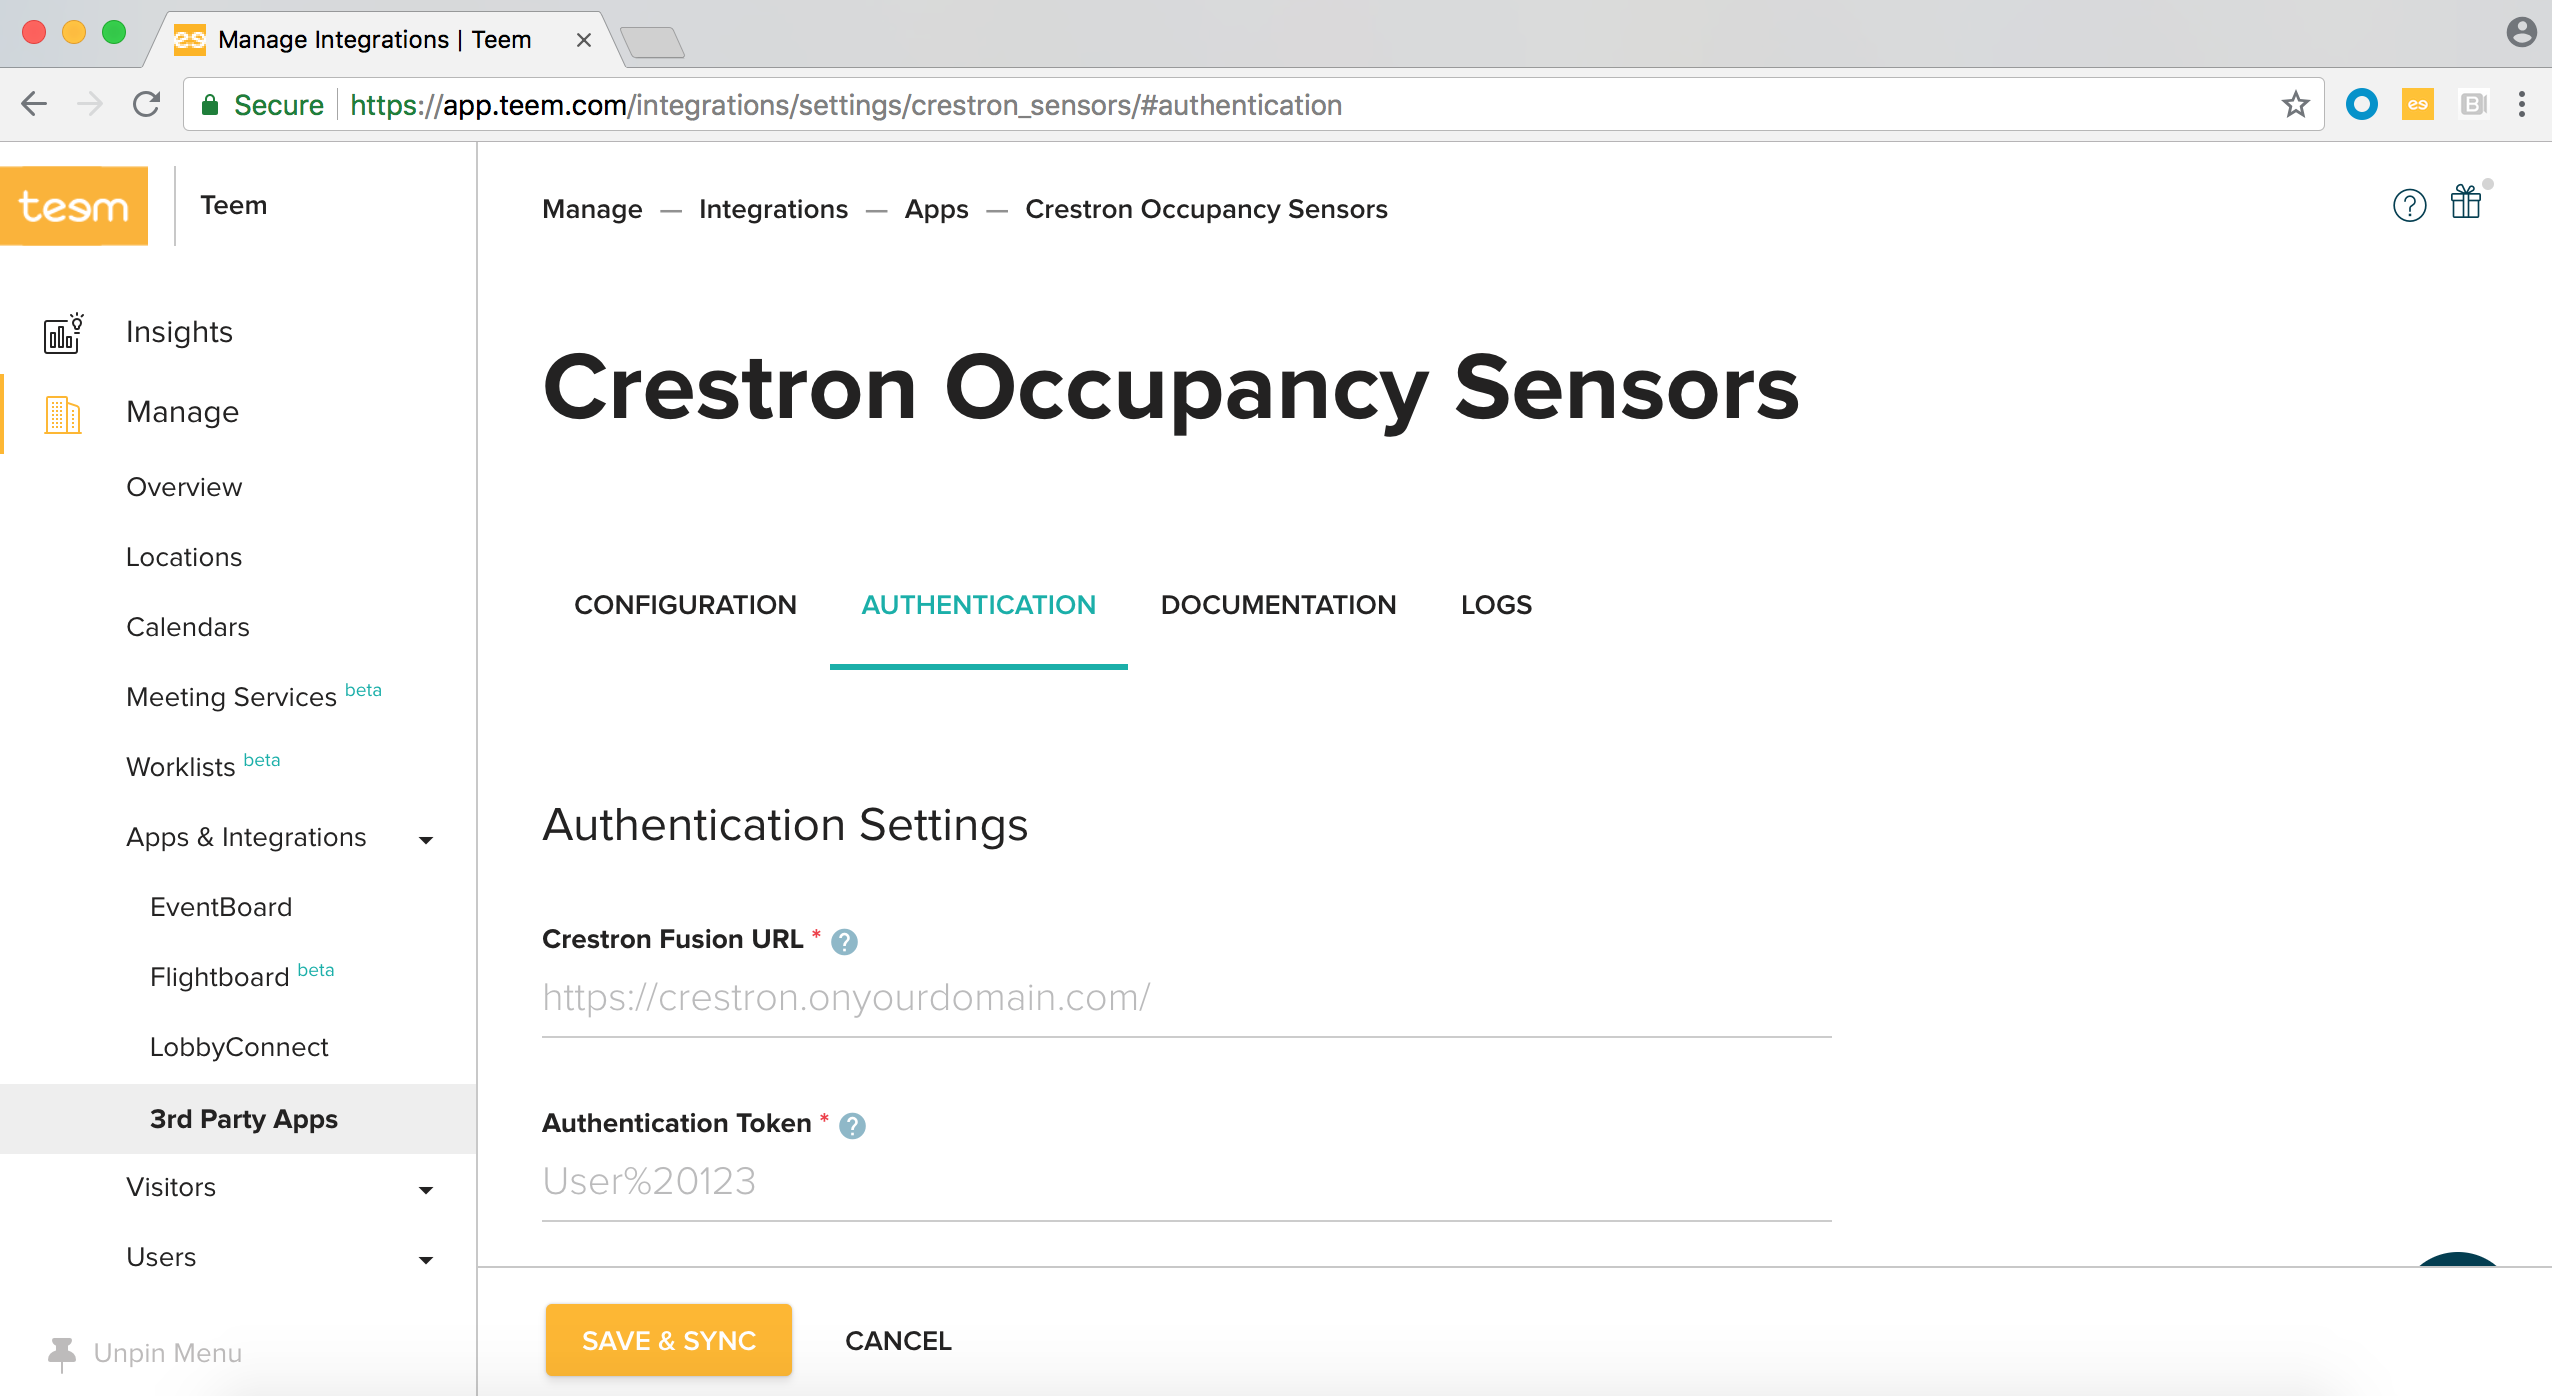
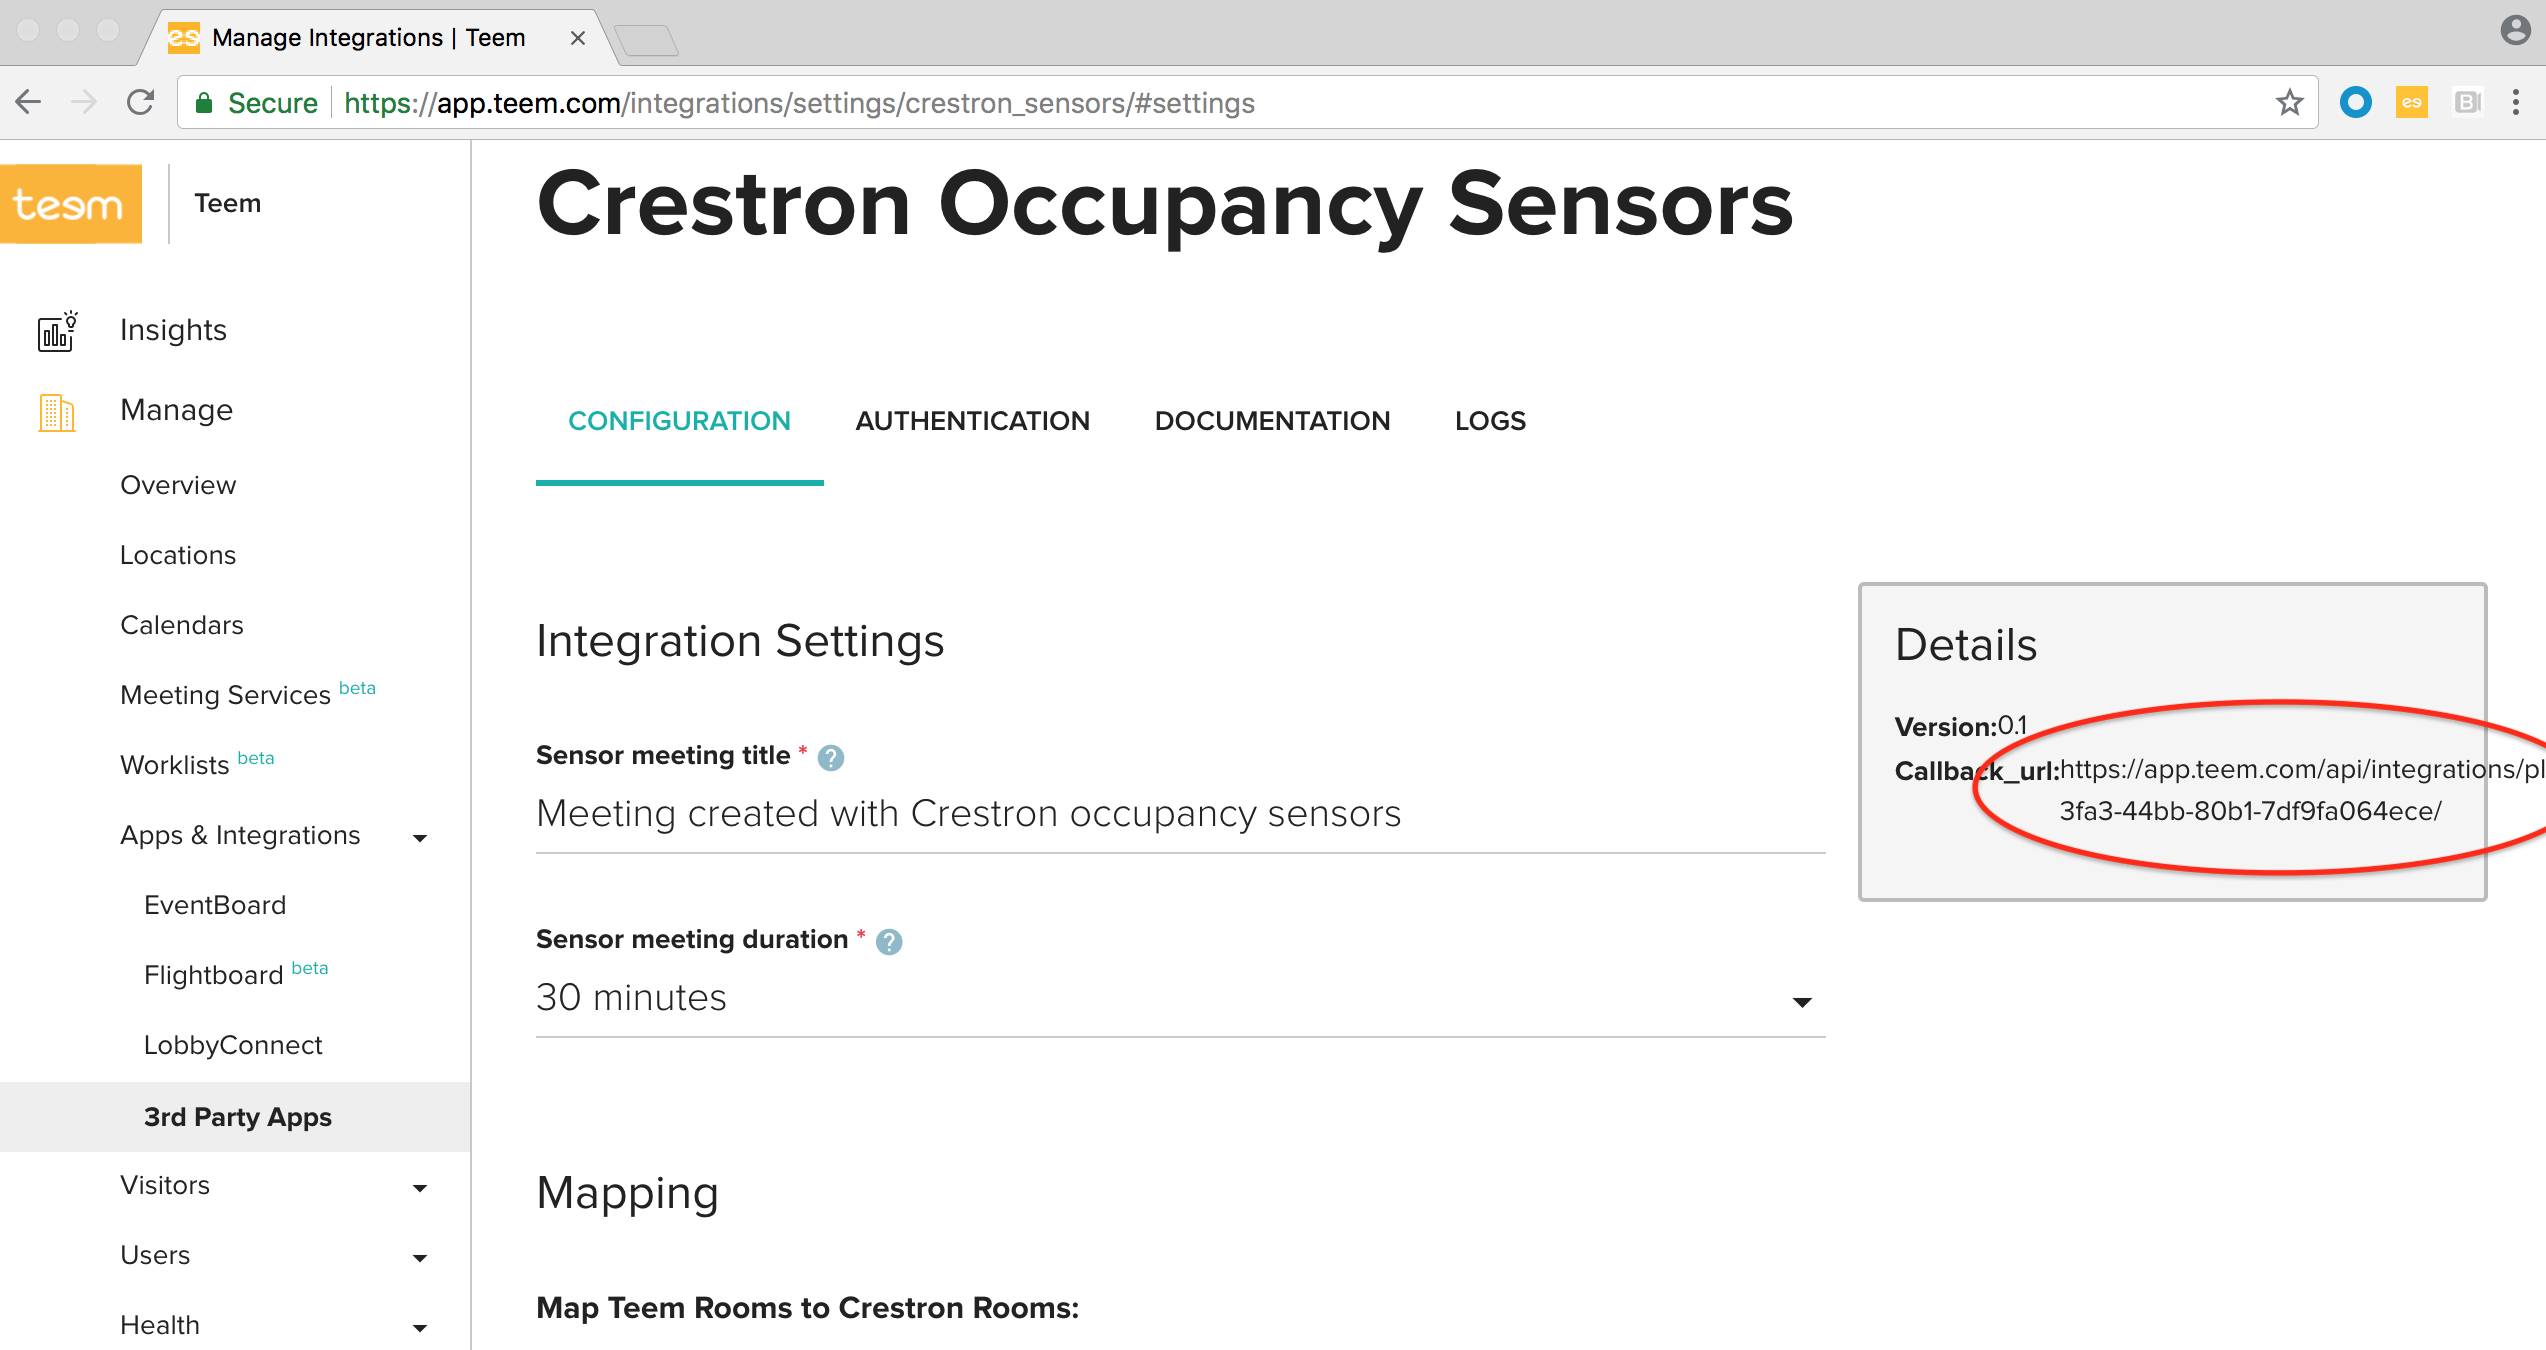
Within your Teem dashboard from Manage>Apps & Integrations>3rd Party Apps>Crestron, you'll be taken to the Crestron Occupancy Sensors page. Under Authentication, you'll see that you need a Crestron Fusion URL and Authentication Token.
- Obtain your Authentication Token from the Fusion API by going to {your_fusion_url}/fusion/apiservice/security/{your_username}/?roles=RoomView+Administrators&auth={client_passcode}
- your_fusion_url is the beginning of your URL when logged into your Crestron Fusion Instance. This is everything from the beginning to ".com" . This is also your Crestron Fusion URL.
- your_username is your username for your Crestron Fusion Instance.
- client_passcode is the Client Passcode you just set when you enabled your API.
- Make sure to substitute {your_fusion_url} {your_username} and {client_passcode} with appropriate values. When you do, and it successfully logs in, you will be redirected to a generic Fusion page. Copy everything after "auth=" from the resulting URL. This is your Authentication Token.

1. Input your Crestron Fusion URL and Authentication Token where you’re prompted on the Teem dashboard that was shown earlier. This will allow Teem to successfully communicate with Crestron.
Step 3. Set up Mapping - Teem Dashboard
To set up Mapping within the Teem dashboard from Manage>Apps & Integrations>3rd Party Apps>Crestron, select Configuration. Along with Mapping, you can set your sensor meeting title and sensor meeting duration. For the sensor meeting title, we've found something like "Meeting created with Crestron Occupancy Sensors," works well. The default for ad hoc meeting duration is 30 minutes, but there are multiple durations to choose from.
To begin Mapping, follow these steps.
1. Select the correct Teem room.
2. Then select the correct Crestron room to map it to.
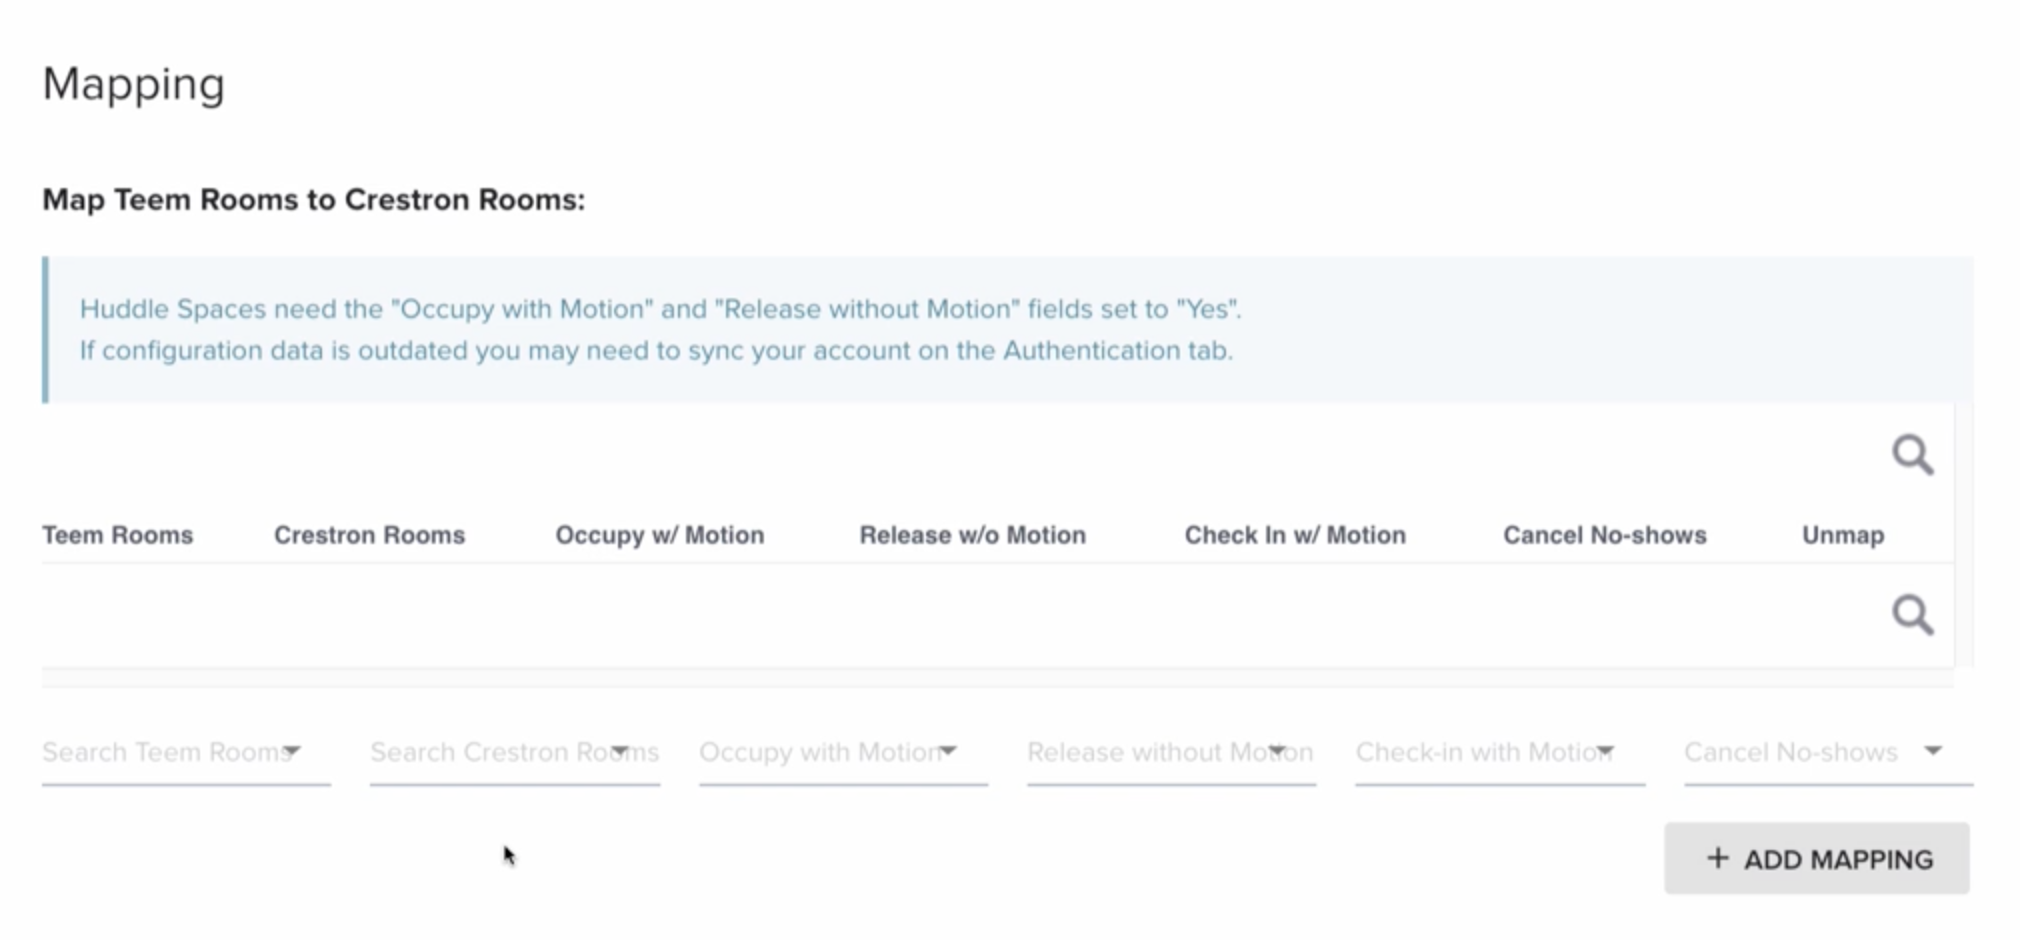
3. Under Occupy w/ Motion, select Yes. This makes it so that a room is reserved when motion is detected.
4. Under Release w/o Motion, select Yes again. This makes it so that a room is released and freed up for others to use and reserve when no motion is detected for a set amount of time.
5. Under Check In w/ Motion, this makes it so Teem will automatically check into a reservation when motion is detected. For Teem, we use sensors to track, identify, and show what huddle spaces (ad hoc spaces, which usually cannot be reserved in advance) are available. Also, if a meeting goes over time, and motion is detected in the room, Teem will check into the next reservation even if it's not actually the meeting space was intended for. So for our case, we will select no. If you would like to have an anonymous, passive Check-in with sensors, select yes.
6. For our case, we will select no for Cancel No-shows. This is optional.
7. Next, click Add Mapping.
Step 4. Adjust Sensor Behavior - Crestron Fusion
Crestron Occupancy Sensors interact very quickly with Teem by notifying Teem on occupancy status without Teem needing to constantly ask for updates. For this to work, Crestron must know where to update Teem.
1. Copy the Callback_url in the Teem Instance.
2. Return to the Crestron Configuration page. Go to Open and select Configuration in the drop-down menu.
3. Then select Configure in the lower-left corner once again.
4. This time, select Forwarding in the left menu.
5. Under Forwarding URL(s), you will paste the Callback_url you copied earlier from the Teem instance.
If there is already something here that is needed, simply separate the items with a "|".
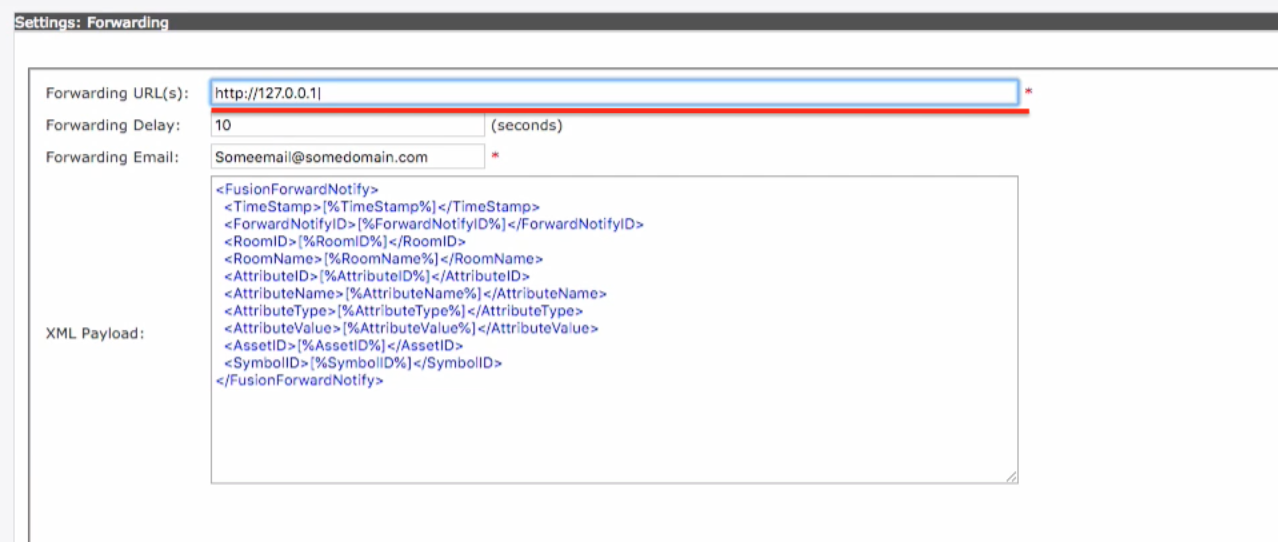
6. Forwarding delay is how long a space is occupied before Crestron sends Teem an update. You can set this to something like 10 seconds. This helps to avoid “pop-ins” (booking a room when motion detected when someone just quickly walks in and out of a room for whatever reason).
7. Insert Forwarding Email
8. XML Payload can be left alone. Next, click Save.
9. Next, select Open again. Then select Room View Monitoring.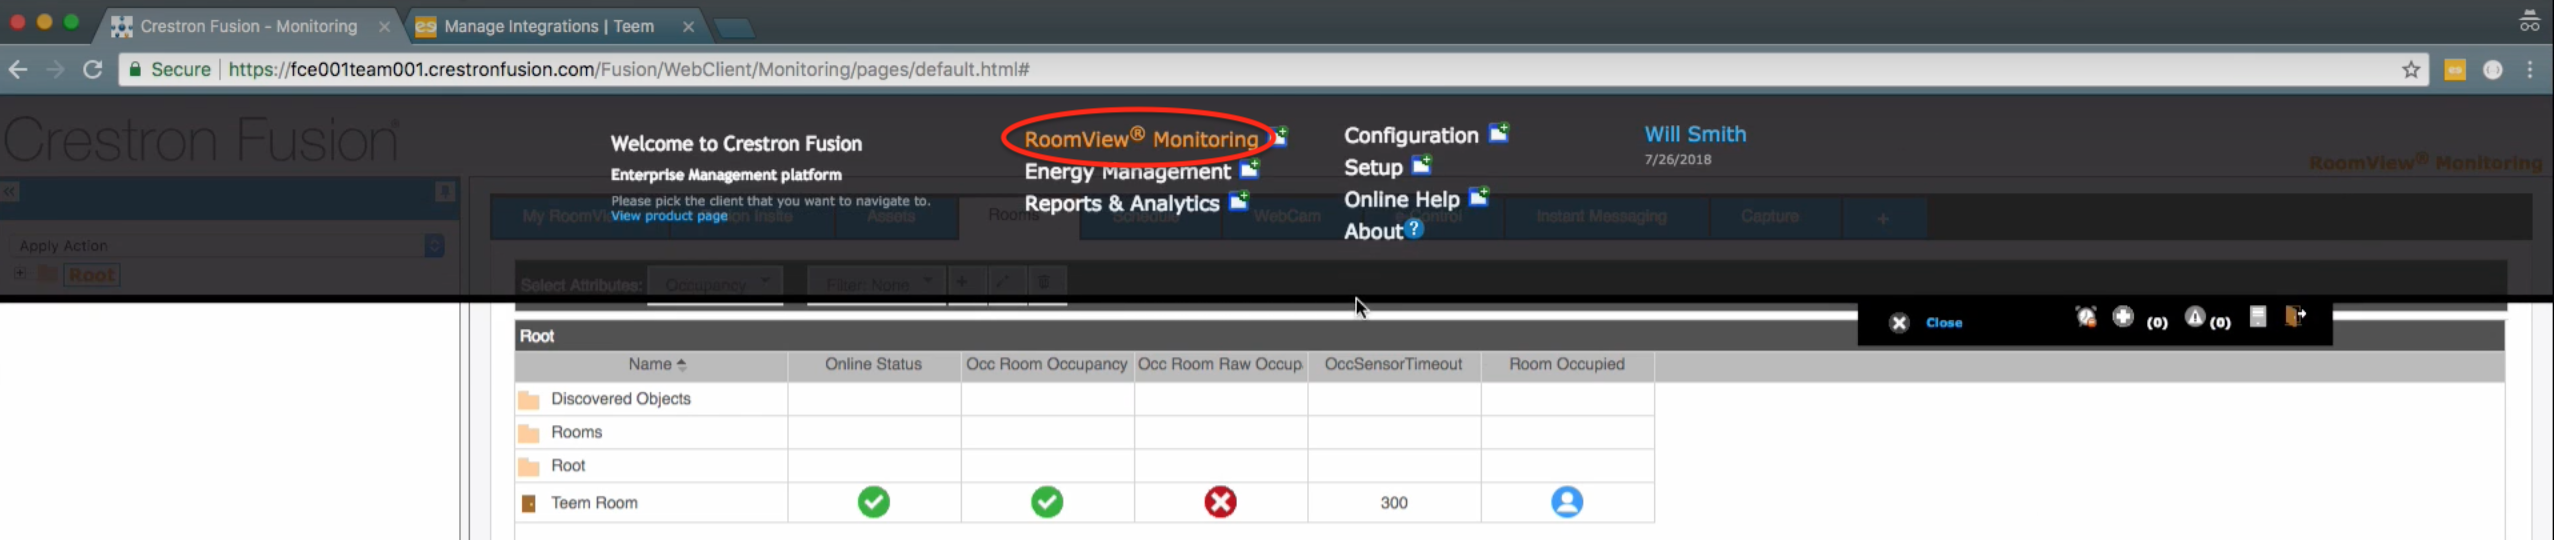
10. Now you will adjust the OccSensorTimeOut, which is how long the sensor is going to wait before it identifies a room as empty.
This replaces the Teem End Event Early feature. The default time is 300 seconds or 5 minutes.
11. This can be changed by simply clicking on the time, setting the desired time, and then clicking change.
This can also be a global setting. Utilize your Crestron Fusion contacts to do this.
And that's it. You've successfully integrated Teem with Crestron Sensors.