Create, Edit, and Deploy Finder Views
Finder makes meeting rooms and huddle spaces more visible for employees by showing real-time status for these spaces in your organization. We recommend that the hardware that Finder is displayed on is a touch-enabled device and it is located on each floor for all employees to use as a quick list reference or map view.
Also, have a look in the Finder FAQ article for the frequently asked questions.
Prerequisites
- Make sure you have purchased the digital signage hardware and service and it meets the minimum requirements, see Minimum Requirements and Supported Platforms.
- Confirm your company's subscription plan. Remember that Finder Maps and Interactive features are only available in Enterprise plans.
Create a Finder View
If you want to display the Map View with the pre-loaded floorplan then this must be enabled. If the Map View is not enabled then only the List View will display in Finder.
From Teem Web, complete the following:
1. Navigate to Manage > Apps & Integrations > Finder.
Within the Finder Management section, the columns provide quick insights on how location views are configured:
- View Name: The name of a location/floor used for Finder.
- Interactive: Indicates if the Finder is configured as Read-Only or Interactive (touch-enabled).
- Mode: Indicates the type of view being shown (Map or List).
- Style: Indicate the theme of the view being displayed (Dark or Light).
- Permanent URL: Provides the URL to display the Finder views.
2. Click the + NEW VIEW button.

3. In the New Finder View, complete the following:
- In the New View field, enter the name view for the location.
- In the Choose Location field, either use the search to find the location or navigate to the location and then select the location.
- Toggle the Enable Map Mode setting ON to display a map. If the floor does not have a map this setting will be disabled.
- Toggle the Enable 24-Hour Clock setting ON to display the 24-hour clock format (and when this is OFF the 12-hour clock format displays).
4. When the Enable Map Mode is enabled then you can toggle the Read-Only View setting ON if you do not have touch-enabled hardware.
5. Additionally, when the Enable Map Mode is enabled then the Map View Configuration can be set up :
5.1 Click the Map View Configuration button to set up the orientation. The preview dialog displays
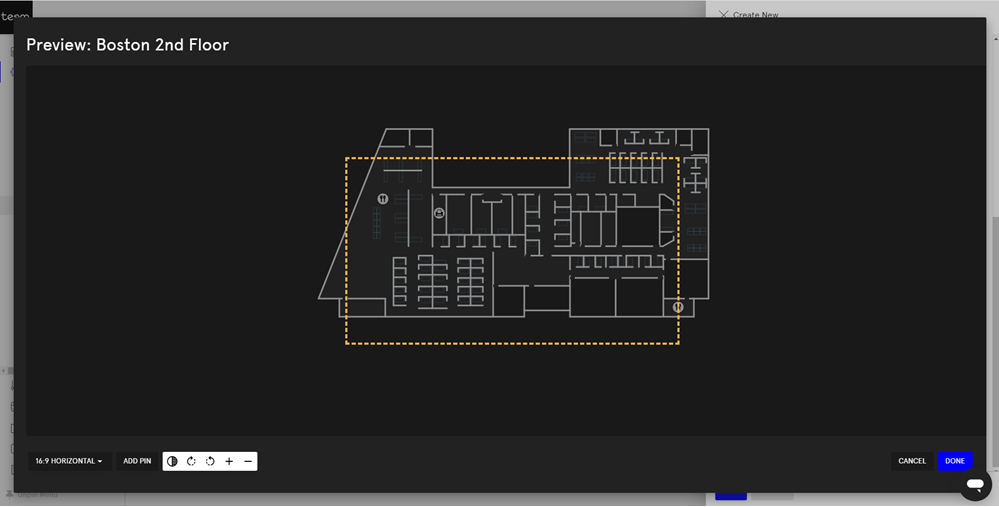
5.2 You can drag and drop the map to position it in the rectangle (the orange lines indicate the device's screen).
5.3 Select the required orientation either 16:9 horizontal view, 16:9 vertical view, 4:3 horizontal view, or 4:3 vertical view.
5.4 Click the Add Pin button and then click on the floorplan where the Finder touchscreen is installed. This will display the ‘You are here’ location.
5.5 Click the Mode  icon to change the display from the Dark Mode to the Light Mode.
5.4 Click the Rotate  icons to rotate the floorplan either clockwise or anti-clockwise.
5.5. Click the Zoom  icons to zoom the floorplan in or out.
5.6 When you have finished click the DONE button.
6. Click the SAVE button.
Deploy Finder Views on Digital Signage
The deployment of your Finder view to your device(s) will depend if you opted to use a digital signage service or not.
Digital Signage Service
Follow the instructions of your digital signage service to remotely add the URL of the Finder view on the relevant display(s).
No Digital Signage Service
After the view is configured, the Finder view can be deployed to the digital signage display that will show the new Finder information:
1. From the Finder page, select COPY URL from the relevant view. Paste the URL in your digital signage web browser to display the new view.

-
If you have a digital signage service like Telemetry TV, the URLs can easily be deployed remotely without physically visiting and setting up the URL on the digital signage. Teem by iOFFICE recommends Telemetry TV to standardize for digital signage service standardization.
-
If you do not have a digital signage service, you will need to physically visit the digital signage hardware. The URL will need to be manually entered in on the signage’s browser. URL shortening tools like Bitly could help reduce the URL character count.
Edit Finder Views
You can edit all the related details of your Finder view.
From Teem Web, complete the following:
1. Navigate to Manage > Apps & Integrations > Finder.
2. Select the Finder View you want to edit.
3. Now, you can edit the settings of your current view.
4. Click the Save button.
Delete Finder Views
You can delete a Finder view at any time. Deleting a view will disable the URL and direct unauthenticated browser sessions to the Teem login page.
From Teem Web, complete the following:
- Navigate to Manage > Apps & Integrations > Finder.
- Select the Finder Views you want to delete.
- Click the Delete Views button.