Update your Profile
After you log into the Eptura Workplace application, your profile contains your user information. It allows you to add or update user information such as name, email address, contact name, or room. From this screen you can complete the following:
- Update your Profile Information
- Add or Remove an Avatar
- Reset a Password
Update your Profile Information
To access the Profile screen, complete the following:
- Click your Profile in the upper right-hand corner of your browser window.
- Select the Profile option from the drop-down menu.
The Profile screen displays.
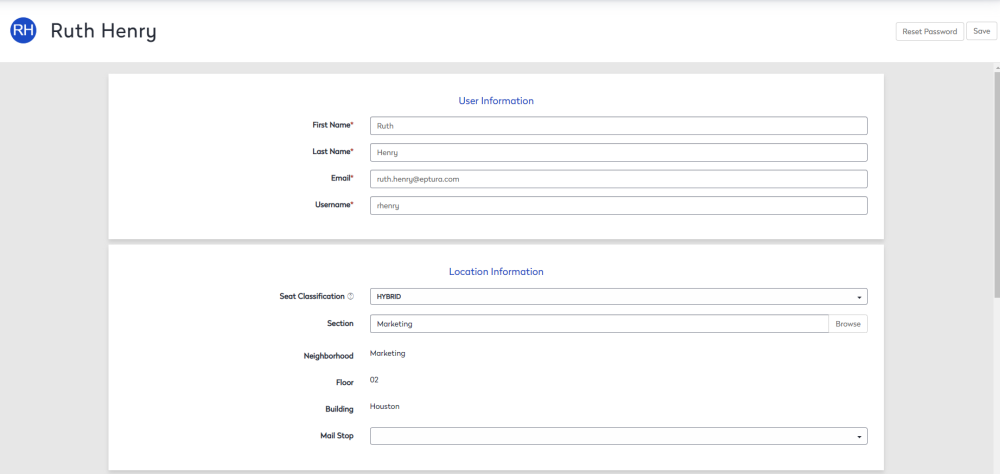
The Profile page contains required fields that require input. These will be specified by a * (Red Asterisk) displayed to the right of the field name. Examples of required fields can be seen in the image above (First Name, Last Name, Email, and Username).
All required fields require an entry. If you attempt to navigate away from your profile with empty required fields, you will be unable to do so (and will see a notification banner at the top of your screen, similar to what you will see when you save changes to your profile).
A profile may also contain custom fields. These can be seen by the (Custom Field) following a field (e.g. Client Matter # in the Profile Screen image above).
Custom Fields can only be added or removed as an administrator. If you are not an administrator, you should contact your local administrator and request to add or remove necessary custom fields.
If a custom field is required, you will need to enter information into the field prior to navigating away from the profile. If you attempt to leave your profile without entering information in any required fields, you will receive a notification message (similar to what you will see when changes to your profile are saved).
Information that is entered is automatically saved. You will receive a taskbar notification near the top of your browser when profile information is saved.
Add or Remove an Avatar
Add an Avatar
You can upload a specific image for your profile (also known as an avatar).
For best results, use an image with the same height and width dimensions. For example, an image that is 200 x 200 pixels.
To upload an avatar image, complete the following:
- Drag and drop an image on to the Profile page.
![]()
Your avatar image is now saved to your profile.
Remove an Avatar
You may also remove any image you choose to upload to your profile.
- Click on the avatar image in the upper-left corner of your screen.
- Click the Remove button. Your image has been removed from your profile.
Reset a Password
In order to reset your password, complete the following:
- Verify your email address is correct. If your email address is incorrect, then enter the correct address in the Email field. This is important as the reset password link will be sent to the email address on your profile.
- Click the Reset Password button. An reset email will be sent.
An email will then be sent to the email address that was filled out, the email includes a link to reset the password.
- Open the reset password email.
- Click the reset password link.
The New Password Required dialog displays.
- In the New Password field and Confirm New Password field, enter in your new password.
- Click the Submit button.
The password requirements are:
- A mix of uppercase and lowercase characters.
- 1 or more numerical digits.
- 1 or more special characters.
- Passwords should be at least 8 characters.
- Cannot contain your username or the word 'password'.