Set up Inventory Items
The Inventory Items allows you to view and/or modify inventory category items.
- Search for Inventory Items
- Add Inventory Category Items
- Edit Inventory Category Items
- Delete Inventory Category Items
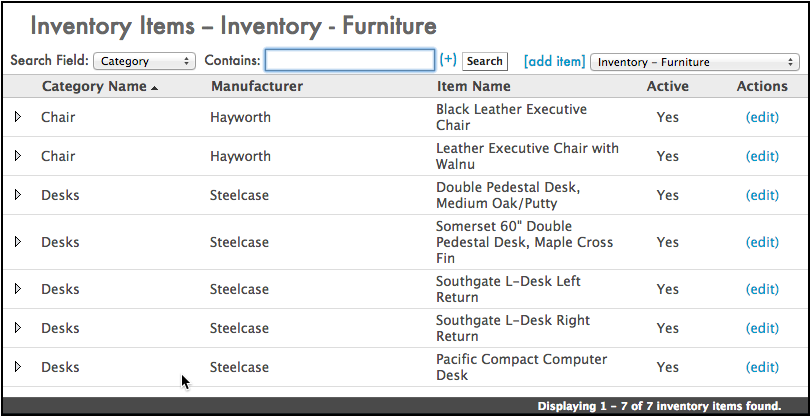
Search for Inventory Items
If you want to search for an inventory item, perform the following steps:
-
You can perform a search by category by selecting an item from the Search Field drop-down and enter search terms in the Contains field.
-
Click the( + ) allows you to add additional search terms.
-
Click the Search button to initiate the search.
Add Inventory Category Items
If you want to add an inventory category item, perform the following steps:
-
Click Admin > Inventory > Inventory Items. The Inventory Items screen opens
-
Click the [add item] link. The Add Item screen opens.
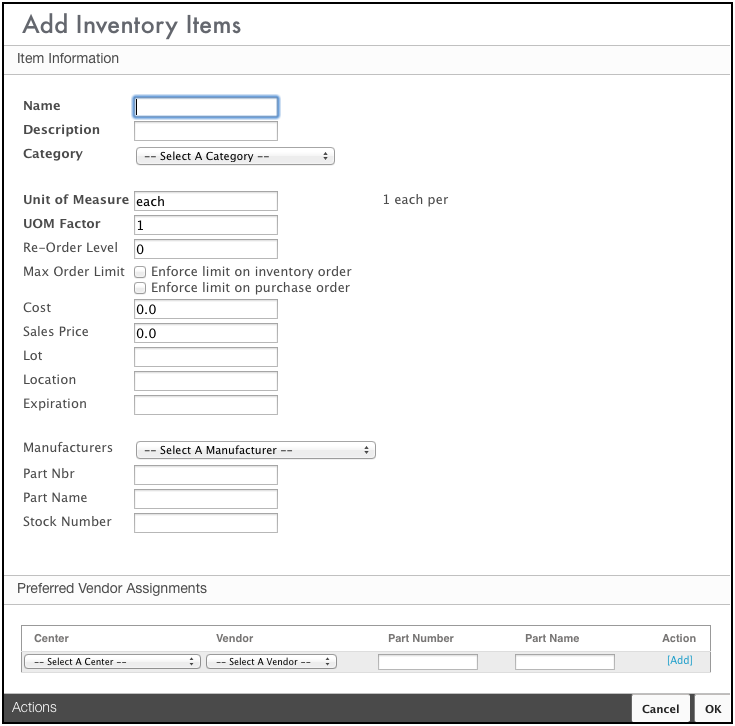
The majority of the fields on this screen are optional. It simply depends on how much information you have, or want to share, about your new inventory item. However, fields that are highlighted are mandatory, and you will be unable to save until you enter information in these fields.
The following fields (and steps) are mandatory:
Item Information Section
-
Enter the name of the inventory item in the Name field.
-
Enter the description of the inventory item in the Description field.
-
Enter the category of the inventory item from the Category drop-down field.
-
Enter the units of measure of the inventory item in the Units of Measure field.
-
Enter the unit of measure factor in the UOM Factor field. As an example, if a unit of measure for the item is selected as each, then the UOM Factor would be one. However, if the inventory item is a package or a set, then the UOM Factor would be modified according to the amount in the package or set.
The remaining fields in the Item Information section are optional.
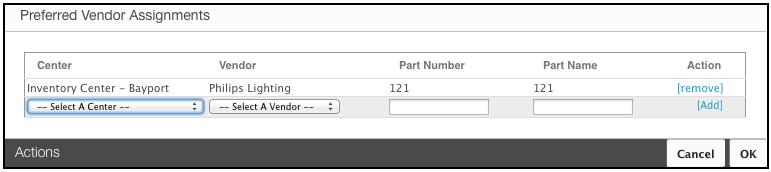
Preferred Vendor Assignments
-
Select the center from the Center drop-down field.
-
Select the vendor from the Vendor drop-down field.
-
Enter the part number in the Part Number field.
-
Enter the part name in the Part Name field.
-
In order to specify an Action, you will need to enter information in the Center, Vendor, Part Number, and Part Name fields. Then you have the option to add or remove additional vendor assignments.
-
Click OK to save your new Inventory Item.
Edit Inventory Category Items
If you want to edit an inventory category item, perform the following steps:
-
Click Admin > Inventory > Inventory Items.
-
Click edit to the right of the inventory item you want to edit.
-
Make any changes to revise your selected inventory item and click OK to save your changes.
Delete Inventory Category Items
If you want to delete an inventory category item, perform the following steps:
- Click Admin > Inventory > Inventory Items.
-
Click edit to the right of the inventory item you want to edit.
-
Click the Delete button at the bottom of the inventory item you want to delete. The item is deleted.