Local File Repository
Level: Eptura Implementation team / Client IT team
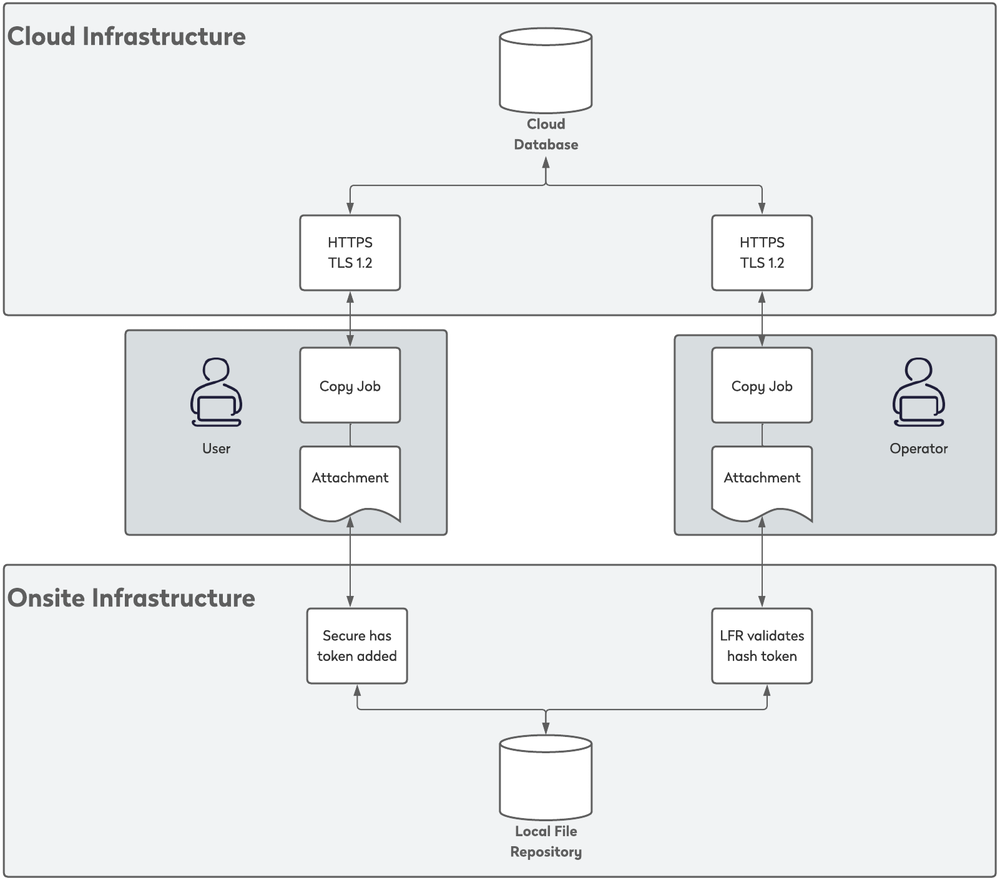
This describes the install process for the local file repository used with job ticket attachments. This functionality requires a Microsoft IIS server. The process involves installing an ISAPI plug-in called Tabs Upload and creating a URL for use with a set of ASP pages.
Requirements
Eptura Workplace supports all serviceable versions of Windows server. An Eptura Workplace database administrator will work with you to enable the local file repository.
In Windows server versions where "ASP Classic" is an option (such as Windows server 2003, 32 or 64 bit), "ASP Classic" must be enabled in IIS. In Windows server 2008, the “ASP” role under IIS must be enabled.
CPU requirements are minimal (1 GHz for x86 processors or 1.4 GHz for x64 processors), and the memory requirements do not exceed 10 GB (able to run IIS and execute ASP pages). Disk space varies by customer (depends on documents and retention period). The application works in a shared environment and on a virtualized machine (VM).
Install Process
Set up the File Upload Component
- Install Microsoft IIS
- Enable ASP Classic / ASP. https://www.iis.net/learn/application...default-on-iis
- Download the zip file that contains the Tabs Upload software and ASP folder at: http://downloads.iofficecorp.com/servlet/servlet.FileDownload?file=015A0000001CH5Z
- Run the appropriate Tabs Upload installer (either x64 for 64-bit Windows, x86 for 32-bit) and contact Eptura Workplace to receive your Tabs Upload license key.
- Create a new website or virtual directory in IIS.
- Move the contents of the ‘asp’ folder to the websites home directory. The URL to this IIS site is referred to as the website URL.
- Create a folder on the server. IIS must have the appropriate security rights to read and write to this folder. This folder is referred to as the storage directory.
Information Exchange
Provide the internal website URL to Eptura Workplace. This can be either the local IP address or the DNS name. Eptura Workplace uses this to direct the user's browser to the repository.
Provide the storage directory to Eptura Workplace, this is used to direct the Tabs Upload application to store the files in the aforementioned directory.
Security
To access your URL from certain versions of Internet Explorer, the website must first be added to the Trusted sites list using the Internet Options window.
If you are using Google Chrome to access your URL, an SSL certificate is required and the website must be a secured (https://) site.
Testing
To verify functionality, open up the web browser and head to the website URL. For example, https://internalserver/form.asp.
If the website is setup correctly, the customer will see a simple file upload form.
- Log into the application. Create a new copy ticket, upload a file and submit the ticket.
- Log into the server, verify that the file was transferred to the storage directory successfully.
Troubleshooting
If the file is not in the storage directory, verify permissions on the folder and in IIS. Make sure appropriate permissions (read/write) have been set for the IIS account.
-
Verify the website URL forwarded to Eptura Workplace. Check the server address, virtual site name, and full path.