Manage User Roles
Each person can have one or multiple roles, with each role made up of a number of secured actions. During the implementation of Serraview, the Onboarding team will discuss the types of users you will have and assist in the creation of user roles that suit your business.
Default Roles and Report 117 Role Actions and Users Report
Each customer is given a standard set of default roles when first provided with a Serraview environment and this Default Role Actions and Users.xlsx report contains the list or security roles and assigned secured actions when your environment was first set up. If you need a full list of your existing roles and assigned secured action then generate the 117 Role Actions and Users Report from the Reporting module.
The default roles supplied to all new customers are:
| Security Role | Description |
|---|---|
| Auto Room Booking Administrator | Role assigned to a Auto Room Booking Service user |
| BOS Migration Manager |
A user able to modify data in the BOS grid. To assign BOS roles then refer to Security in BOS. |
| BOS Super User |
A user with full access to all BOS Move Plans data. To assign BOS roles then refer to Security in BOS. |
| Email Notification - VBS Change | Add users to this group to receive VBS notification emails. |
| ImportUser | Import Server User. |
| Locator User |
Role assigned to user for access to Locator. If your company uses the room booking then those secured actions will need to be added to the role. For more details on Locator security, refer to Security in Locator. |
| Mapper (Serraview) | Can map and adjust VBS but cannot delete containers. |
| Read Only |
Not in used, no secured actions assigned. |
| Room Booking Administrator | Role assigned to a Room Booking Service user. |
| Scenario Planner Reports | Role assigned when someone receives access to a scenario. |
| Scheduler User | SchedulerServerUser |
| Service Account | Role assigned to service accounts. |
| System - Default New User |
Role assigned to a user that has requested an account through the sign up page. For more details, refer to Configure Default User Role and the Logon Identifier. |
| System Administrator |
Do not use, instead use the System Administrator (Client) role. |
| System Administrator (Client) | Role assigned to your Serraview System Administrator. |
| System Administrator (Serraview) | Role assign to Serraview Support and Onboarding team. |
| Wayfinding User | Do not use. Retired Wayfinding product. |
| WiFi Location Administrator | Role assigned to a WiFi Location Service user |
| Wireup Administrator |
Role assigned to a user for full access to Wireup and its configuration. For more details on Wireup security, see Wire-up Workpoints – User Roles and Secured Actions. |
| Wireup User |
Role assigned to a user to be able to log in to Wireup. For more details on Wireup security, see Wire-up Workpoints – User Roles and Secured Actions. |
| Workplace Manager |
Roles assign to a user when they are a Workplace Manager. For more details on Workplace security, see Security in Workplace Portal. |
| Workplace Validator |
Roles assign to a user when they are a Workplace Validator. For more details on Workplace security, see Security in Workplace Portal. |
|
WusCom Administrator |
Role assigned to a WusCom Service user. |
Test User
System Administrators can create a test user account so they can work with roles (secured actions) in a more realistic way. Using the test user account to sign in lets the System Administrator understands how a typical user will experience Serraview. For more information, refer to Add a test user account.
Secured Actions for Reports
When changing the secured actions that related to reports, make sure to add or remove all three related secured actions to prevent only 'part' access or removal. For example:
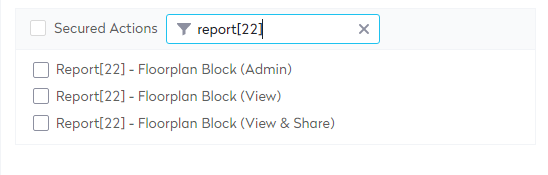
If you require access to this area, you will need secured actions added to your role, refer to Security in the User Security Module.
The following can be completed to change the user's access:
- Edit a user's access via the User screen
- Add a role to a user via the Roles screen
- Edit the secured actions for a role
- Add new role and add secured actions
- Duplicate role and edit the secured actions
- Delete a role
Edit a user's access via the User screen
You can edit an individual's user access by adding or removing the roles.
- Navigate to Resources > User Security.
- In the Search field, enter the name of the person.
- Click on the name of the person. The roles form displays.
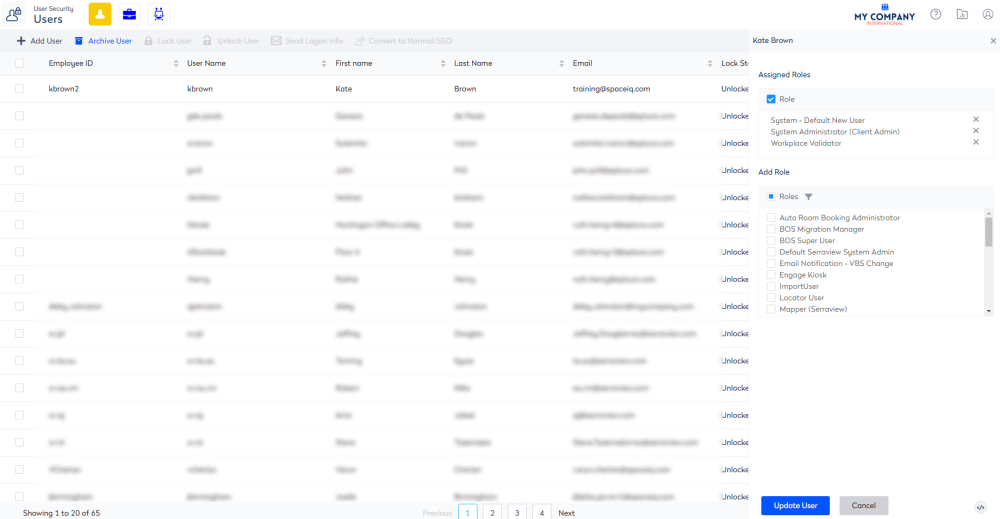
4. You can either remove or add a secured role(s):
Remove secured role
- In the Roles list, beside any role to be removed, uncheck the role check box.
Add secured role
- Click the Filter
 icon.
icon. - In the filter field, enter in the name of the role. The list is filtered.
- Click the role checkbox to add the role.
When you have finished editing the user's access.
5. Click the Update User button.
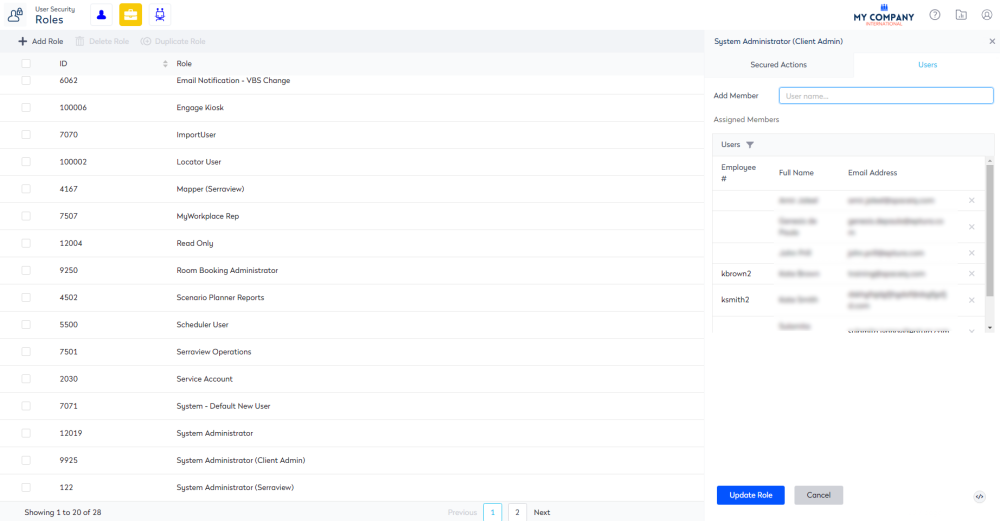
Add a role to a user via the Roles screen
- Navigate to Resources > User Security.
- Click the Roles
 icon.
icon. - In the Search field, enter the name of the role.
- Select the role. The Edit Role form displays.
- Click the Users tab. The list of users that have the role display.

6. In the Add Member field, search for the users name.
7. Select the user name.
8. Click the Update Role button.
You can remove a user from the role.
- Click the Filter icon.
- In the filter field, enter in the user name. The list is filtered.
- For the user name you want to delete click the X icon.
Edit the secured actions for a role
When you add or remove secured actions from a role, it impacts ALL individuals that have that role.
- Navigate to Resources > User Security.
- Click the Roles icon.
- In the Search field, enter the name of the role.
- Select the role. The Edit Role form displays.
5. You can either remove or add the secured action(s):
Remove secured action
- In the Add Secured Actions list, beside any action to be removed, uncheck the actions check box.
Add secured action
- Click the Filter icon.
- In the filter field, enter in the name of the action. The list is filtered.
- Click the secured action checkbox to add the secured action.
When you have finished editing the role.
6. Click the Update Role button.
Add new role and add secured actions
You can create a new role and add one or more secured actions.
- Navigate to Resources > User Security.
- Click the Roles icon.
- Click the + Add Role button. The Add Role form displays.
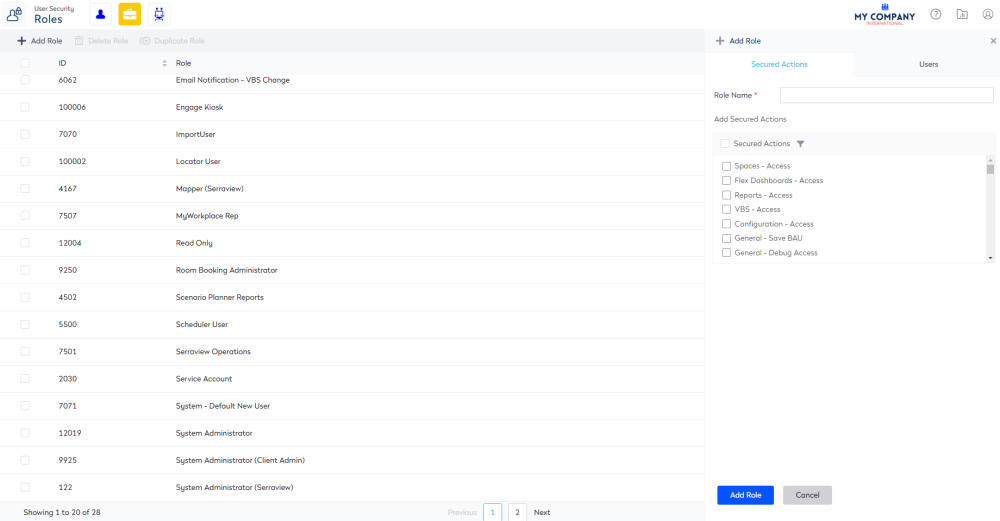
4. In the Role Name field, enter the name of the role.
5. From the Add Secured Action area, click the Filter ![]() icon.
icon.
6. In the filter field, enter the name of the secured action. The list is filtered.
7. Click the secured action checkbox to add the secured action.
8. Click the Add Role button. The new role is added to the Roles list.
Duplicate role and edit the secured actions
You can duplicate an existing role and then add or remove one or more of the duplicated secured actions to create a new and unique role.
- Navigate to Resources > User Security.
- Click the Roles icon.
- In the Search field, enter the name of the role.
- For the role, check the role check box.
- Click the Duplicate Role button.

The role is duplicated and the name includes (copy).
- Click the newly duplicated role. The Edit Role form displays.
- In the Role Name field, enter new role's name.
- You can either remove or add the secured action(s):
Remove secured action
- In the Add Secured Actions list, beside any action to be removed, uncheck the actions check box.
Add secured action
- Click the Filter icon.
- In the filter field, enter in the name of the action. The list is filtered.
- Click the action checkbox to select an action.
When you have finished editing the role.
9. Click the Update Role button.
Delete a role
If you no longer require a role, then it can be deleted.
- Navigate to Resources > User Security.
- Click the Roles icon.
- In the Search field, enter the name of the role.
- For the role, check the role check box.
- Click the Delete Role button.
The role is deleted.